Artist Ultra 14
Product Introduction
Thank you for choosing the XPPen Artist Ultra 14 OLED Drawing Display.
The Artist Ultra 14 OLED combines high resolution, a high refresh rate, and a slim, portable design. Featuring the exceptional color performance of OLED technology, ultra-fast response, and low-latency performance, it delivers a premium mobile creative experience for professional and advanced creators.
To ensure optimal performance and maximize the service life of this product, please read this User Manual carefully before use. During operation, handle and maintain the product properly in accordance with the instructions provided.
As part of our ongoing product improvement efforts, the product appearance, color, and accessories are subject to change without prior notice. Please refer to the actual product. XPPen reserves the right to make technical updates and revise this User Manual without prior notice.
Note: All illustrations in this manual are for reference only.
Product Overview
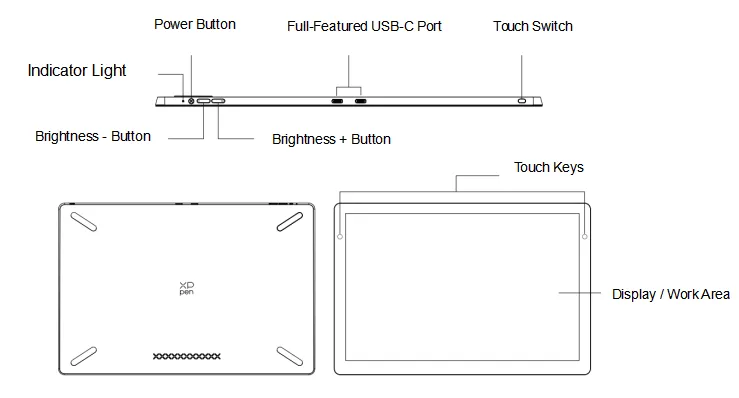
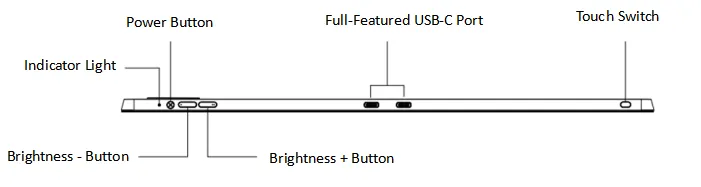
Indicator Light:
- Press the power button to turn it on. The blue light will remain steady. Press the power button again to turn it off.
- Standby mode, steady orange.
- To switch to Drawing Tablet Mode, press and hold the Power button for 3 seconds. The blue light and orange light will flash alternately. Press the power button again to return to regular mode.
Touch Keys:
- Touch Key 1 (Left Key): Tap to bring up the driver settings; tap again to close them. (Default settings are customizable.)
- Touch Key 2 (Right Key): Tap to launch the Virtual Drawing Tablet, where you can control the selected Display 1 or Display 2 connected to the device. Tap again to close it. (Default settings are customizable.)
OSD Settings:
- Press and hold the Brightness "+" and "-" buttons on the top of the product simultaneously to bring up the OSD settings menu.
- Brightness, contrast, color temperature, color, mapping ratio, screen saver, touch switch, and other parameters can be adjusted via touch operation or the stylus.
List of Accessories
|
Artist Ultra 14 Drawing Display × 1 |
Pen Case(with Pen Nibs & Pen Clip)× 1 |
|
X3 Pro Smart Chip Stylus × 1 |
X3 Pro Slim Stylus × 1 |
|
X3 Pro Smart Chip Stylus Pen Nib × 10 |
X3 Pro Slim Stylus Pen Nib × 10 |
|
Slim Stylus Replaceable Cover Plate × 1 |
Wireless Shortcut Remote Bluetooth Receiver × 1 |
|
USB-C to USB-C Cable × 2 |
USB-A to USB-C Cable × 1 |
|
3-in-1 Cable × 1 |
PD Power Adapter × 1 |
|
Wireless Shortcut Remote × 1 |
Cleaning Cloth × 1 |
|
Glove × 1 |
Portable Stand × 1 |
|
Quick Guide × 1 |
Warranty and Driver Download Card × 1 |
Product Connection
1. This is a non-standalone device and requires connection to a computer, Android phone, or Android tablet for operation.
2. Not all USB-C ports support video output. Please ensure the USB-C port on your computer or Android device supports DisplayPort Alt Mode.
1.Computer Connection
a) Full-Featured USB-C Connection
For computers with a full-featured USB-C port (supporting video output):
1) Connect the computer and drawing display using a USB-C to USB-C cable.
2) If the screen does not turn on, use the second USB-C port on the drawing display to attach a USB-C cable and power adapter for additional power.
*Ensure your computer has a USB-C port supporting video output. If not, use the "3-in-1 Cable Connection".
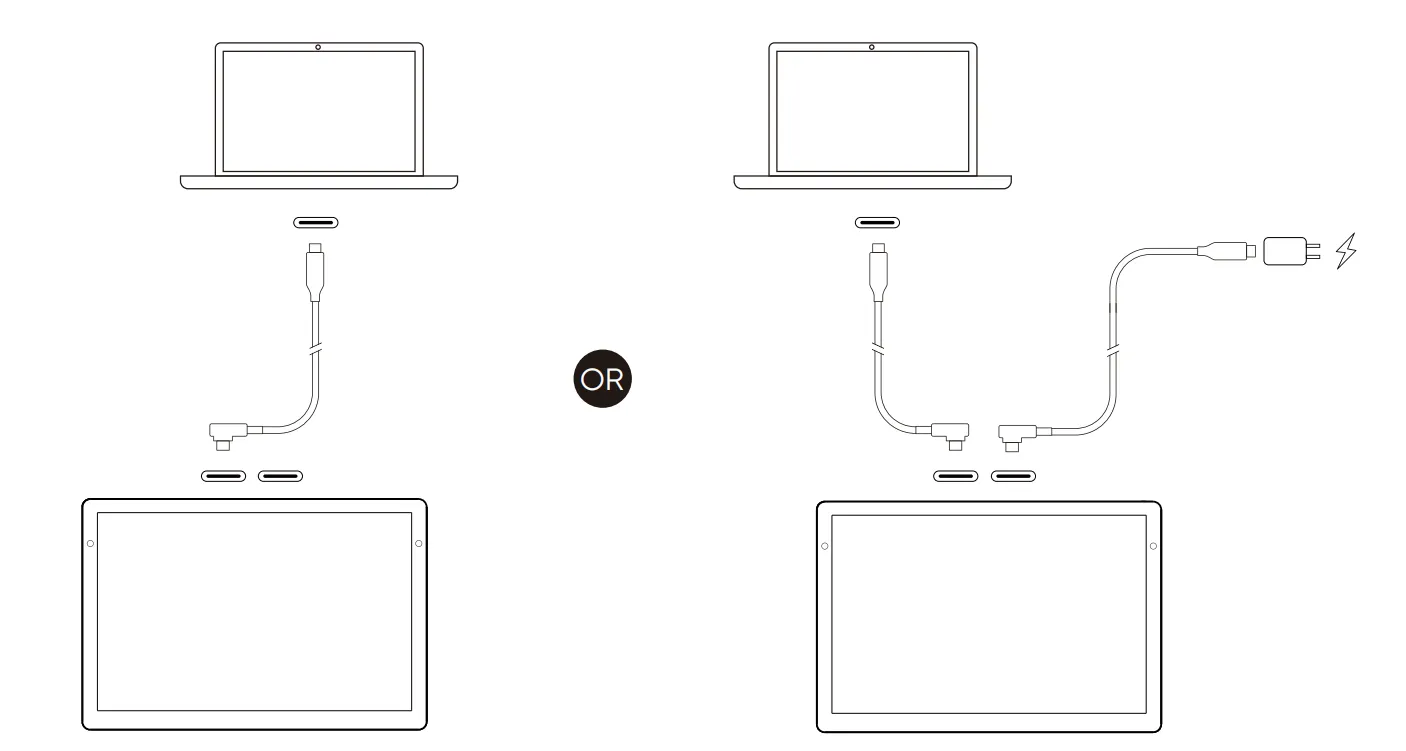
*Image is for illustration only.
b) 3-in-1 Cable Connection
1) Insert the HDMI and USB-A plugs of the 3-in-1 cable into the computer.
2) Insert the USB-C plug of the 3-in-1 cable into the drawing display.
3) Use a second USB-C to USB-C cable to connect either the 3-in-1 cable’s USB-C power port or the drawing display’s secondary USB-C port to the PD power adapter.
* It is recommended to use the computer's discrete graphics HDMI port (if available).
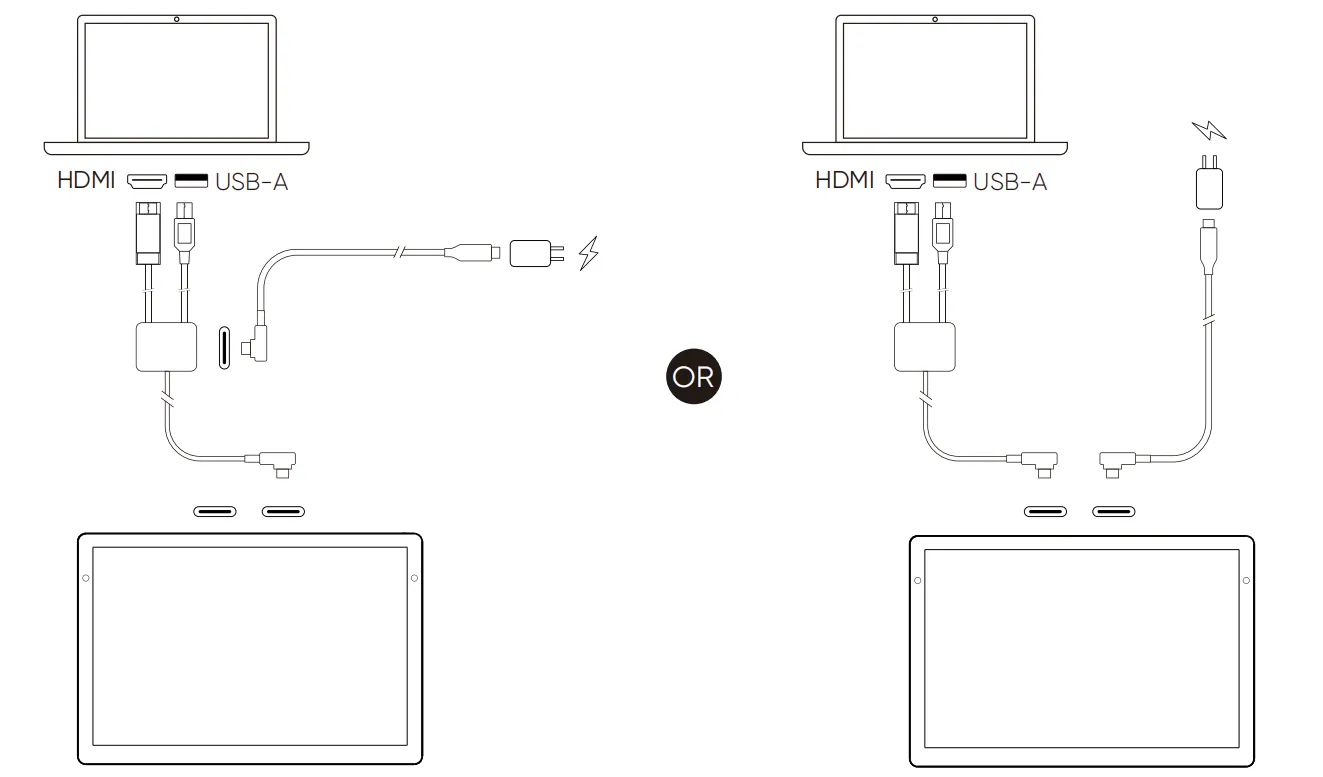
*Image is for illustration only.
2.Android Device Connection
1) Connect the Android phone/tablet to the drawing display using a USB-C to USB-C cable.
2) Connect the drawing display to the PD power adapter with another USB-C cable.
* It is recommended to use an Android device that supports "desktop mode". Please refer to the official website for specific models.
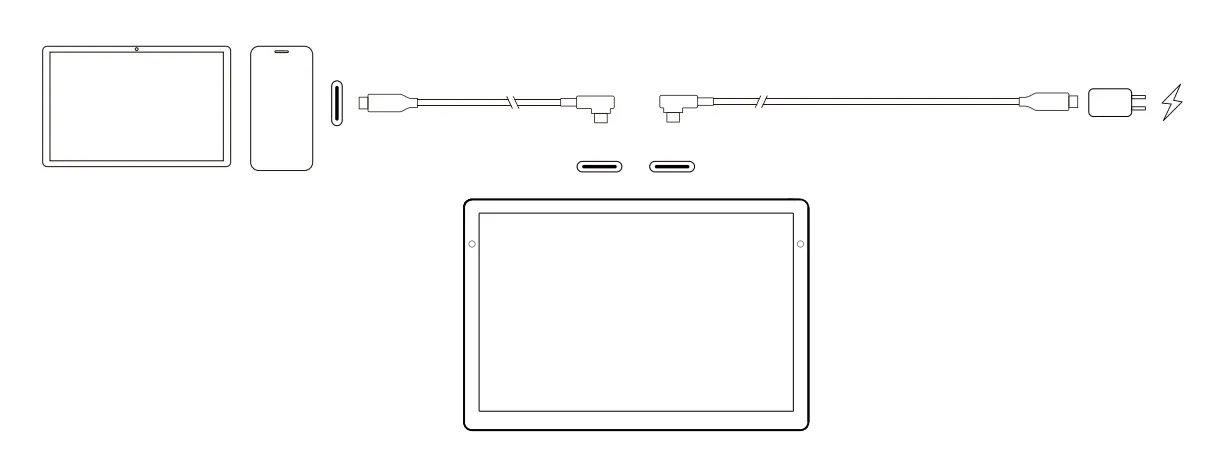
*Image is for illustration only.
Wireless Shortcut Remote
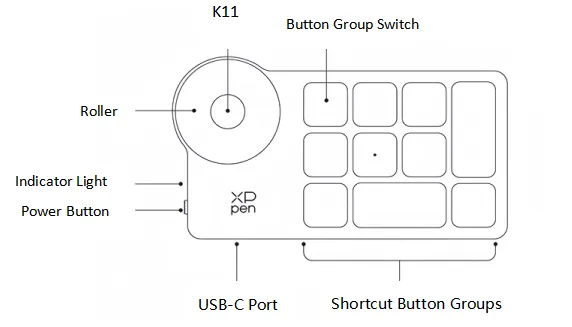
1.Wired Connection
Connect the Shortcut Remote to the computer using a USB-A to USB-C or USB-C to USB-C cable.
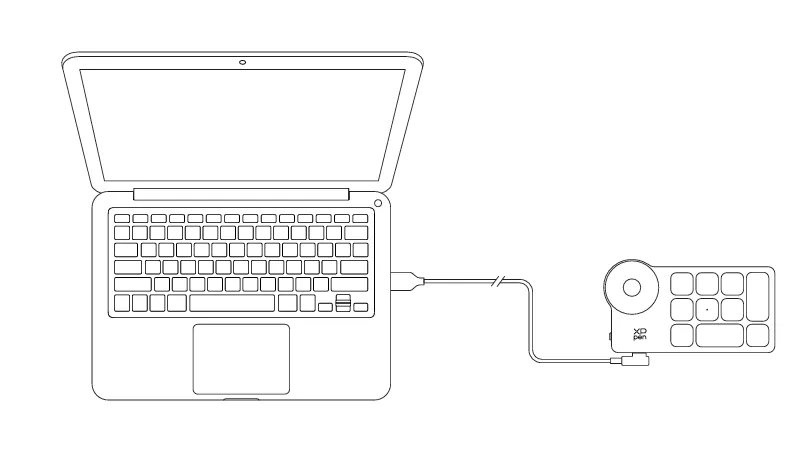
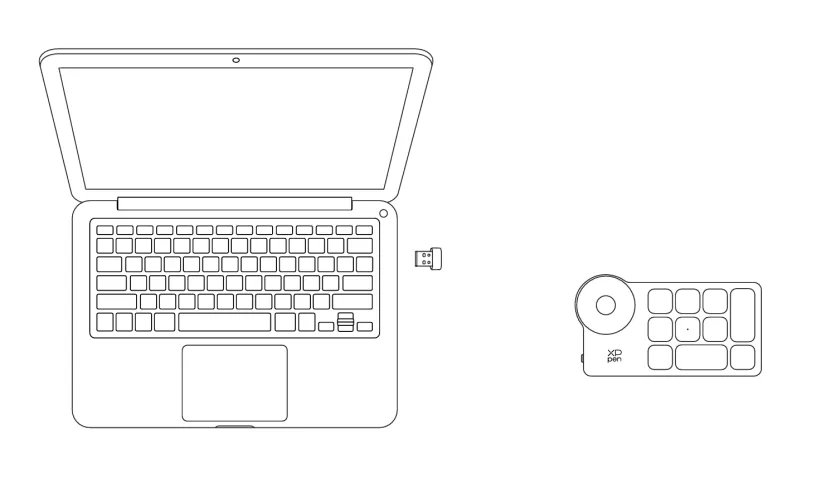
2.Bluetooth Receiver Connection
- Insert the Bluetooth receiver into the computer’s USB port.
- Turn on the Shortcut Remote’s power switch.
- If the blue indicator light remains steady for 30 seconds and then turns off, the connection is successful.
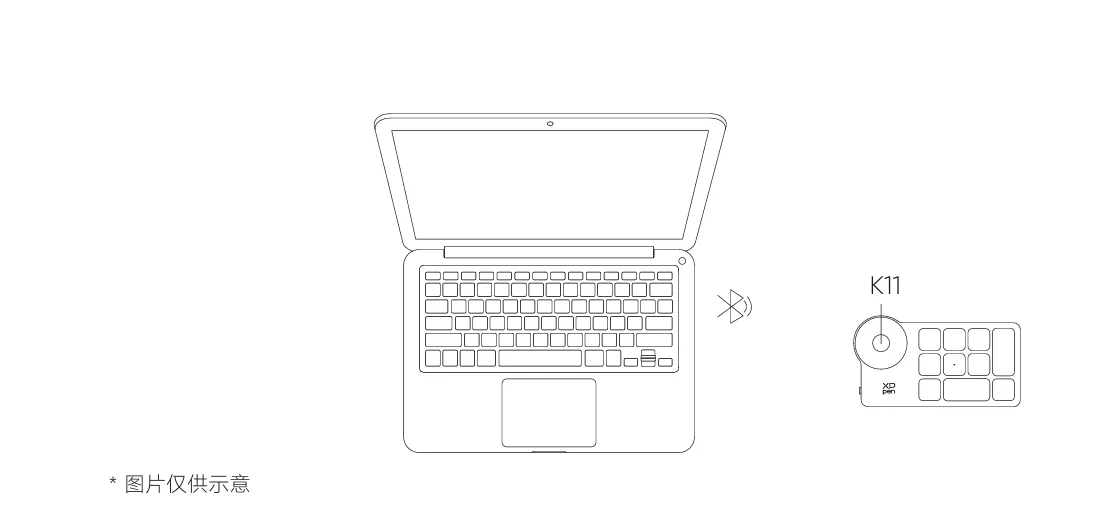
3.Bluetooth Wireless Connection
- Turn on the Shortcut Remote’s power switch.The blue light will blink slowly.
- Press and hold the K11 key for 6 seconds. The blue indicator light will blink rapidly to enter pairing mode.
- Select "Shortcut Remote" in the computer’s Bluetooth settings to pair.
- After successful pairing, the blue indicator light remains steady for 30 seconds and then turns off.
Compatibility
Windows 7 or later
(Touch function supports only on Windows 10 or later)
macOS 12 or later
Android 10.0 or later (USB3.1 DP1.2 required)
ChromeOS 88 or later
Windows ARM
Linux (Touch function supports only on Ubuntu 20.04 LTS or later)
Driver Installation
1.Driver Download
- Make sure your drawing display is properly connected to the computer;
- Visit the official website: www.xp-pen.com.;
- Navigate to the Driver page. Search for Artist Ultra 14 . Then download and install the driver compatible with your system;
- Launch the driver. Configure parameters and test product features.
Important Pre-Installation Notes:
• Close all anti-virus software and drawing software
• Uninstall drivers for other brands of sketch tablets/displays
• Restart your computer after installation
* It is recommended to use the latest version of the driver for optimal performance.
2.Driver Installation
Notes:
- Before installation, please close all active anti-virus software and drawing software;
- If your computer has drivers for other brands of sketch tablets/displays installed, please uninstall them first;
- After installation, please restart your computer;
- For optimal device performance, it is recommended to use the latest version of the driver.
2.1. Windows
Unzip and run the . exe file with administrator privileges. Follow the prompts to complete the installation.
2.2. macOS
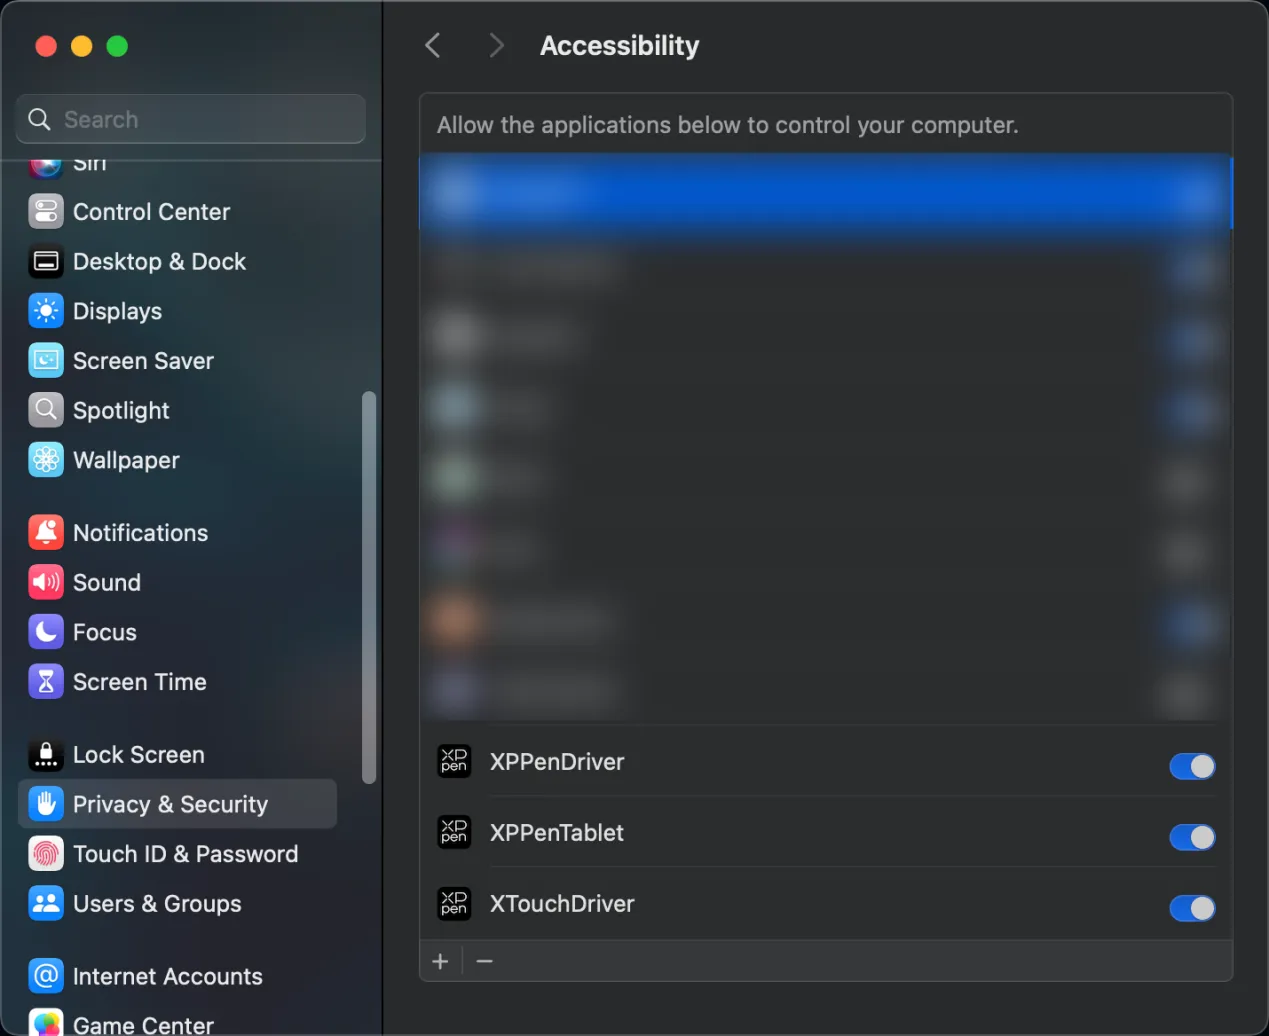
Unzip and run the .pkg file. Follow the prompts to complete the installation. Add the required security settings ( System Preferences -> Privacy & Security -> Accessibility ). After authorization and unlocking, make sure the XPPenDriver , XPPenTablet and XTouchDriver option are checked. Otherwise, the device and driver may fail to function properly.
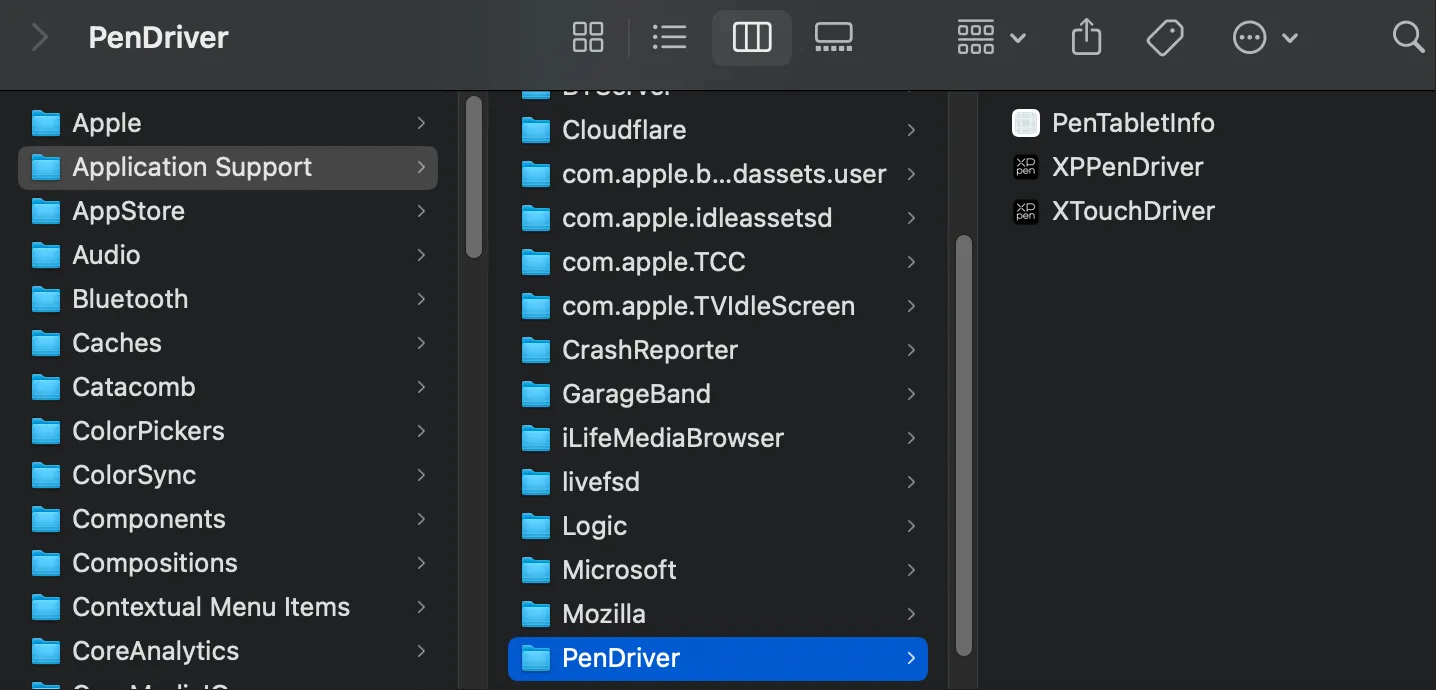
If there are no related options in the list, please navigate to the Library -> Application Support -> PenDriver to add manually.
2.3. Linux
DEB: In the command line, enter sudo dpkg –i . Drag the installation file into the window. Then execute the command;
RPM: In the command line, enter sudo rpm –i . Drag the installation file into the window. Then execute the command;
Tar.gz: Unzip the file first. In the command line, enter sudo . Drag install.sh into it. Then execute the command.
3.Driver Overview
After driver installation completes, the software launches automatically. If automatic launch fails, please manually navigate to the driver installation directory and open the driver.
Windows access path: Start -> Pentablet
MacOS access path: Applications -> XPPen -> PenTablet
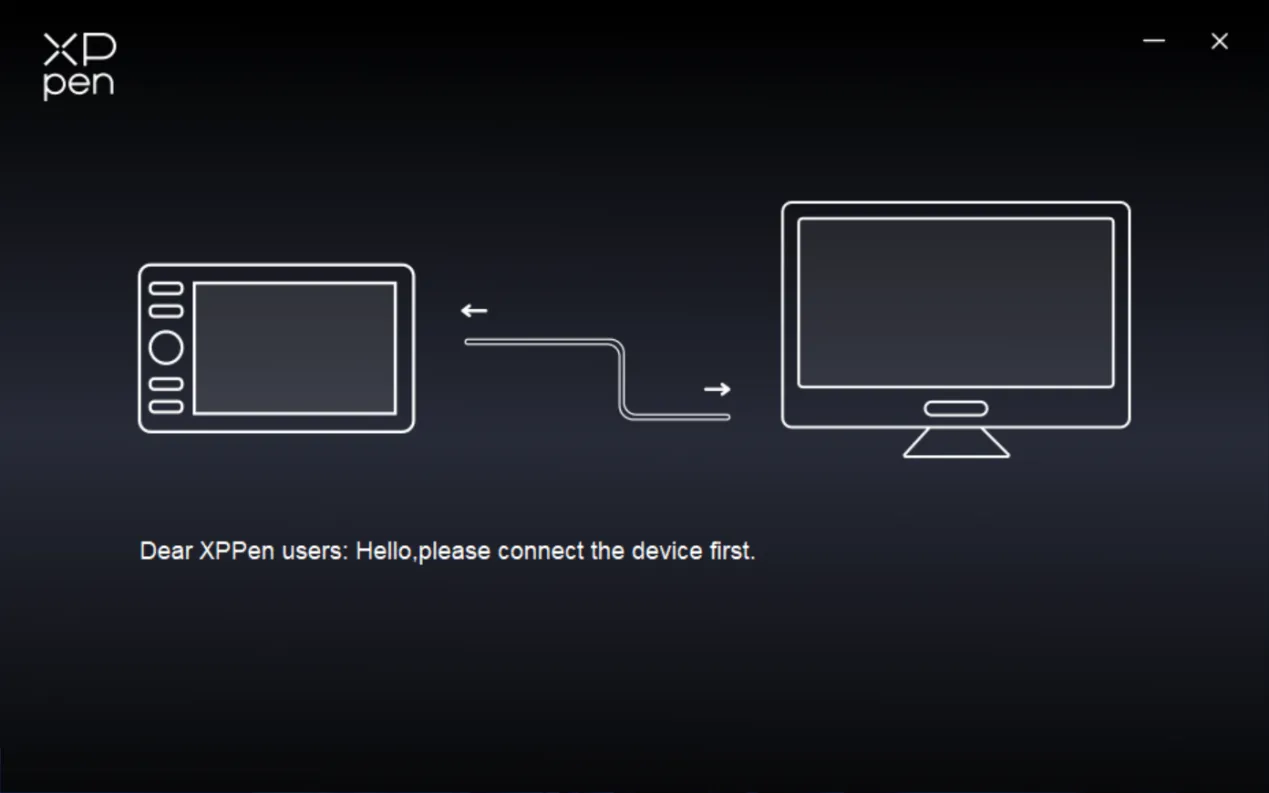
For no device detected or connection unsuccessful, the following prompt is displayed. Please try to reconnect the device and restart the computer or driver before trying again, or contact customer support for assistance.
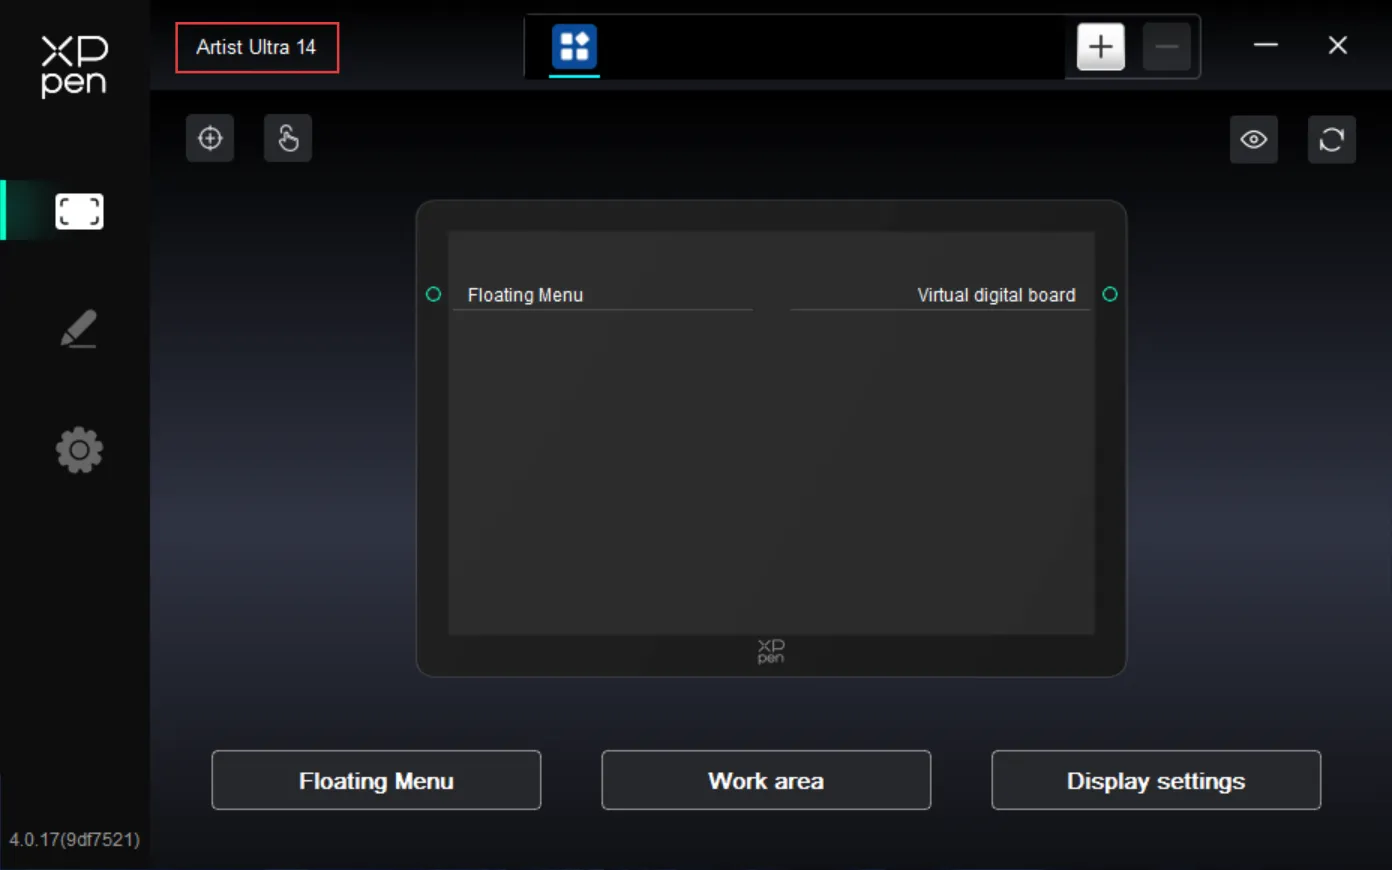
If the device is successfully connected to your computer, the device name is displayed in the upper left corner of the driver.
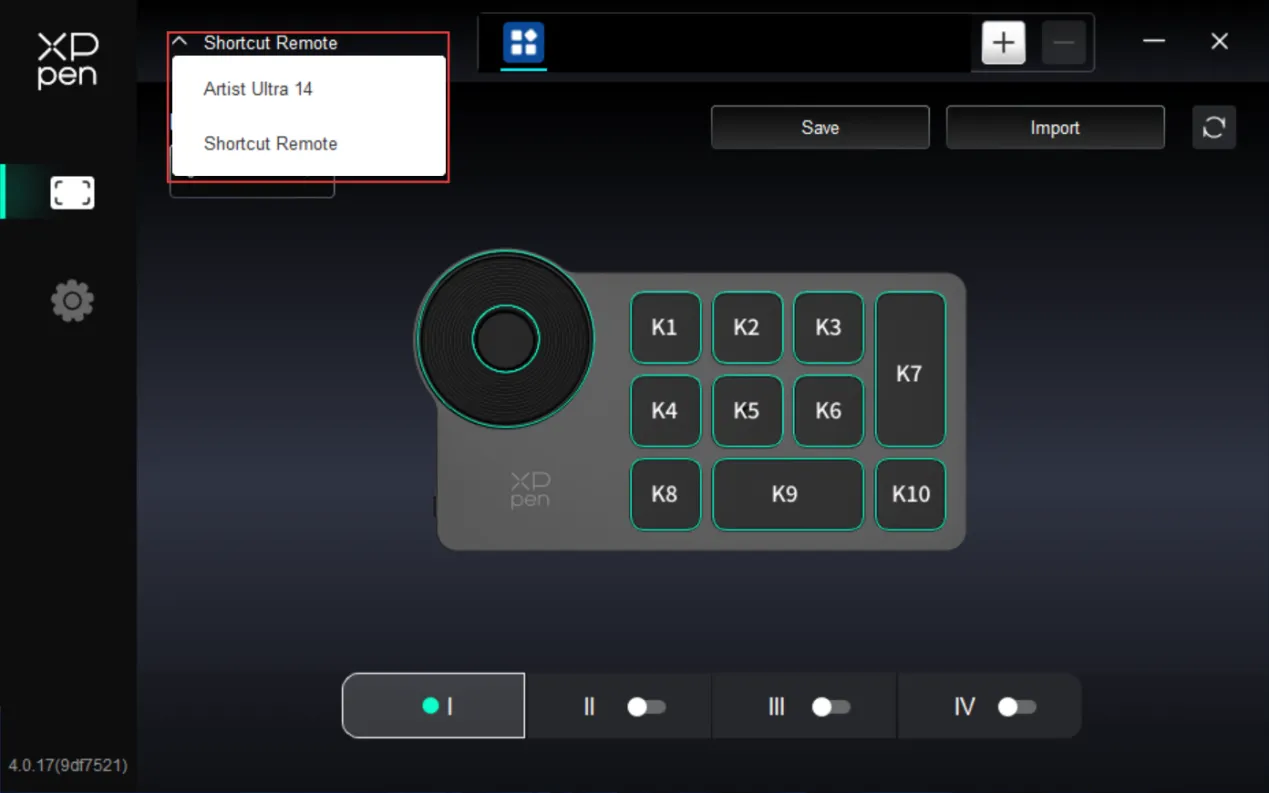
The driver can support up to three devices at the same time. After switching one of them, you can customize settings for the currently selected device, and these settings only apply to the device.
Stylus Usage
The Artist Ultra 14 comes standard with the X3 Pro Smart Chip Stylus and X3 Pro Slim Stylus. The X3 Pro Smart Chip Stylus comes with a silicone grip sleeve to reduce fatigue from long periods of creation. The X3 Pro Slim Stylus offers enhanced ergonomics for a comfortable grip, while its removable keys help minimize accidental presses.
Stylus Holding:
Hold the stylus as you use a regular pen or pencil. Then rotate the stylus to adjust the shortcut key position until your thumb or finger can comfortably press the key.
Note: During use, avoid accidental presses of the shortcut key to prevent unintended operations.
Stylus Storage:
When not in use, please store your stylus properly. To prevent pressure or weight from being applied to either the nib or eraser ends to extend the service life of the nib and pressure sensor, it is recommended to store the stylus in its included case when not in use.
Note: Do not place the stylus on the device when not in use. Otherwise, it may affect mouse operation and may prevent the computer from entering Sleep Mode.
Nib Replacement:
Replace the nib promptly if it becomes severely worn or develops sharp edges.
- Find the replacement nibs in the stylus case or product packaging. Please note that the nibs for the X3 Pro Smart Chip Stylus and X3 Pro Slim Stylus are not interchangeable, so ensure correct identification when replacing;
- Insert the current nib into the nib extractor inside the stylus case. Then tilt the stylus to remove the old nib;
- Insert the new nib into the stylus's socket. Push it vertically until it stops.
Touch Feature
The Artist Ultra 14 supports the multi-finger touch feature, which improves creative efficiency through gesture operation. You can use the top touch keys to enable or disable this feature.
With the touch feature enabled, you can use multi-finger touch gestures on Windows or macOS. The product supports system standard gestures. You can also customize the touch area and custom gestures through the product driver.
1.Touch Area
The product supports three touch area modes, including Default, Basic, and Custom.
- Default: The entire display area is touch-enabled;
- Basic: Touch input is enabled only for the floating menu on the display; no single- or multi-finger input is recognized elsewhere;
- Custom: Touch input is enabled only outside the custom area; no single- or multi-finger input is recognized in the custom area (such as the canvas area).
2.Basic Gestures
The basic gestures include single- and two-finger touch interactions. Basic gestures enable system navigation, mouse clicks, scrolling, zooming, or rotation.
3.Advanced Gestures
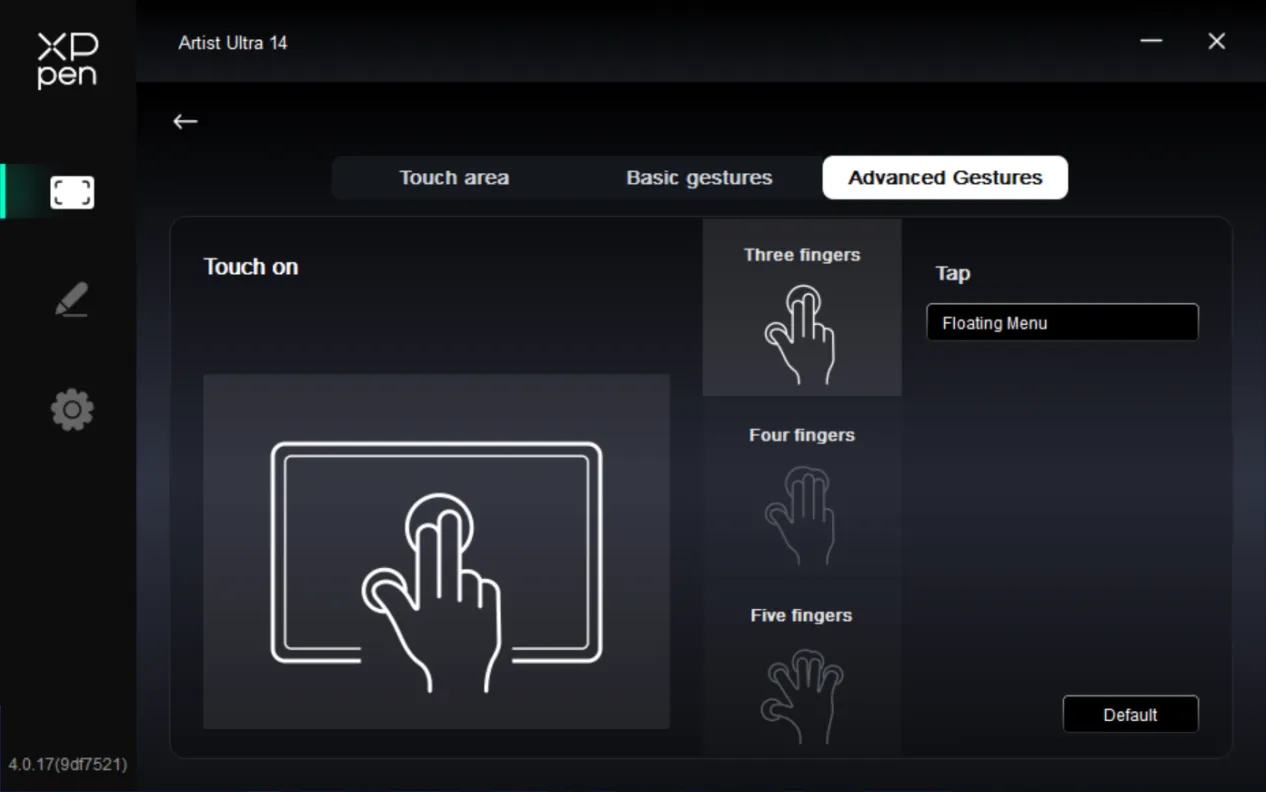
Advanced touch gestures include 3-, 4-, and 5-finger touch interactions. The product supports standard multi-finger gestures. You can also select new custom gestures through the gesture drop-down menu.
4.List of Supported Gestures
Note: Some system default gestures may not be supported depending on your operating system version.
|
Gesture |
Operation |
Windows 11 |
macOS |
|
Single-finger |
Tap |
Select |
Select |
|
Double tap |
Open |
Open |
|
|
Long press |
Right click |
Not supported |
|
|
Drag |
Drag |
Drag |
|
|
Two-finger |
Tap |
Not supported |
Right click |
|
Double tap |
Not supported |
Smart zoom |
|
|
Scroll |
Scroll up and down/left and right |
Scroll up and down/left and right |
|
|
Pinch |
Zoom |
Zoom |
|
|
Rotate |
Rotate |
Rotate |
|
|
3-finger |
Tap |
Floating menu Customizable |
Floating menu Customizable |
|
Sweep left and right |
Switch application |
Not supported |
|
|
Swipe up |
Show all open windows |
Mission Control Customizable |
|
|
Swipe down |
Show Desktop |
APP Expose Customizable |
|
|
4-finger |
Sweep left and right |
Switch application |
Switch application |
|
Swipe down |
Toggle display mapping Customizable |
Not supported |
|
|
Pinch |
Not supported |
Lanuch Pad |
|
|
Spread |
Not supported |
Show Desktop |
|
|
5-finger |
Tap |
Show Desktop Customizable |
Toggle display mapping Customizable |
|
Swipe down |
Show Driver Settings Customizable |
Show Driver Settings Customizable |
Floating Menu
The floating menu can display floating shortcut keys on the drawing display or computer monitor. You can set common operations on the floating menu. Then tap the button with your stylus, mouse or gesture to perform the set operation. To customize the display and features of the floating menu, click the Floating Menu button on the driver's homepage.
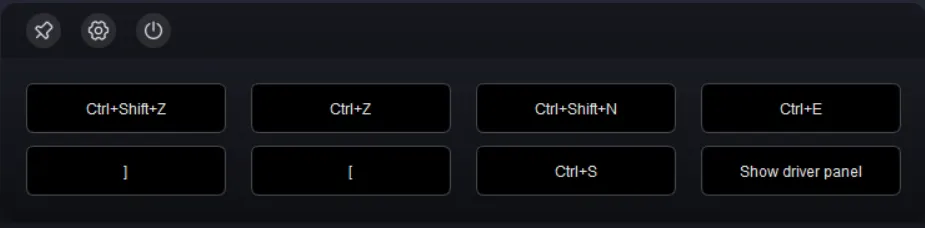
Icons in the upper left corner: Lock position, access driver settings for the floating menu, or close the floating menu.
Driver Settings
By clicking the icon on the left side of the driver, you can switch the driver features to set the relevant settings of the drawing display, including:
- Device Settings
- Stylus Settings
- Driver Settings
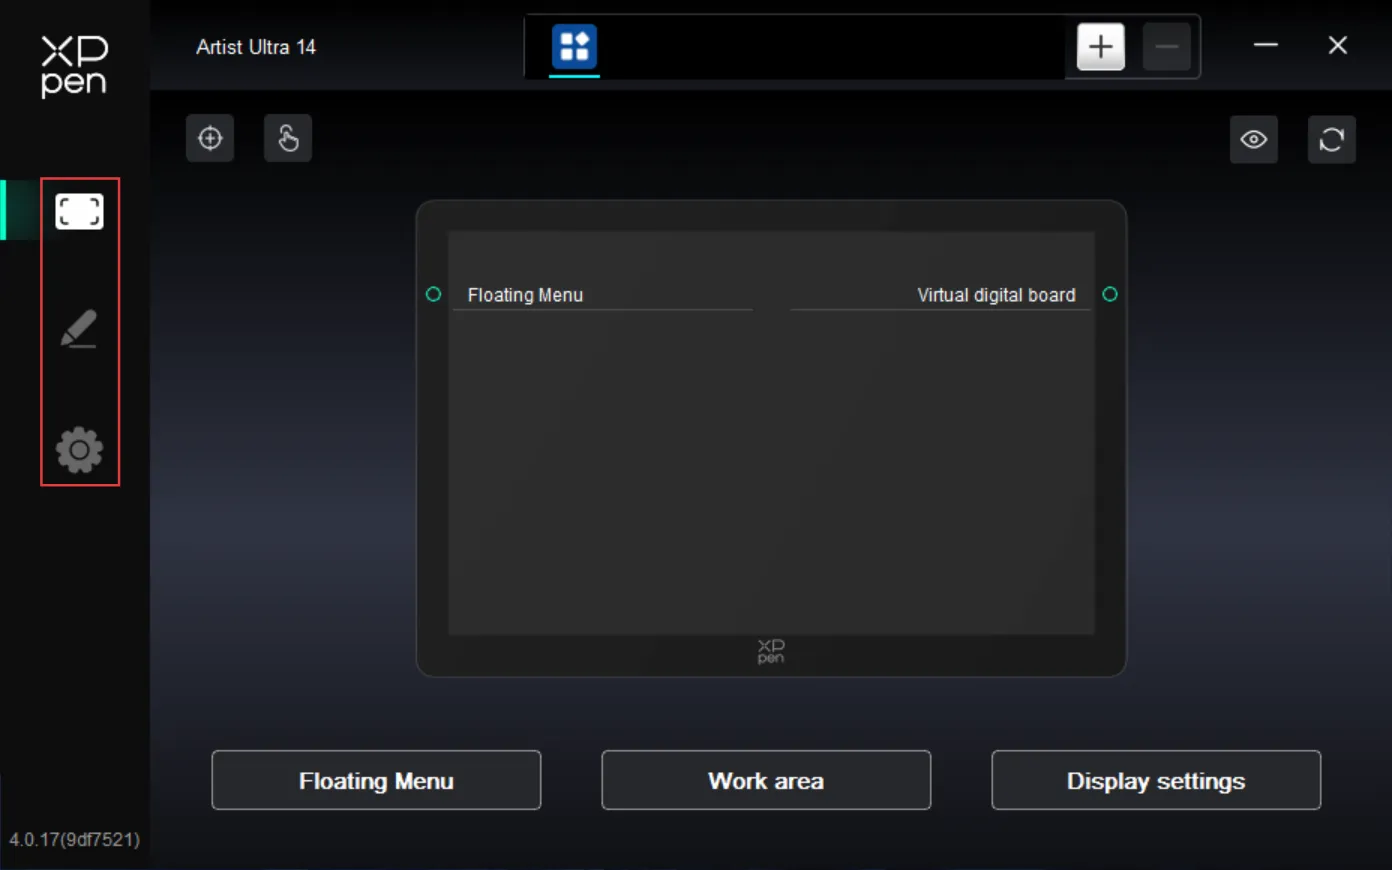
1.Device Settings
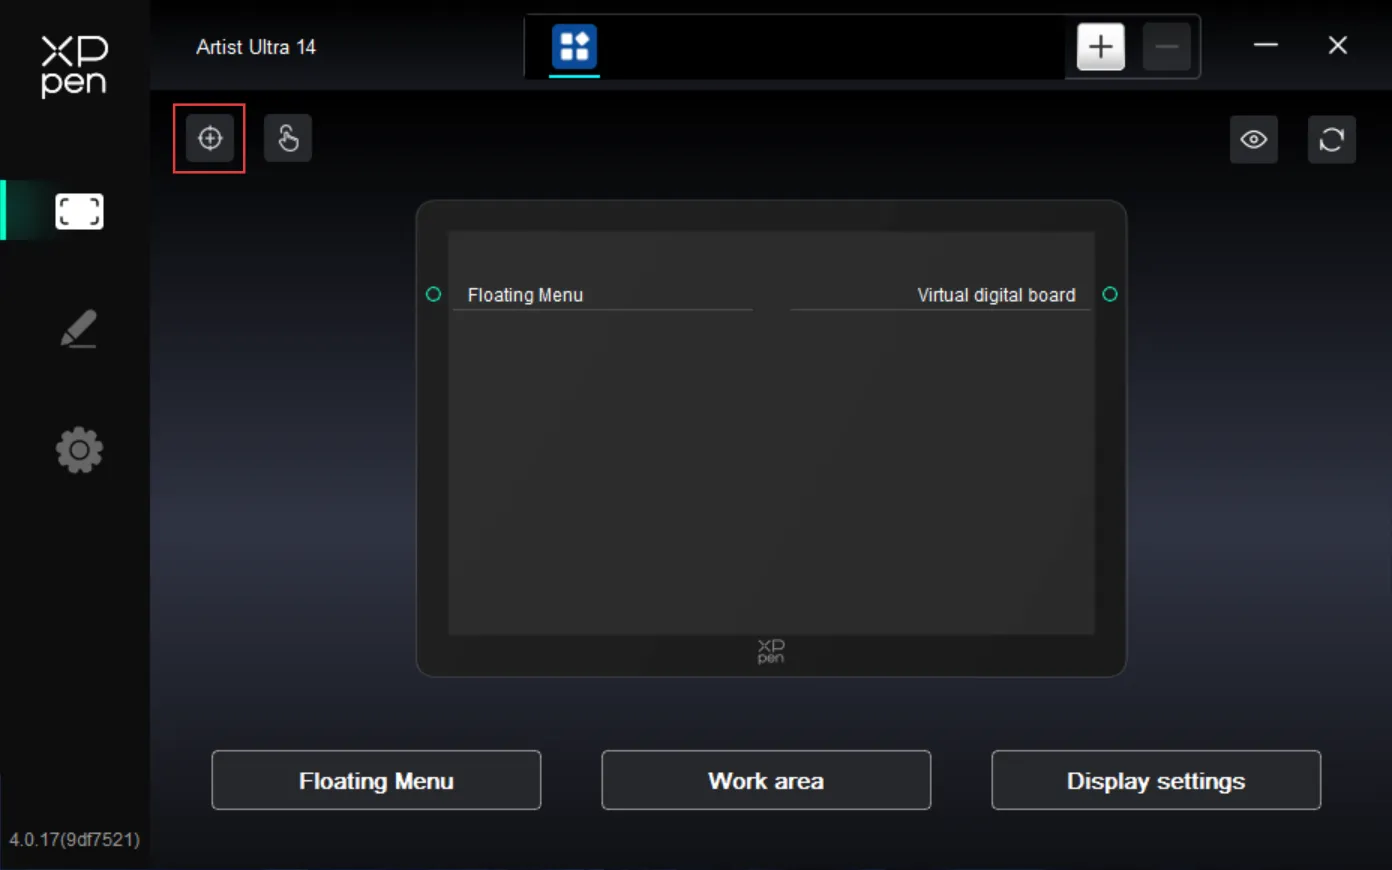
1.1. Display Calibration
Make sure the stylus is properly mapped to your Artist Ultra 14. Otherwise, please refer to the Work Area section to adjust the mapping area. Then use the stylus nib to tap the red cross center that appears on the display in standard stylus holding style to calibrate the offset between the stylus and cursor.
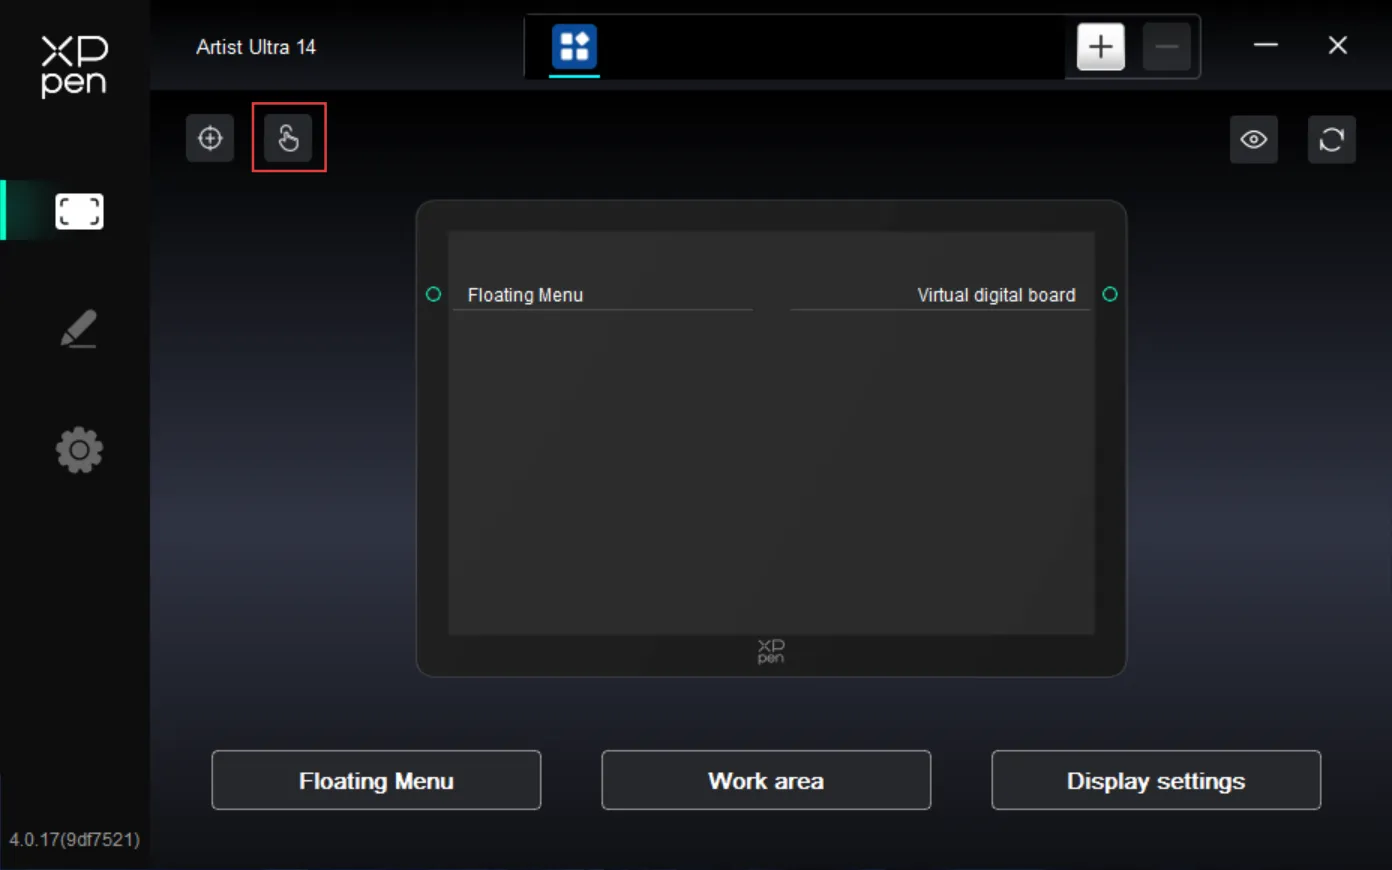
1.2. Touch
You can customize your touch area and gestures through the touch feature.
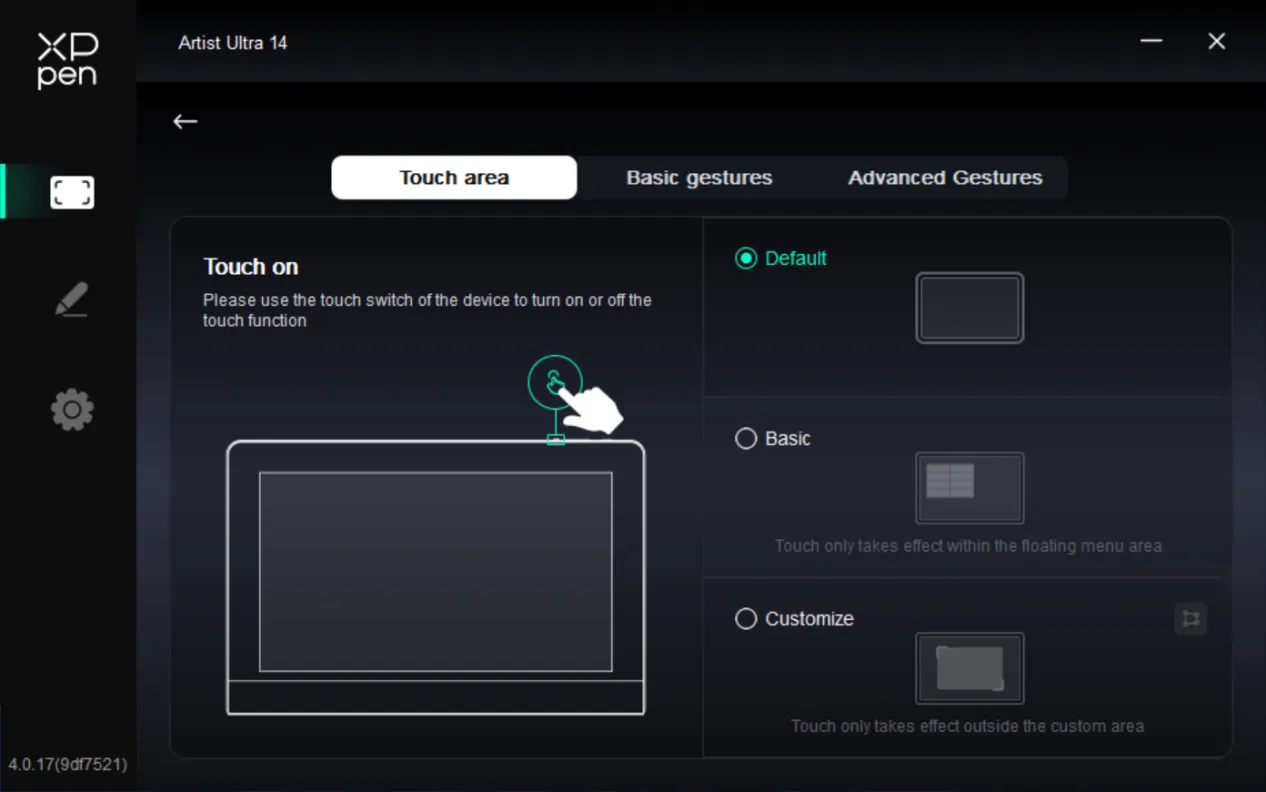
1.2.1. Touch Area
The touch area can only be set when the touch feature is enabled. If the touch feature is disabled, press the touch key on the top of the product to enable the touch feature.
The product supports three touch area modes, including Default, Basic, and Custom. You can switch between them and choose the mode that suits you best.
- Default: The entire display area is touch-enabled;
- Basic: Touch input is enabled only for the floating menu on the display; no single- or multi-finger input is recognized elsewhere;
- Custom: Touch input is enabled only outside the custom area; no single- or multi-finger input is recognized in the custom area (such as the canvas area).
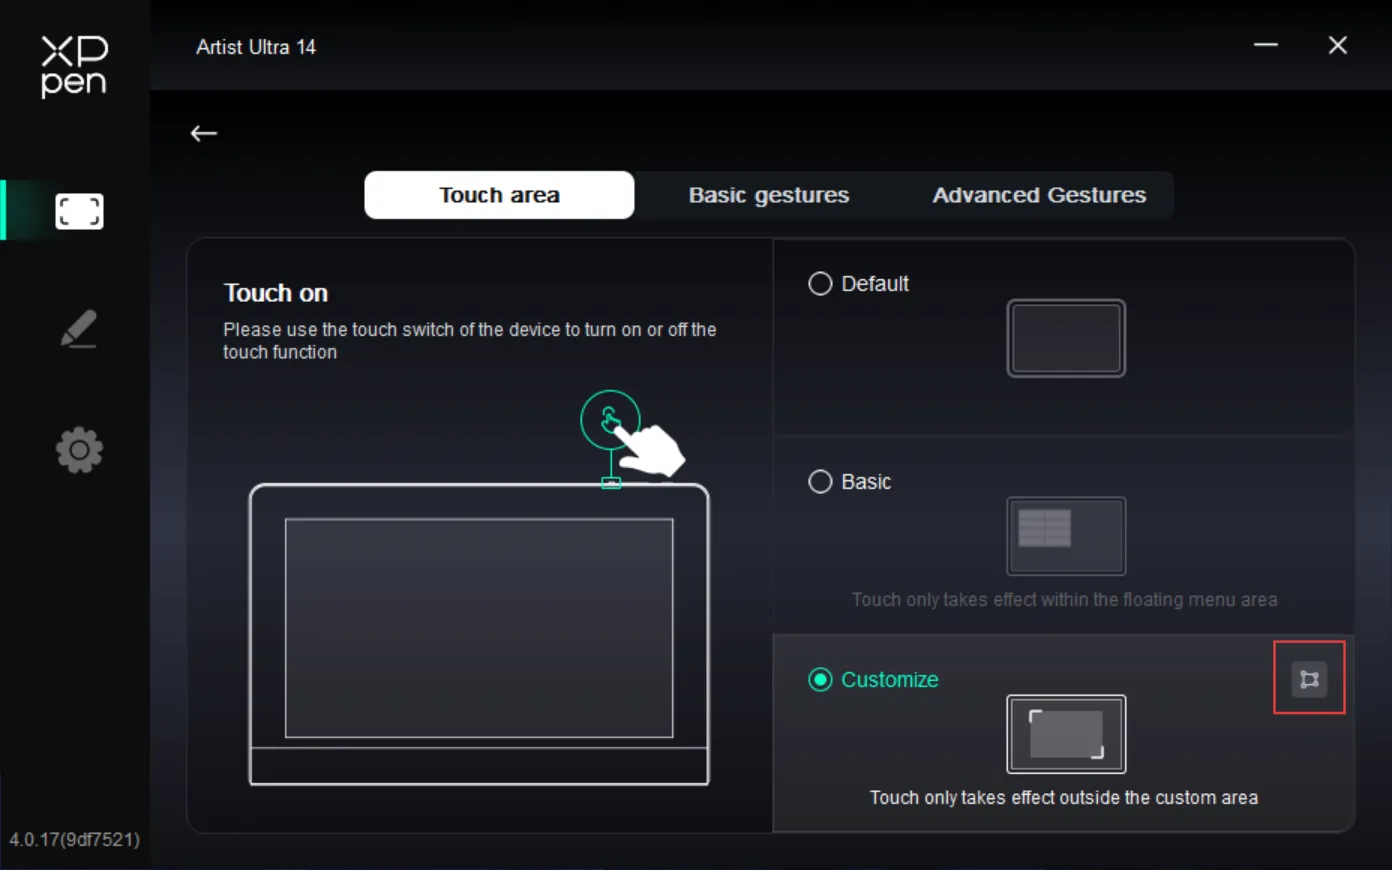
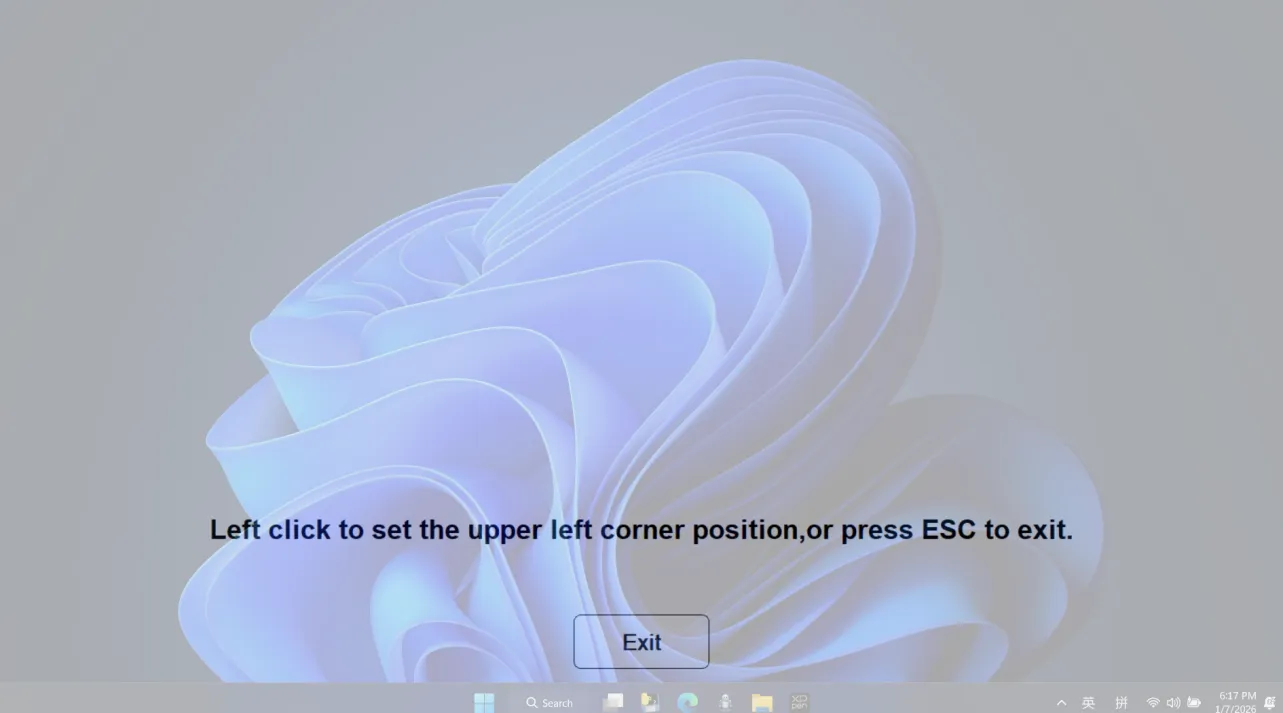
Set Custom Touch Area
Select Custom . Then, on the right side, click the Custom option. On the pop-up window, click the upper left corner and the lower right corner of the area to be set to complete the setup.
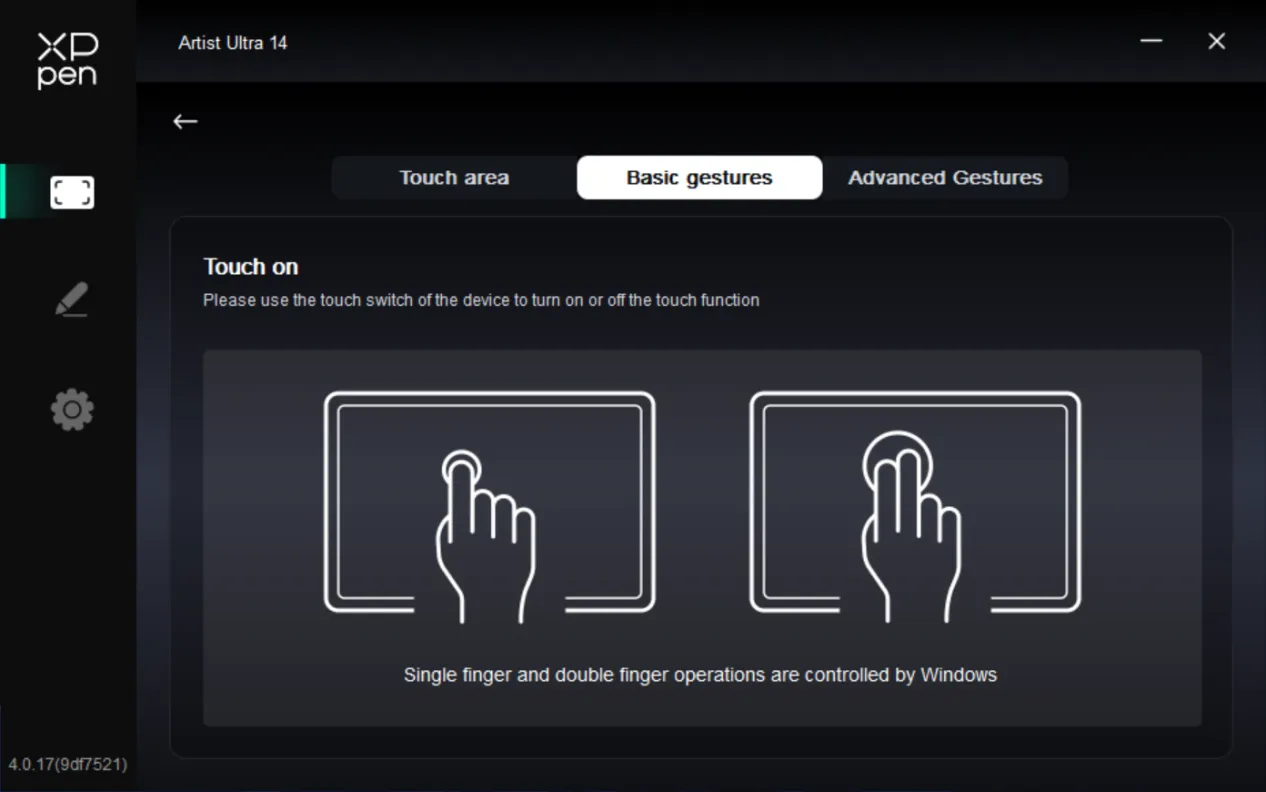
1.2.2. Basic Gestures
The basic gestures include single- and two-finger touch interactions. Basic gestures enable system navigation, mouse clicks, scrolling, zooming, or rotation.
1.2.3. Advanced Gestures
Advanced touch gestures include 3-, 4-, and 5-finger touch interactions. The product supports standard multi-finger gestures. You can also select new custom gestures through the gesture drop-down menu. For specific supported gestures, please refer to the List of Supported Gestures.
1.3. Touch Keys
Tap the corresponding positions of the left and right touch keys to customize their respective functions.
Virtual tablet mode
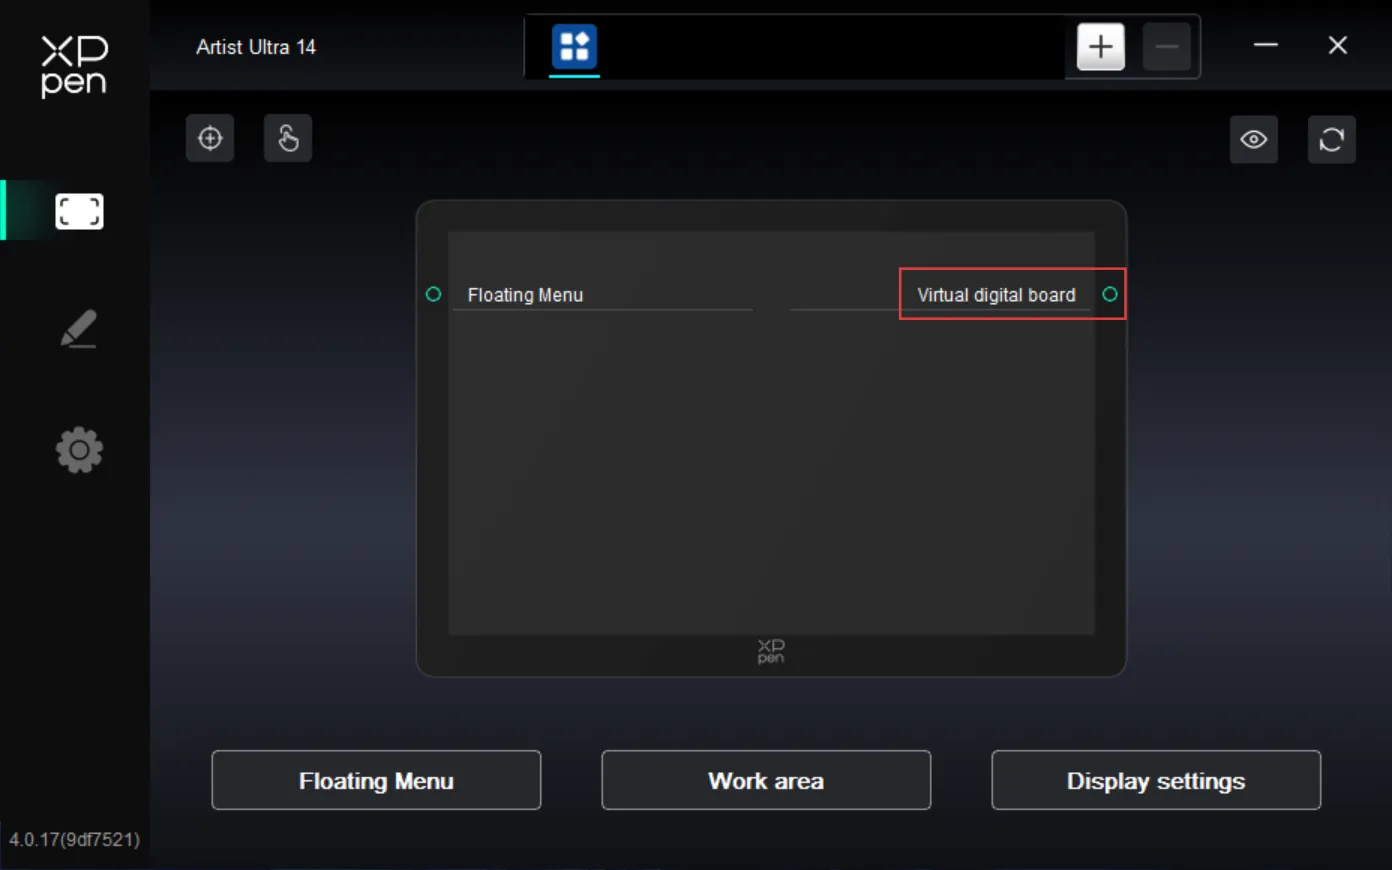
Virtual tablet mode is a special feature that enables unified cross-screen operation across multiple displays.
Under conventional display settings (such as "Extended Mode"), the drawing display is mapped as a separate workspace, and application windows cannot be dragged directly from one screen to another. When Virtual tablet mode is activated, all connected displays are recognized as a single contiguous canvas. With just the stylus, you can freely drag windows, move the cursor, or perform actions across different screens-without the need to switch input sources or reposition the pointer. 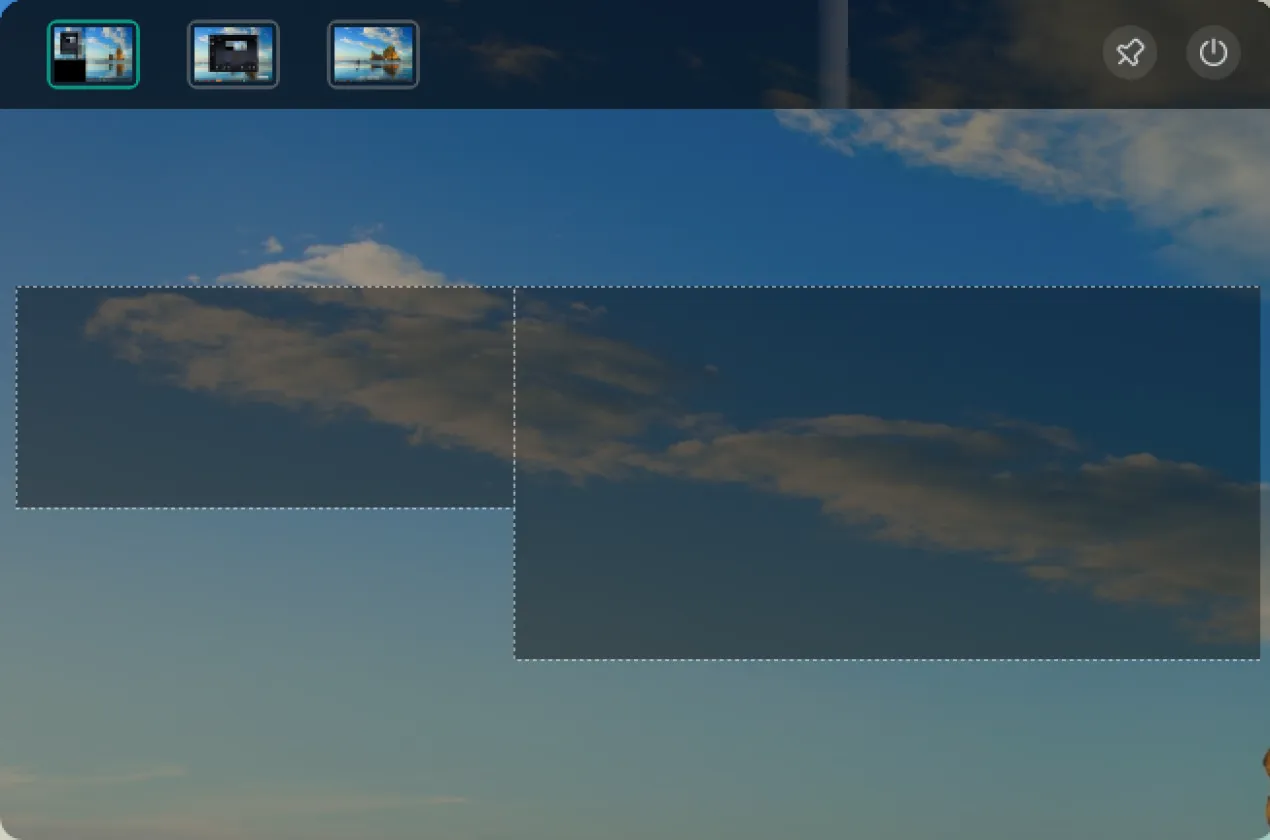
This mode is particularly well-suited for scenarios that require multi-screen navigation or rapid content management, such as reviewing materials across displays or moving application windows from the primary monitor to an auxiliary one. Rather than being designed for fine-art drawing, it serves as an efficient multi-screen command and navigation tool, enabling smoother multitasking workflows.
Prerequisite:
Please ensure that your operating system's display settings are configured to "Extended Mode" (not "Duplicate Mode") in order to enable this feature correctly.
1.4. Floating Menu
The floating menu can display floating shortcut keys on the drawing display or computer monitor. You can set common operations on the floating menu. Then tap the button with your stylus, mouse or gesture to perform the set operation.
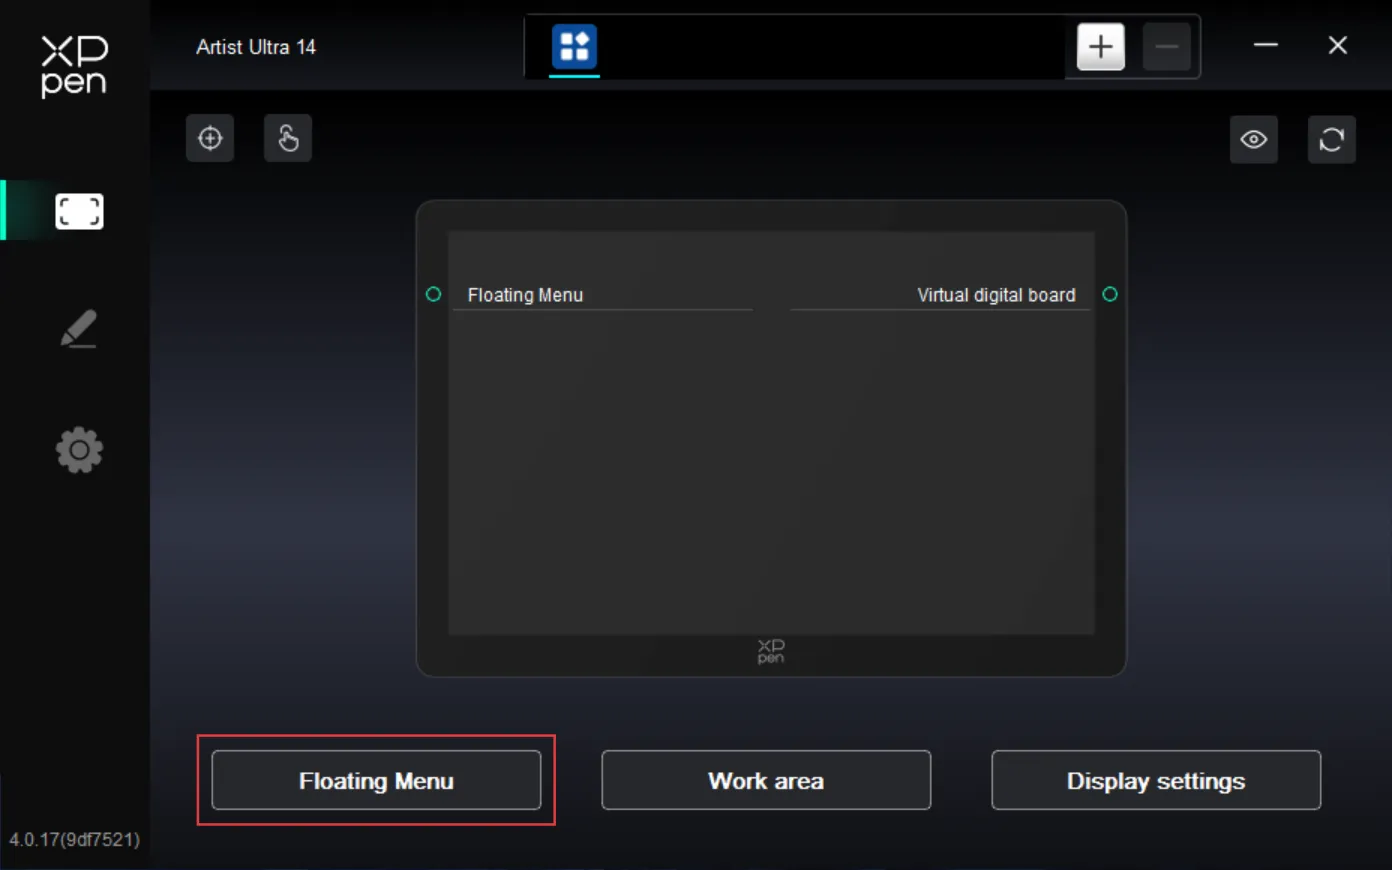
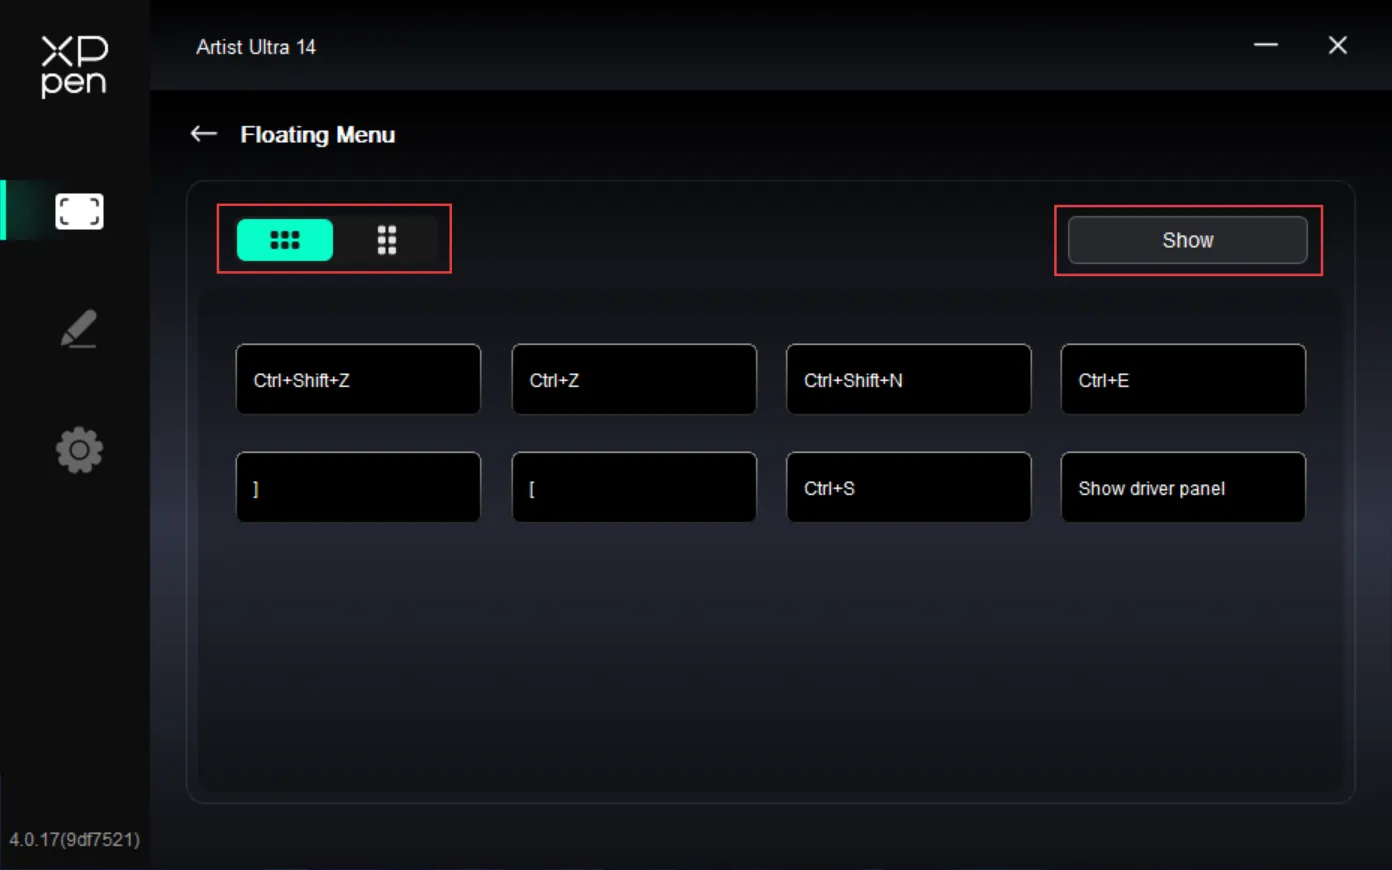
The floating menu supports horizontal and vertical layouts. Click the upper left corner area to switch between layouts. On the upper right corner, click the Show button. Then the floating menu is displayed on the desktop.
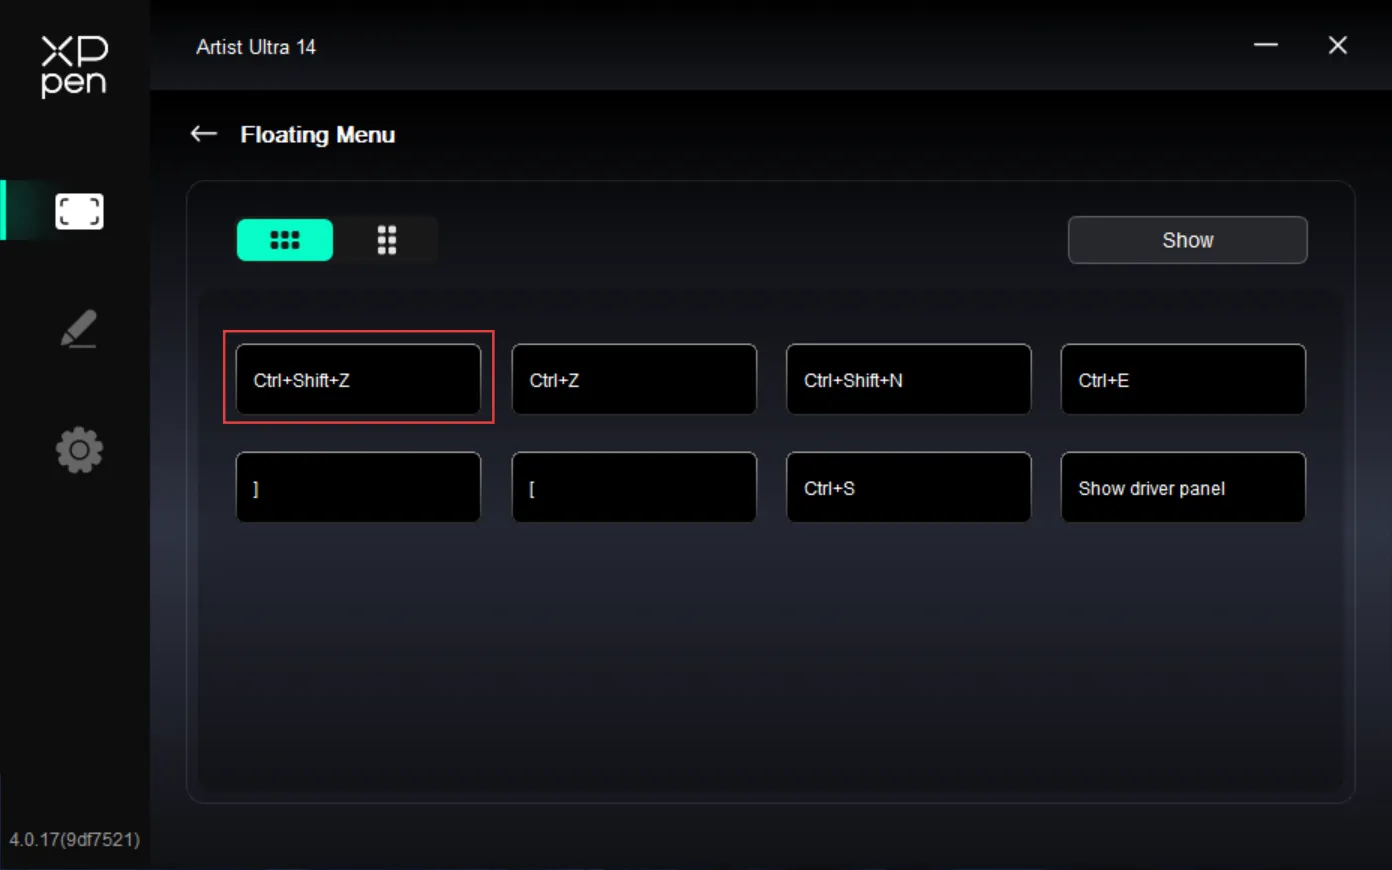
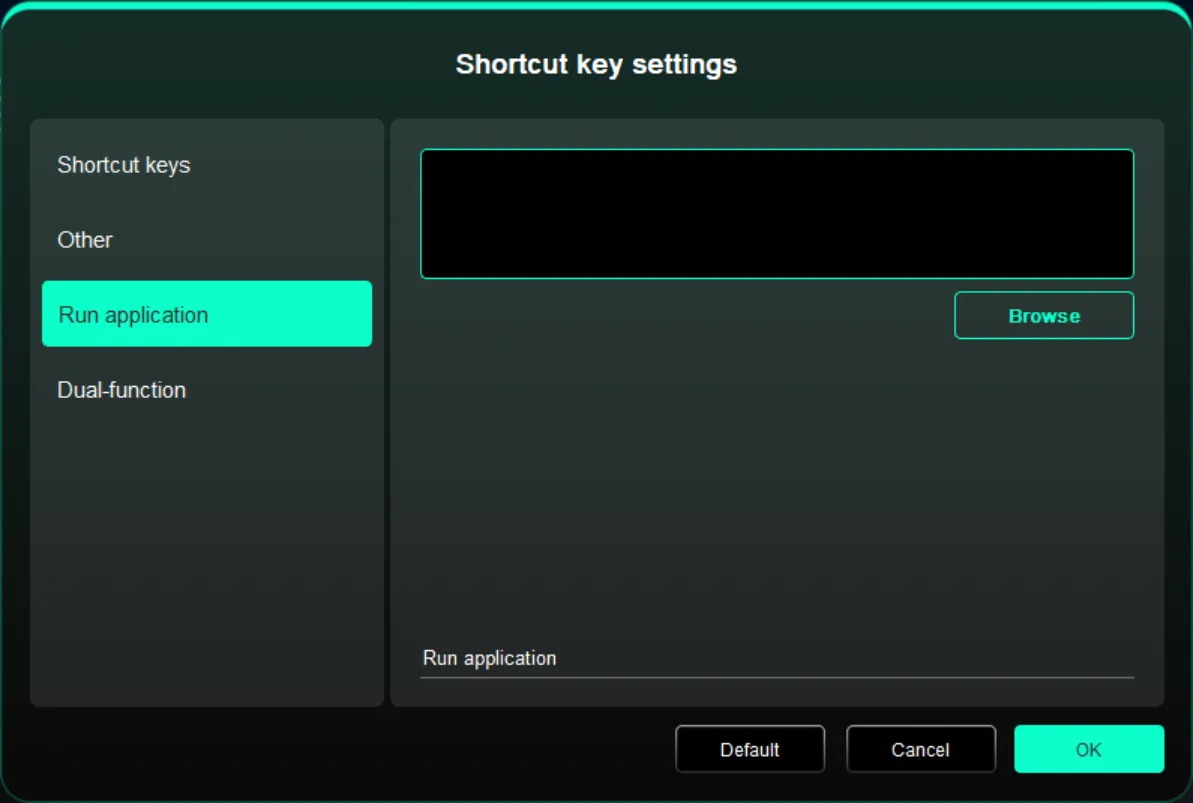
On the floating menu, click any shortcut key to configure its function. You can set it as a Shortcut Key , Others , or Execute Application .
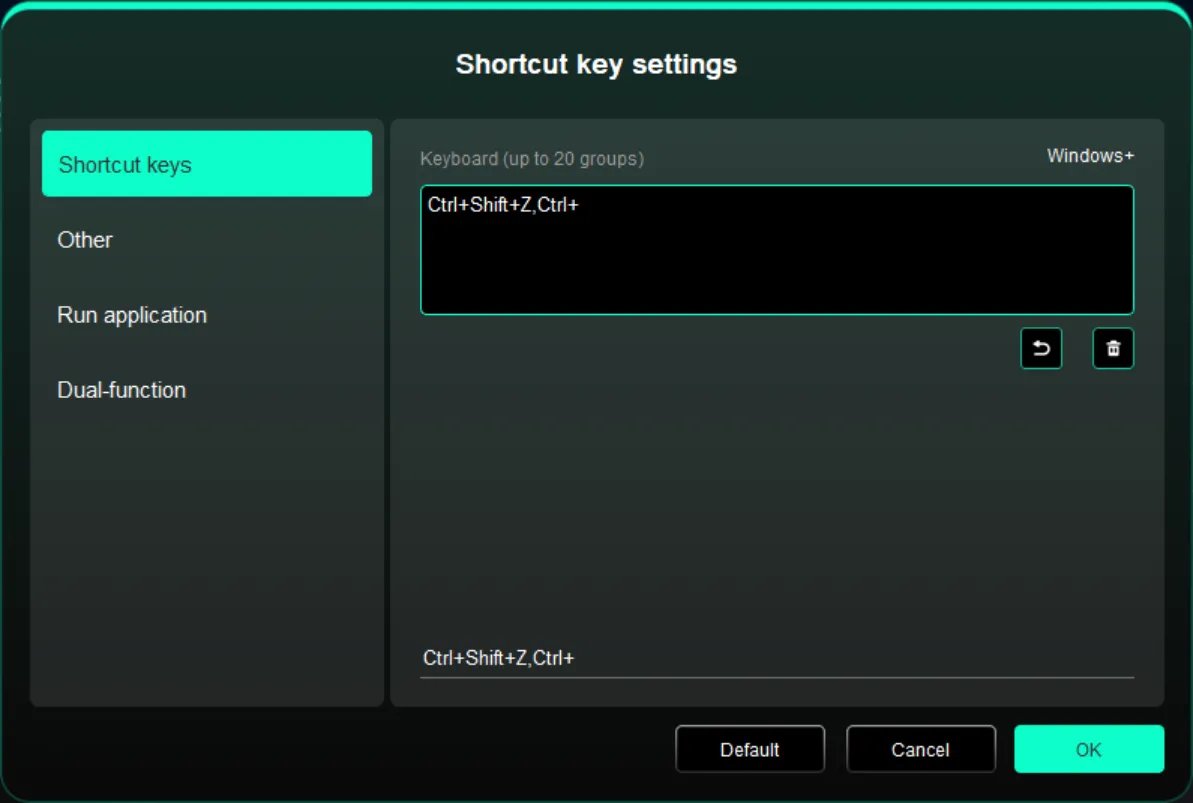
Shortcut Keys:
Configure shortcut keys. For example, in 3D MAX software, set to Alt + A to activate the Align tool.
Shortcut keys can be configured in multiple groups. For example, type Ctrl + C and Ctrl + V . When you press the corresponding shortcut keys, all assigned functions within the group execute sequentially.
Windows (Command): Add system key combinations. For example, to type Win (Cmd) + Shift + 3 , press Shift + 3 . Then the driver automatically includes the system key.
Custom Name: At the bottom of the driver interface, use the Custom Name to assign a display name for your current configuration.
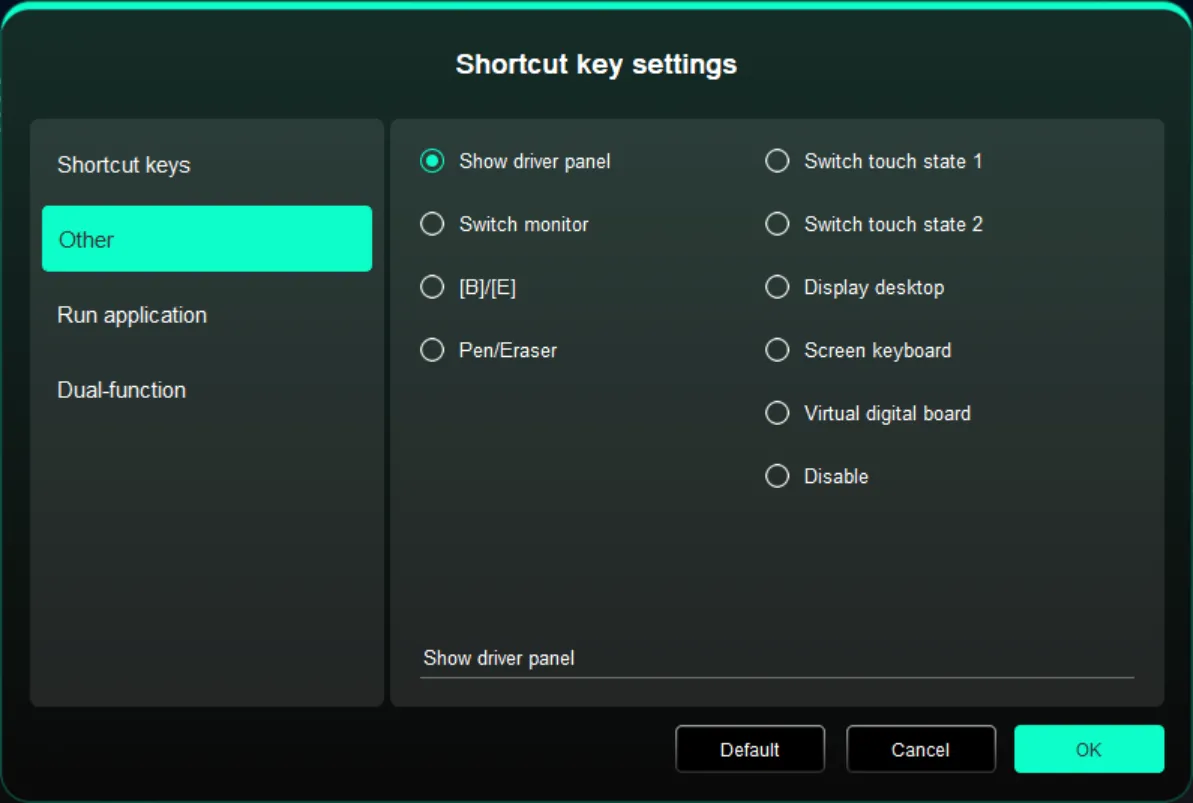
Others:
Show Driver Panel: Used to quickly access the driver settings panel
Switch Monitors: Used to map the cursor to alternate monitors when multiple monitors are connected
[B]/[E]: Used to switch repeatedly between B and E keys
Pen/Eraser: Used to switch repeatedly between Pen and Eraser modes
Switch to Touch Mode 1: Used to switch repeatedly between Default and Basic touch modes
Switch to Touch Mode 2: Used to switch repeatedly between Default and Custom touch modes
Show Desktop: Used to display the system desktop
On-Display Keyboard: Used to activate the system keyboard
Virtual tablet mode: Activate Virtual tablet mode
No Action: Performs no function
Execute Application:
Use shortcut keys to quickly launch the corresponding applications
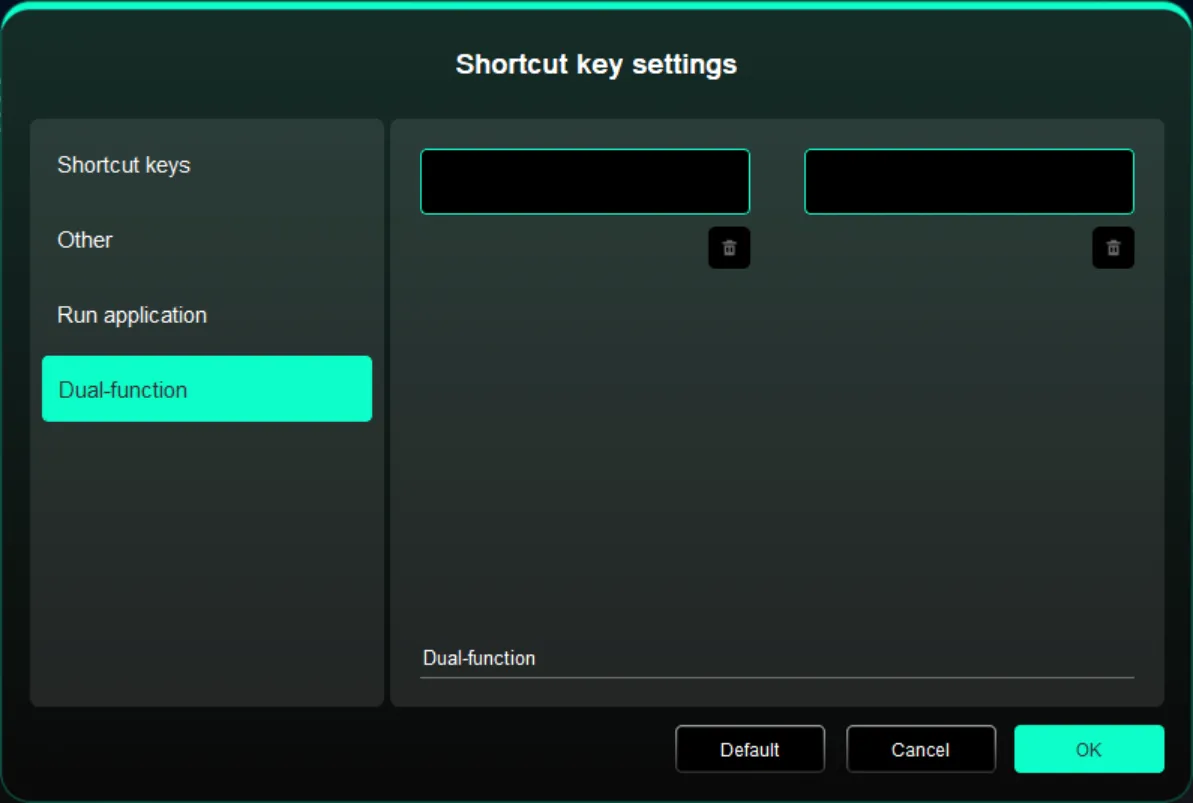
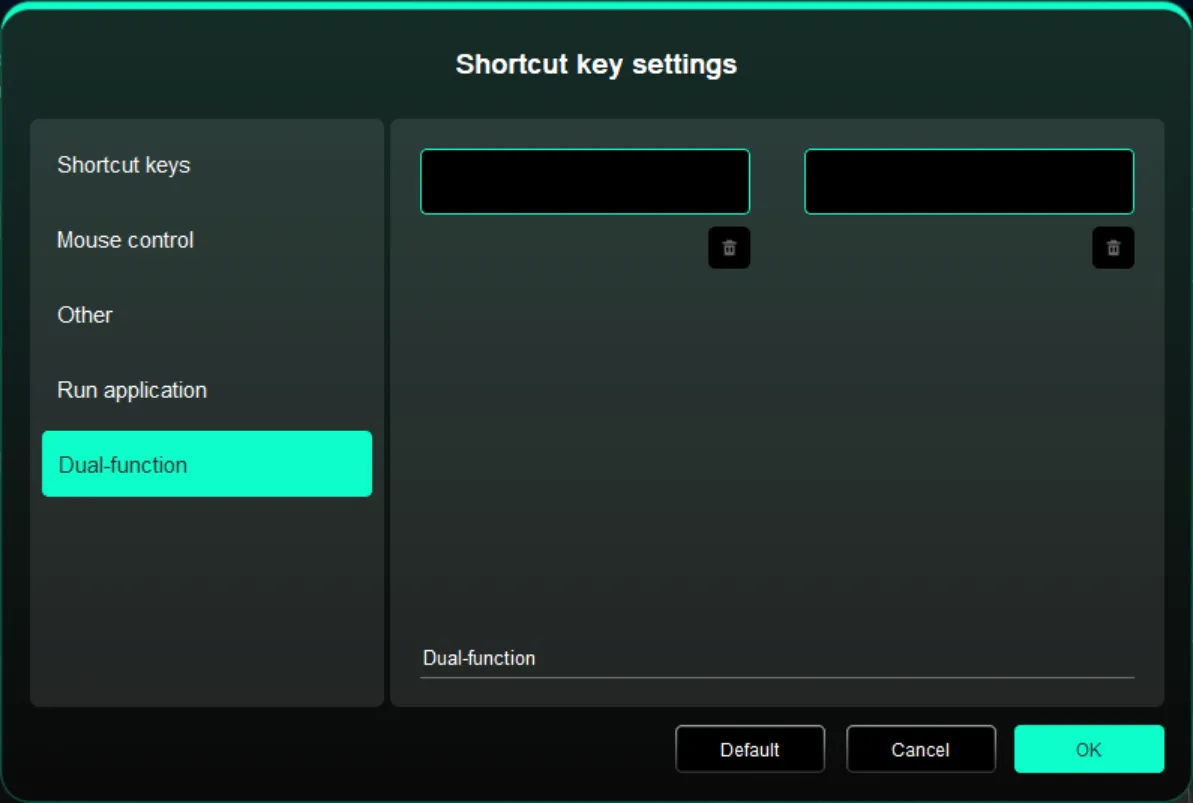
Dual-function:
Pressing a single shortcut key allows switching between two functions (e.g., B/E). Both the left and right sides are each a single group (which can be a combined key). Custom input is available via the keyboard, supporting the Win key, Cmd key, and their combined keys.
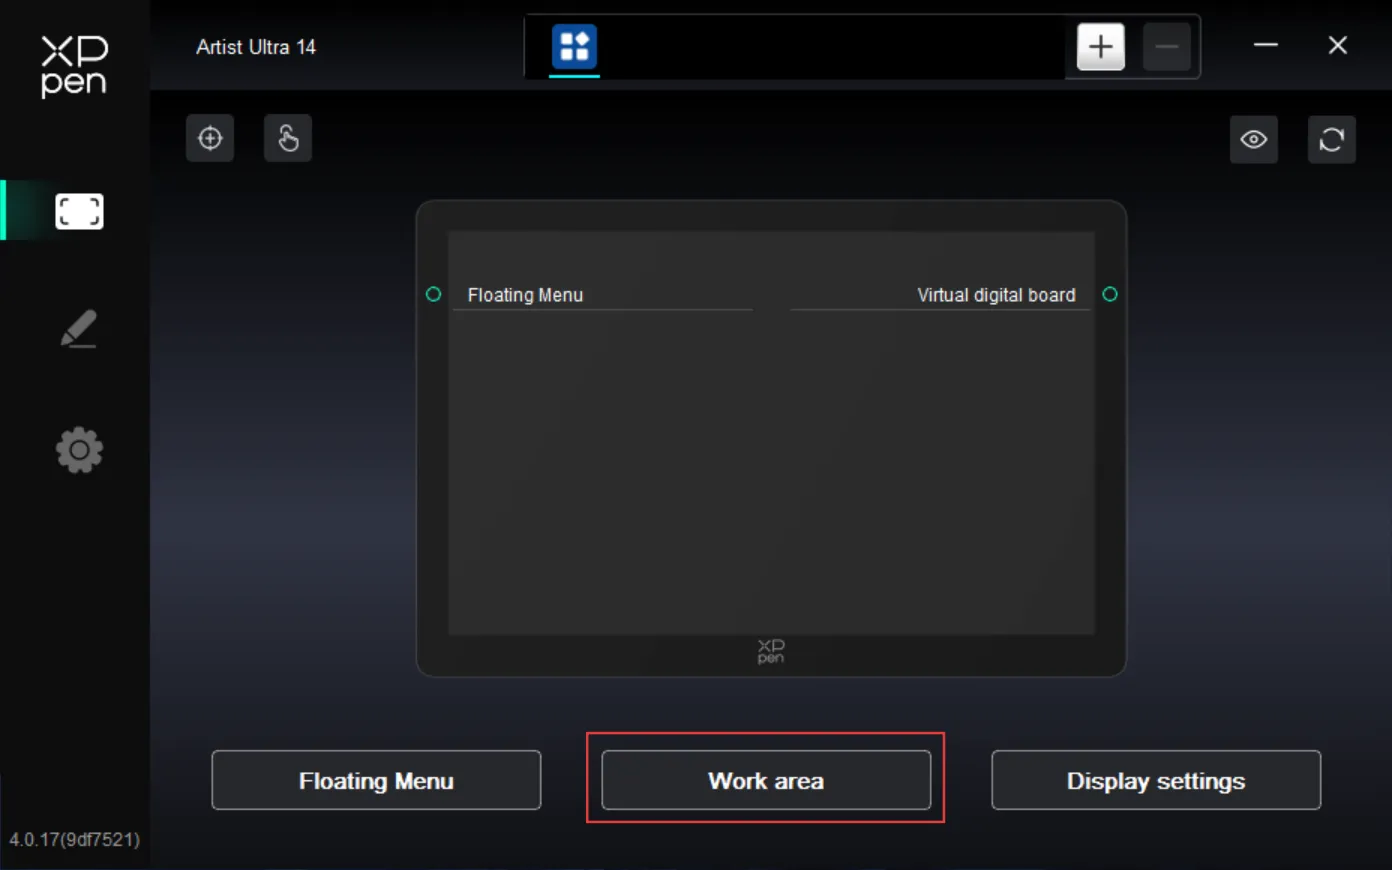
1.5. Work Area
Used to define the mapping relationship between the drawing display's work area and the screen's display area.
Screen
Used to define the mapping relationship between the current monitor's display area and the device.
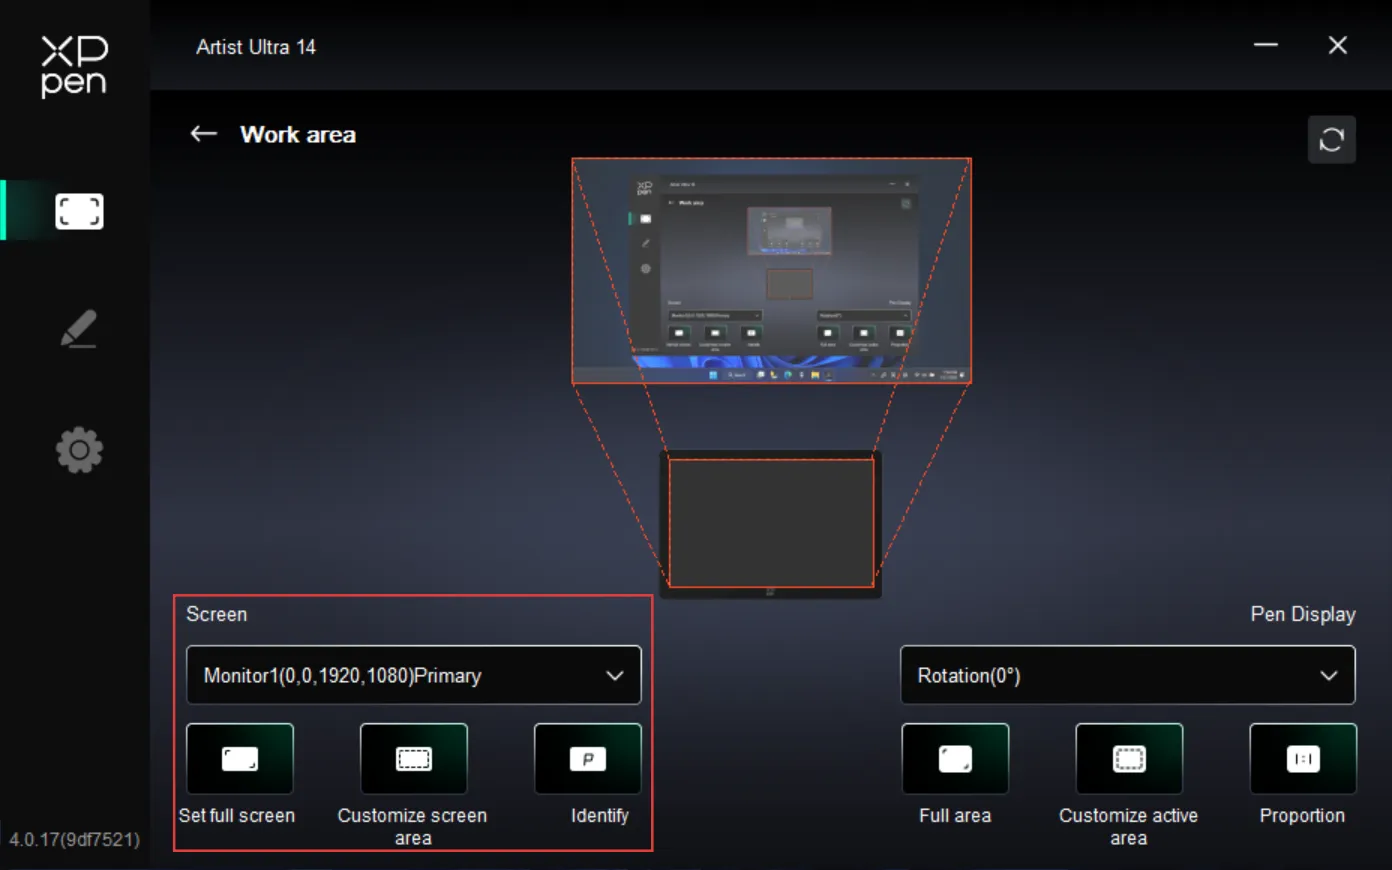
If you are using multiple monitors in Duplicate Mode, the drawing display's work area is mapped to all monitors. The cursor moves simultaneously on every monitor as the stylus moves within the work area.
If you are using multiple monitors in Extended Mode, in the Screen tab, select which monitor the drawing display's work area is mapped to.
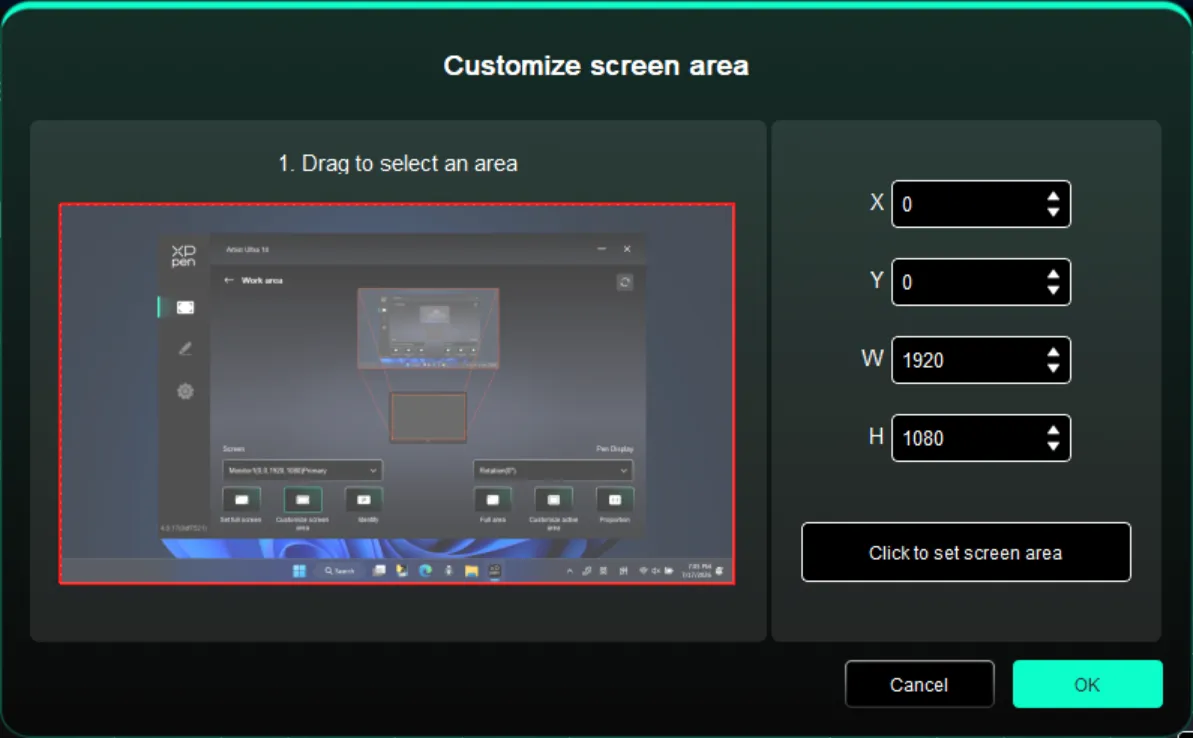
Set the monitor's mapping area:
- Full-Screen Area: The entire area of the monitor is selected;
- Custom Screen Area: Supports three configuration modes.
- Drag Mode: On the screen preview, drag the cursor from one point to another;
- Coordinate Mode: In the corresponding input fields next to X , Y , W , and H , enter coordinates;
- Click Mode: Click the Click to Select Screen Area button. Then, on the monitor screen, click the upper-left and lower-right corner positions to be selected;
- Screen Identification
Used to identify all connected monitors, with numeric identifiers shown in the lower left corner of each monitor screen.
Drawing Display
Used to set the work area of your current drawing display.
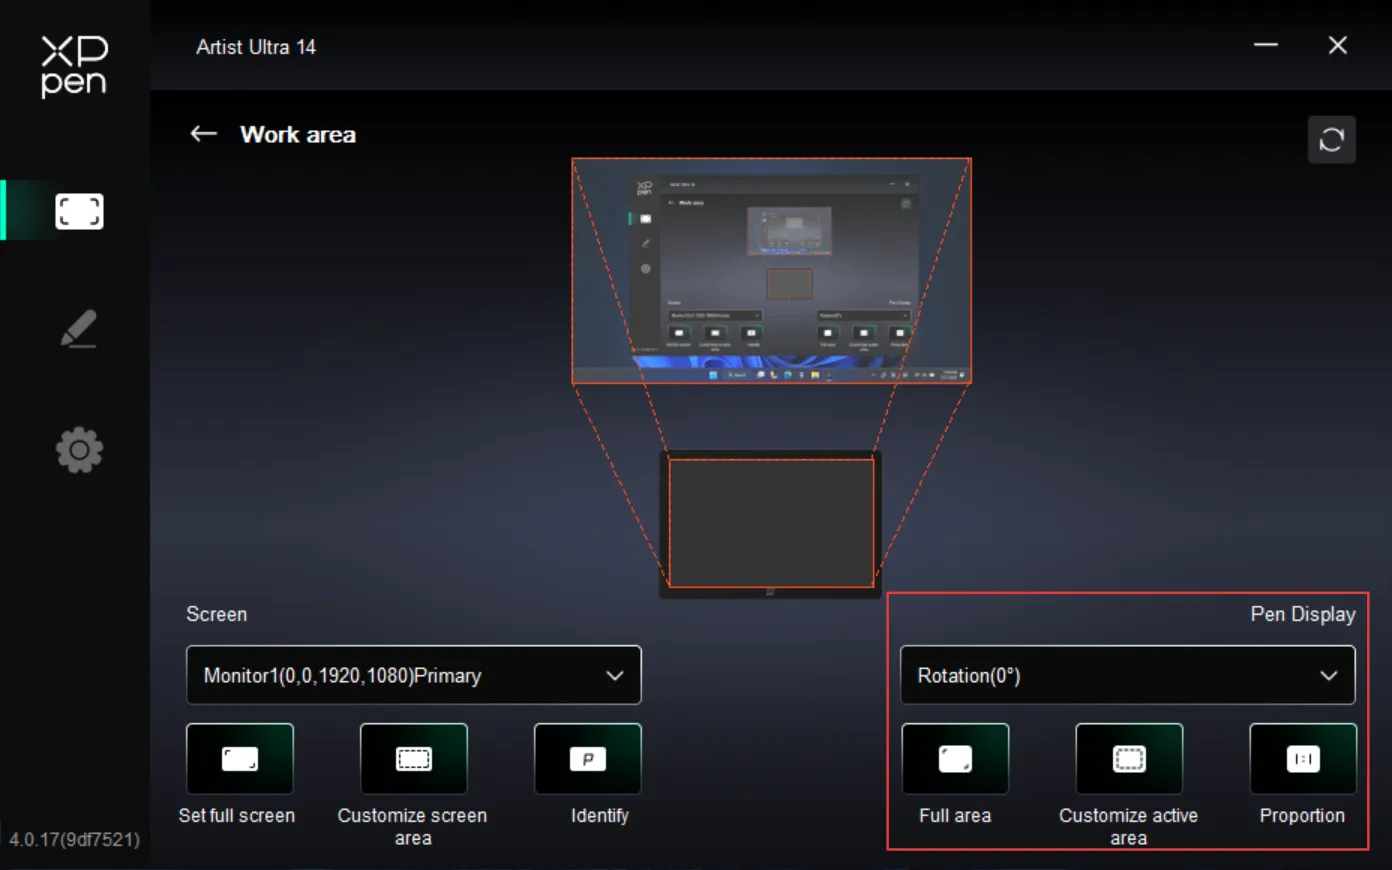
Set the drawing display's work area:
- Full-Tablet Area: The entire work area of the drawing display;
- Custom Tablet Area: Supports three configuration modes.
- Drag Mode: On the drawing display preview, drag the cursor from one point to another;
- Coordinate Mode: In the corresponding input fields next to X , Y , W , and H , enter coordinates;
- Click Mode: Click the Click to Select Tablet Area button. Then, on the drawing display's work area, use your stylus to tap the upper-left and lower-right corner positions to be selected;
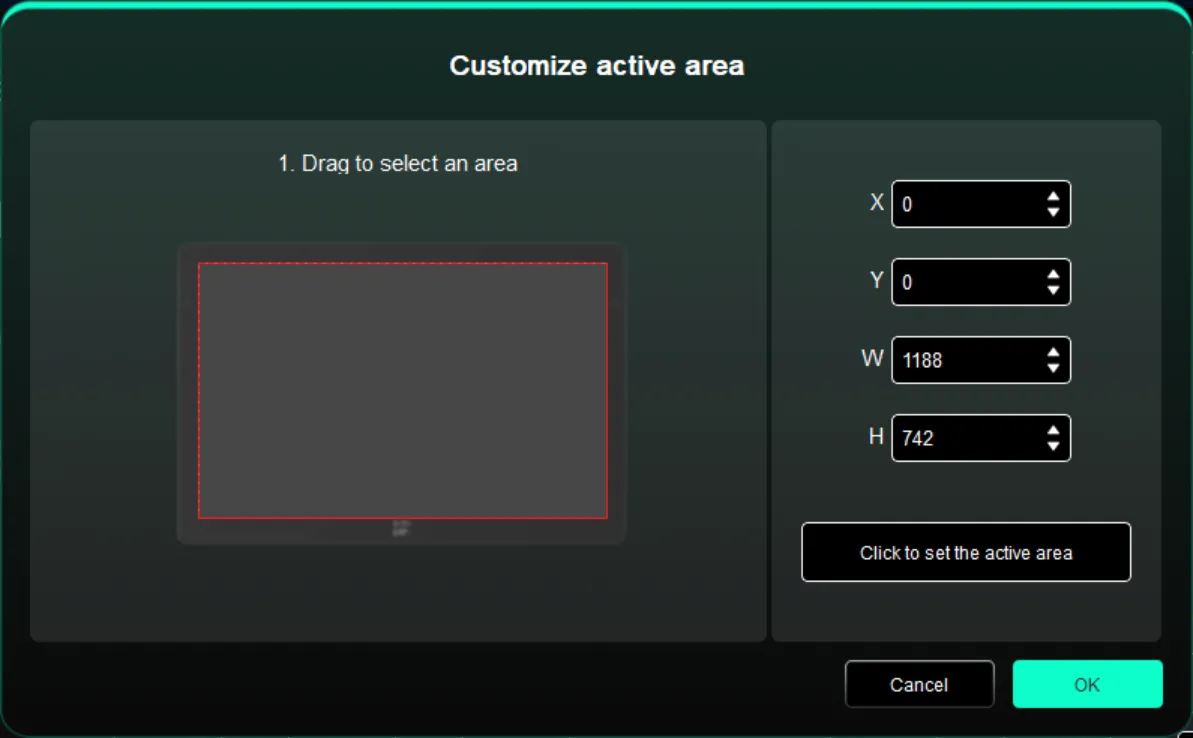
- Screen Ratio: Match the drawing display's work area proportionally to the entire display area of the selected monitor.
1.6. Display Settings
Used to configure color-related parameters for your current drawing display.
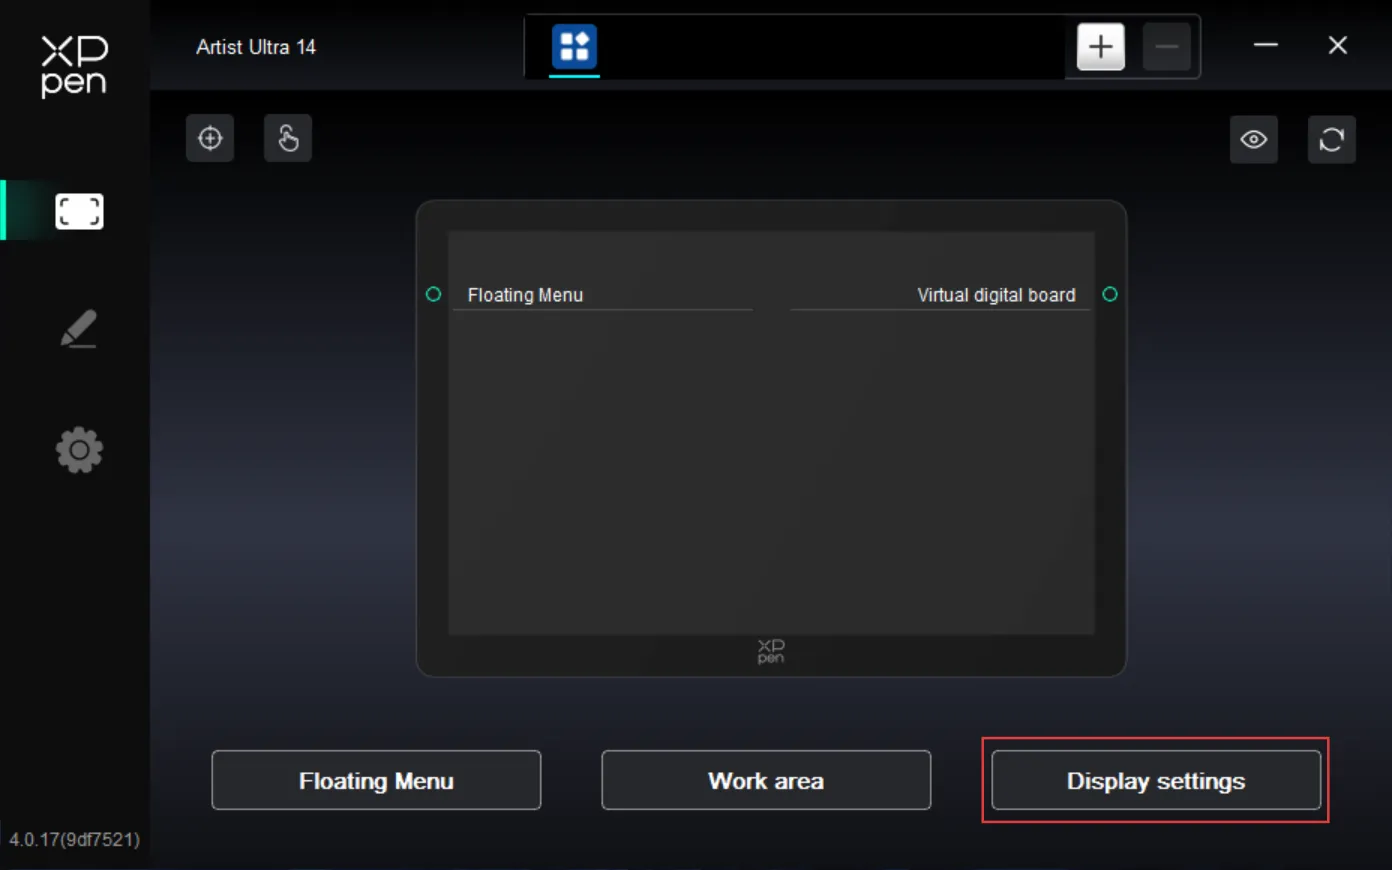
Brightnes sand Contrast: Drag the corresponding slider to adjust the device’s brightness and contrast.
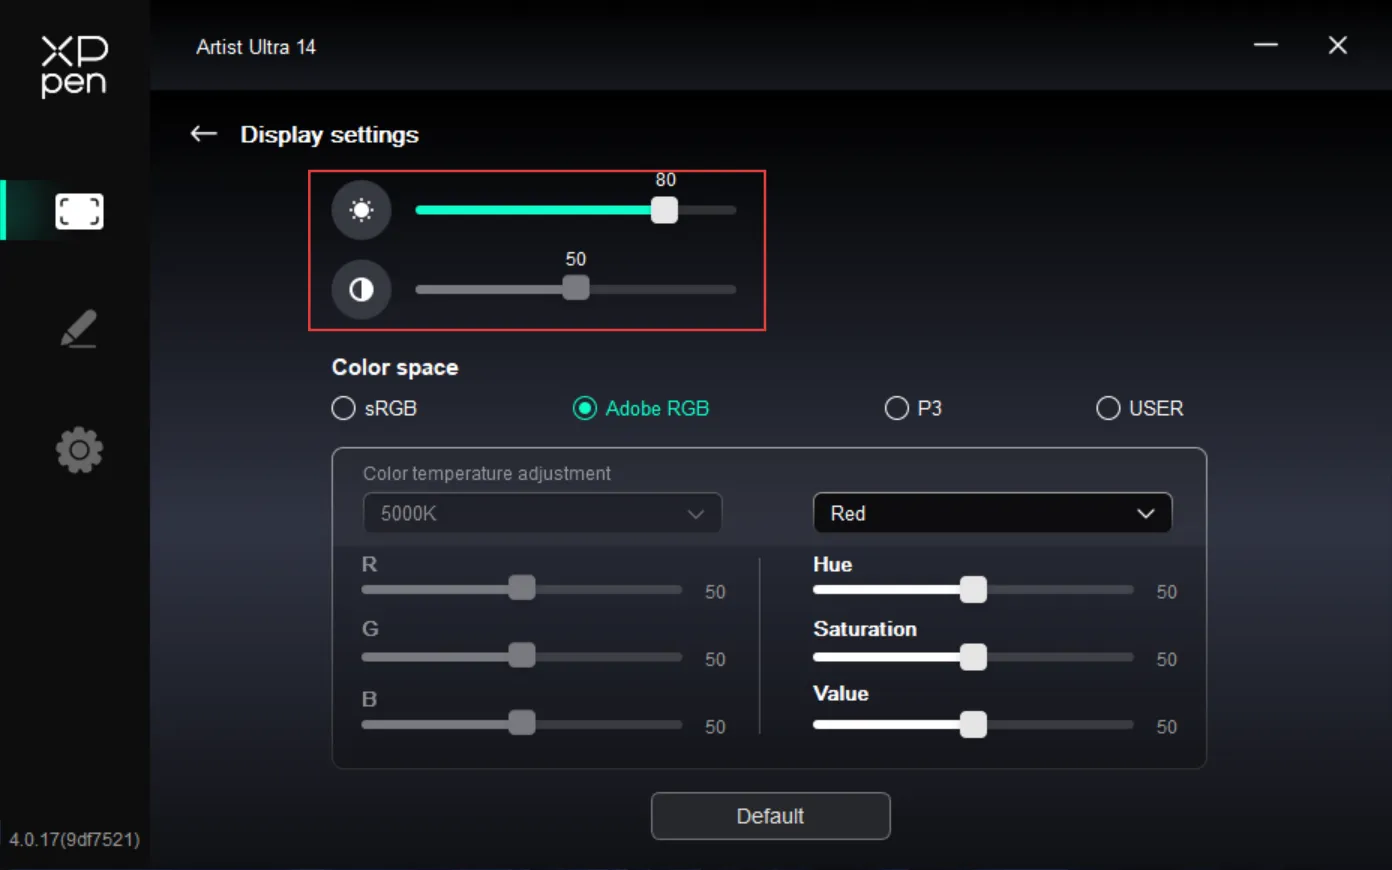
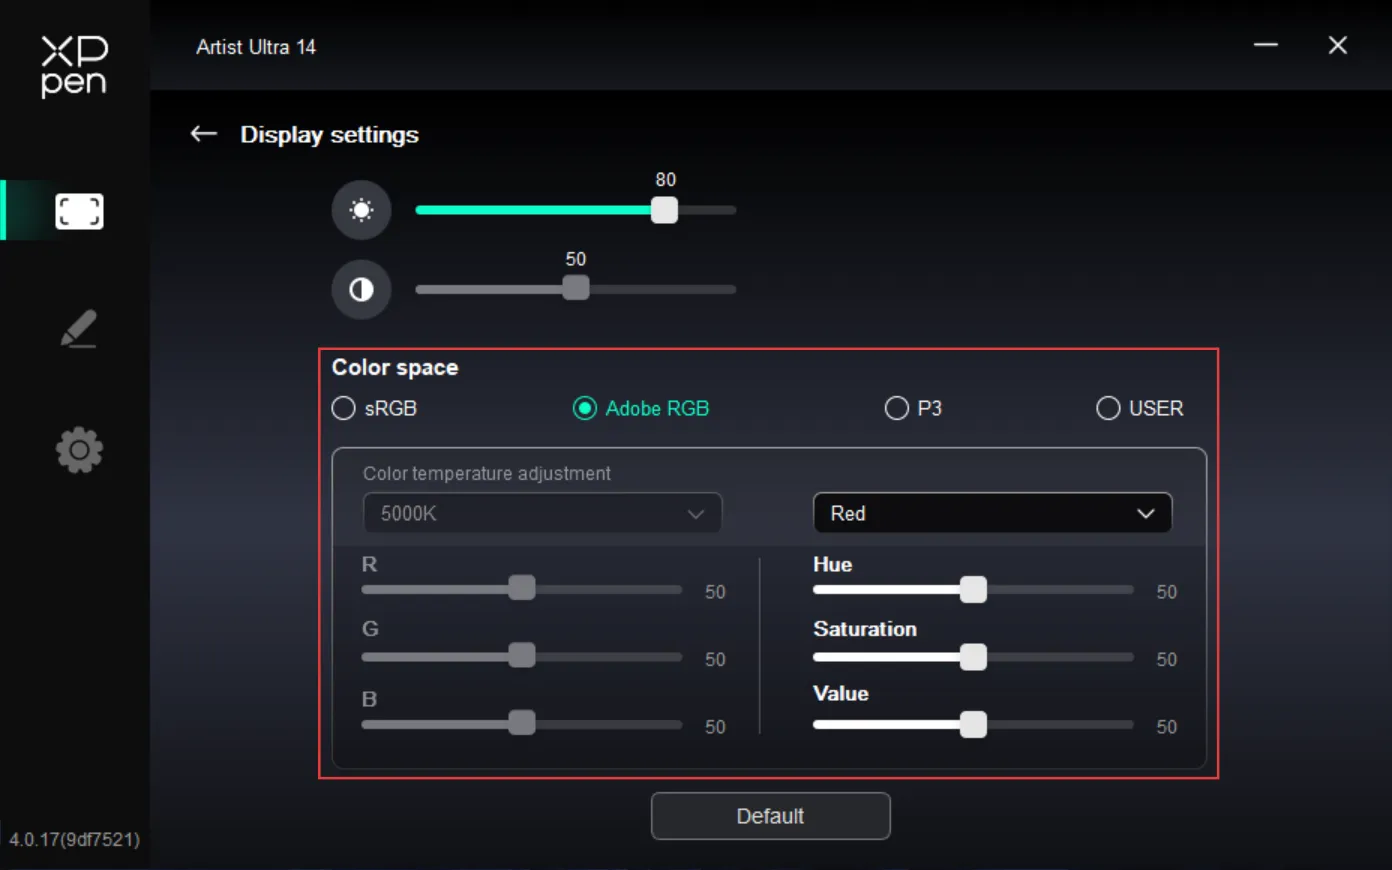
Color Space: This product includes three preset modes: sRGB, Adobe RGB, and P3. These modes have been gamut-limited and pre-calibrated, so no additional ICC clamping is required.
To manually configure ICC, in the Display Settings under the driver interface, select USER mode. Then configure the parameters in the native color mode.
In USER mode, you can adjust the color temperature (when USER mode is selected for color temperature, R/G/B values become editable) to customize the color space.
Supports Hue, Saturation and Value adjustments, giving you full control over the direction and intensity of colors. Independent adjustments for red, green, yellow, cyan, blue, and magenta are also supported.
2.Stylus Settings
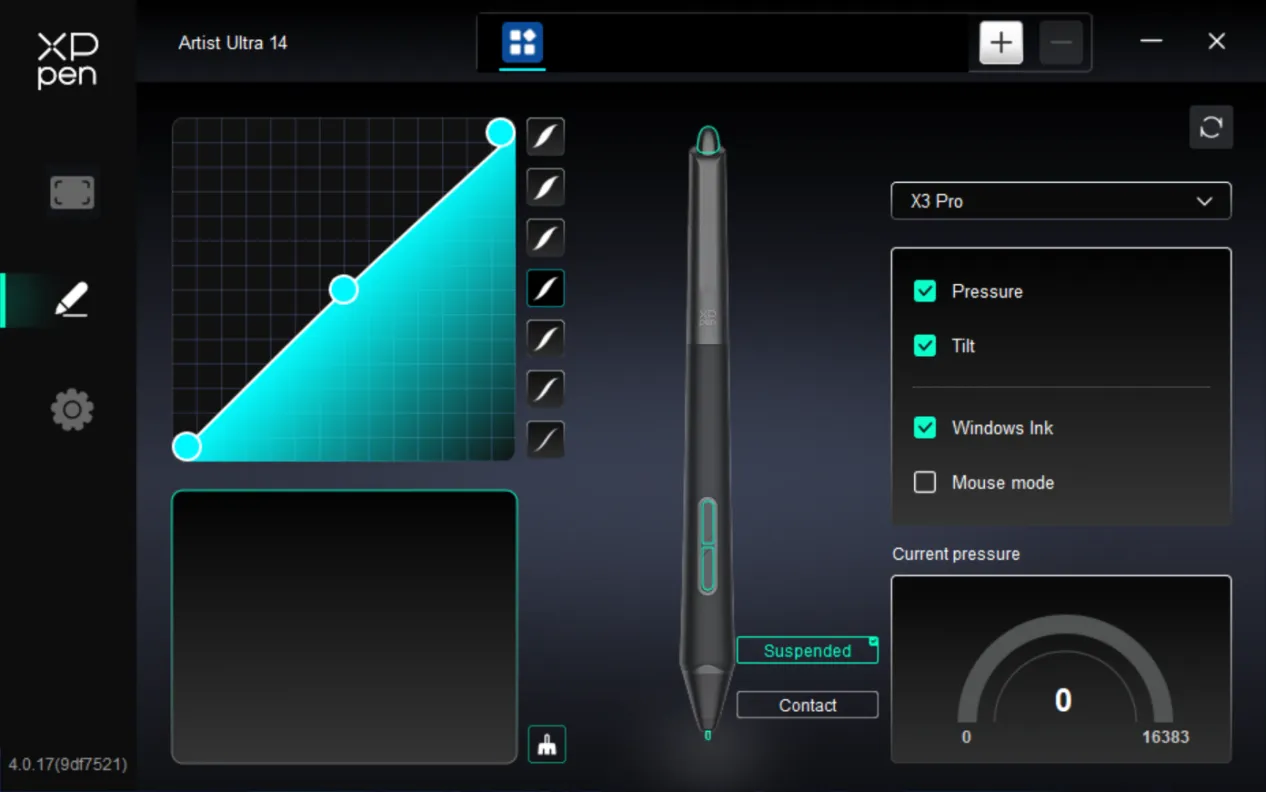
When the stylus is within the work area, the drawing display automatically identifies different stylus models and adds them to the driver. Please note that only compatible styluses are supported. On the right side, click the stylus name drop-down menu to select and configure the corresponding stylus. When you use the corresponding stylus, the driver automatically switches to the selected stylus's custom settings.
2.1. Stylus Keys
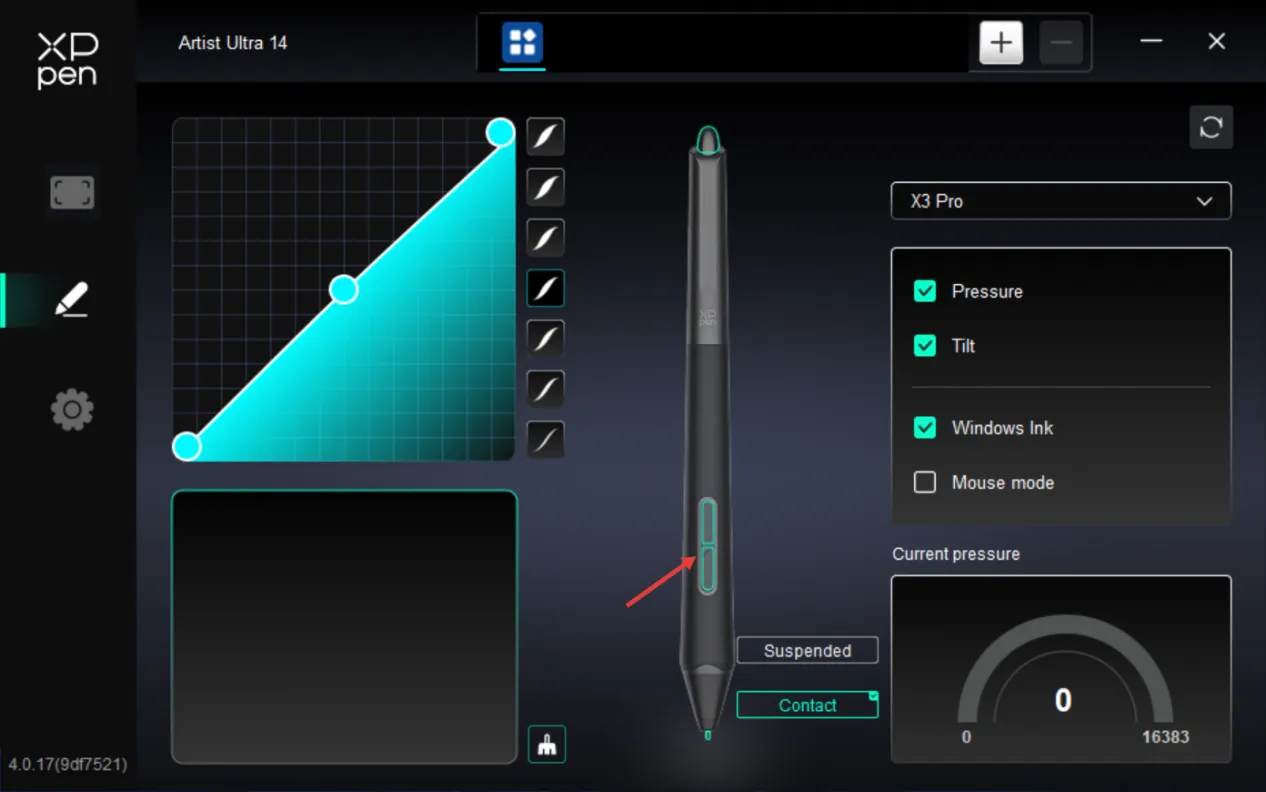
On the diagram, click the stylus key to customize its function.
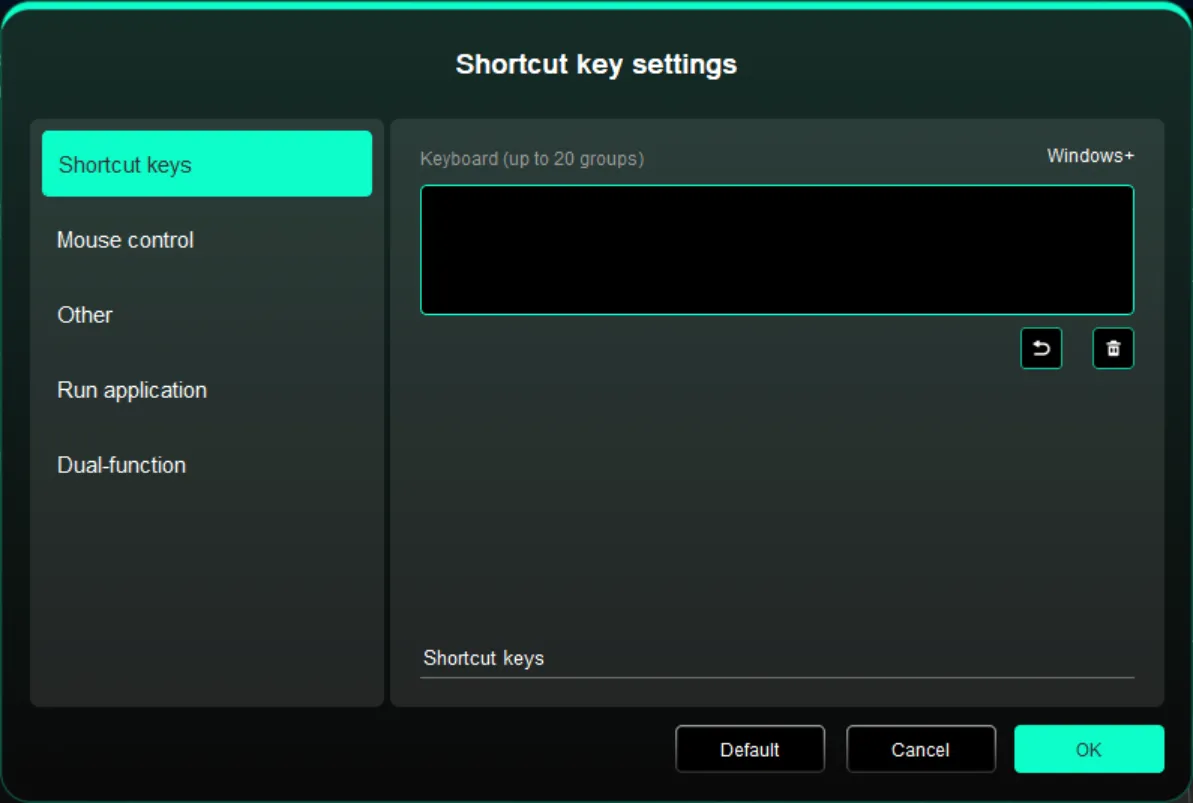
Shortcut Keys:
Configure shortcut keys. For example, in 3D MAX software, set to Alt + A to activate the Align tool.
Shortcut keys can be configured in multiple groups. For example, type Ctrl + C and Ctrl + V . When you press the corresponding shortcut keys, all assigned functions within the group execute sequentially.
Windows (Command): Add system key combinations. For example, to type Win (Cmd) + Shift + 3 , press Shift + 3 . Then the driver automatically includes the system key.
Custom Name: At the bottom of the driver interface, use the Custom Name to assign a display name for your current configuration.
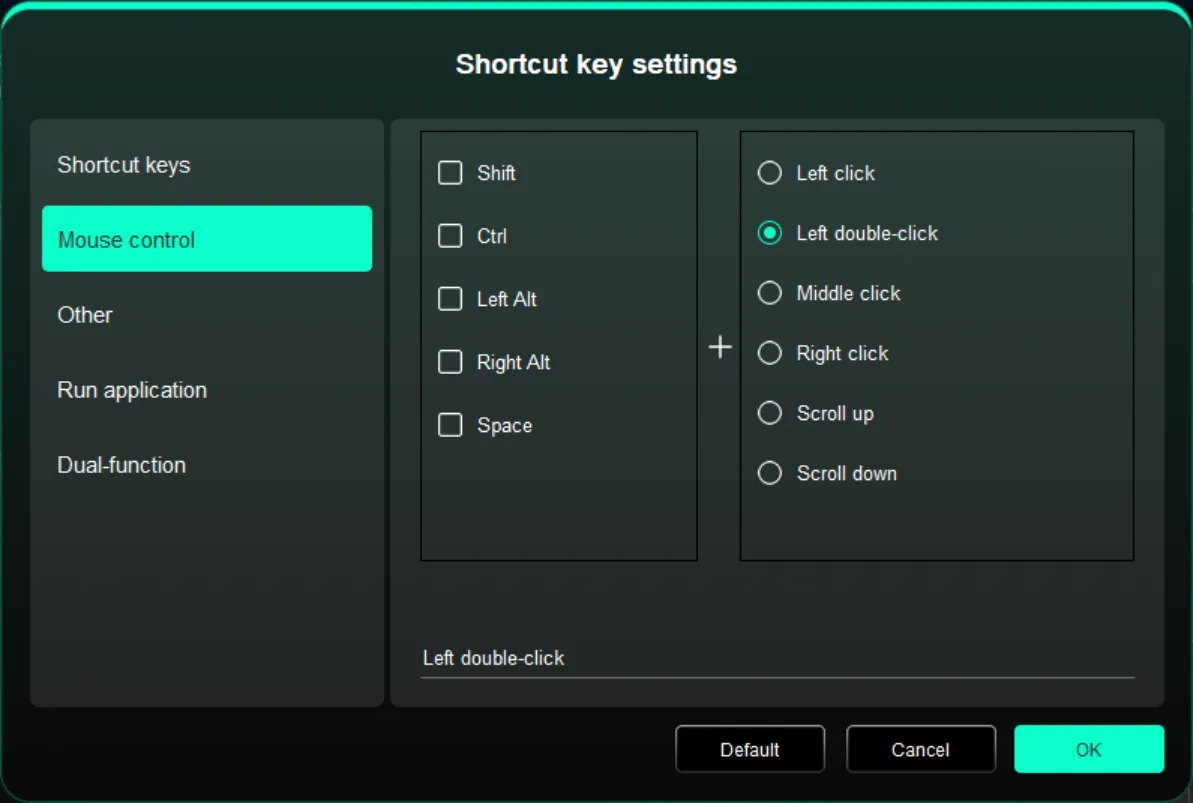
Mouse Control:
Set mouse and keyboard combinations. For example, selecting Shift + Click enables this shortcut in supported applications.
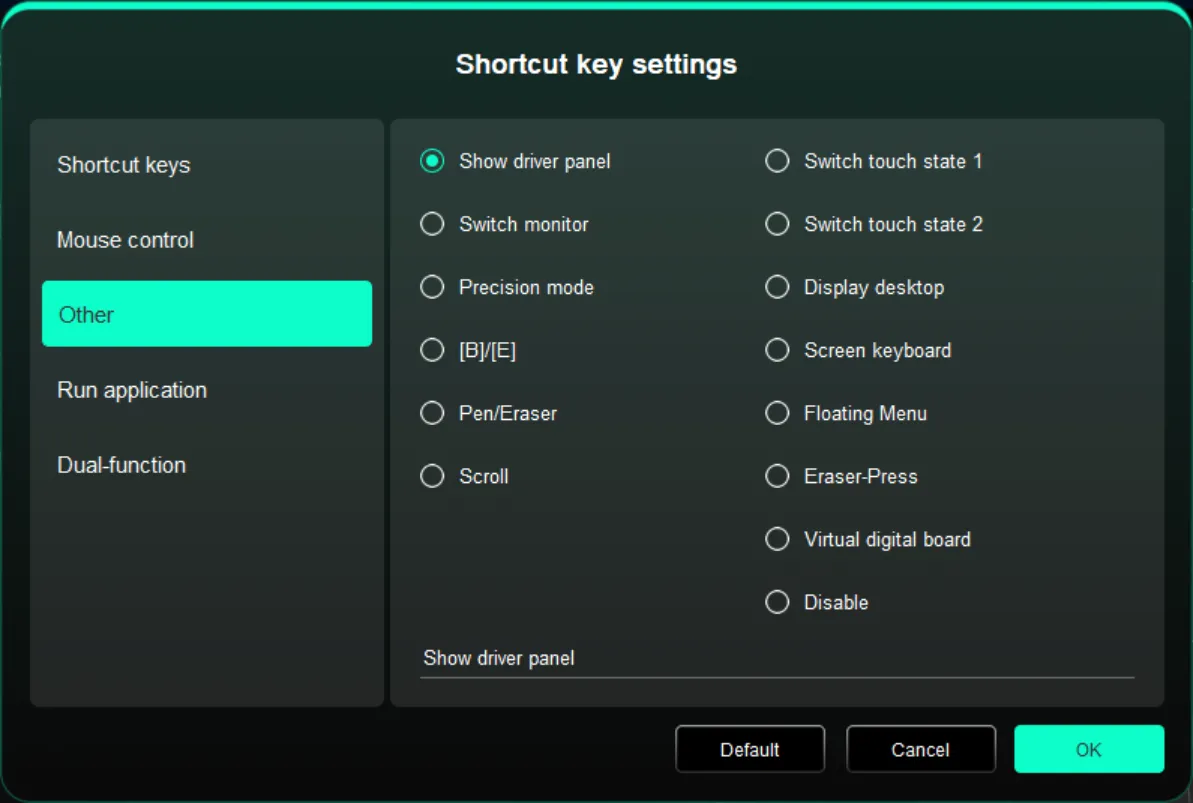
Others:
Show Driver Panel: Used to quickly access the driver settings panel
Switch Monitors: Used to map the cursor to alternate monitors when multiple monitors are connected
Precision Mode: Used to limit the active display area to a certain range, enabling detailed drawing within the limited area
[B]/[E]: Used to switch repeatedly between B and E keys
Pen/Eraser: Used to switch repeatedly between Pen and Eraser modes
Scroll: Press and hold the assigned key, and move the stylus to scroll.
Switch to Touch Mode 1: Used to switch repeatedly between Default and Basic touch modes
Switch to Touch Mode 2: Used to switch repeatedly between Default and Custom touch modes
Show Desktop: Used to display the system desktop
On-Display Keyboard: Used to activate the system keyboard
Floating Menu: Used to activate the floating menu
Eraser -Press: Press and hold this key to invoke the eraser function; release it to revert to the original function.
Virtual tablet mode: Activate Virtual tablet mode
No Action: Performs no function
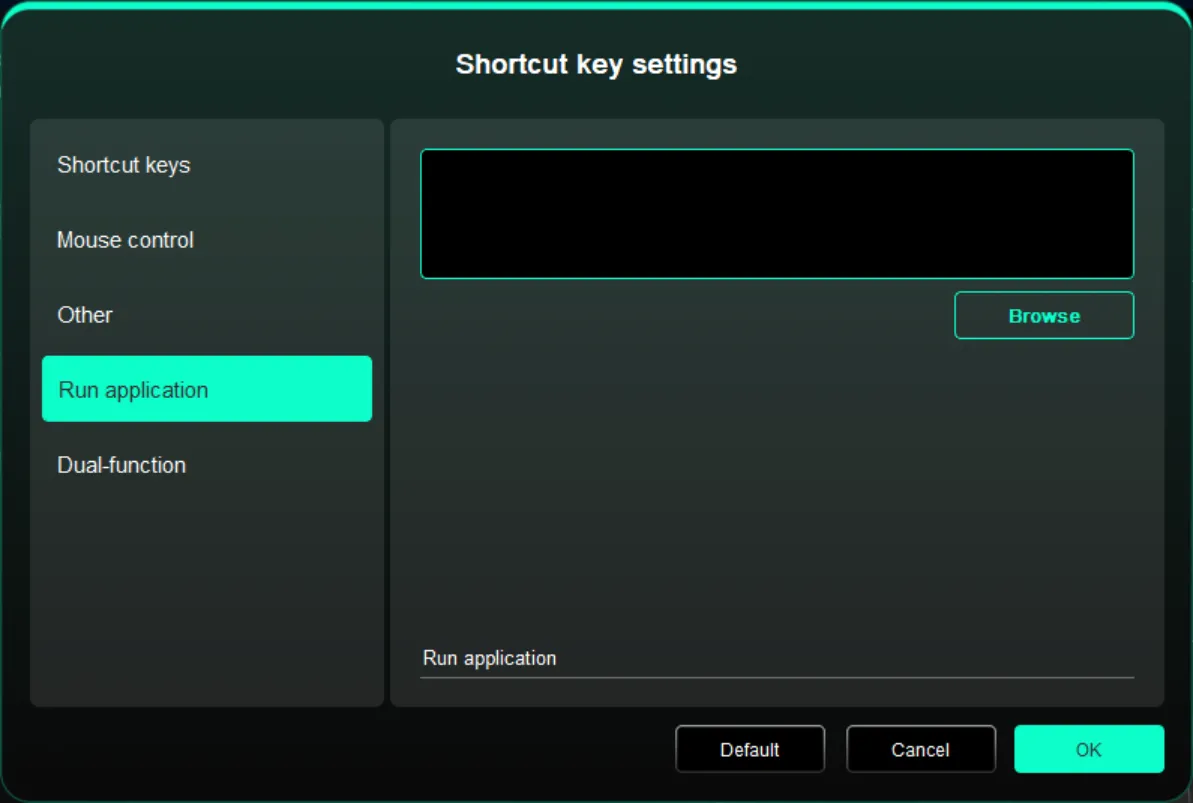
Execute Application:
Use shortcut keys to quickly launch the corresponding applications
Dual-function:
Pressing a single shortcut key allows switching between two functions (e.g., B/E). Both the left and right sides are each a single group (which can be a combined key). Custom input is available via the keyboard, supporting the Win key, Cmd key, and their combined keys.
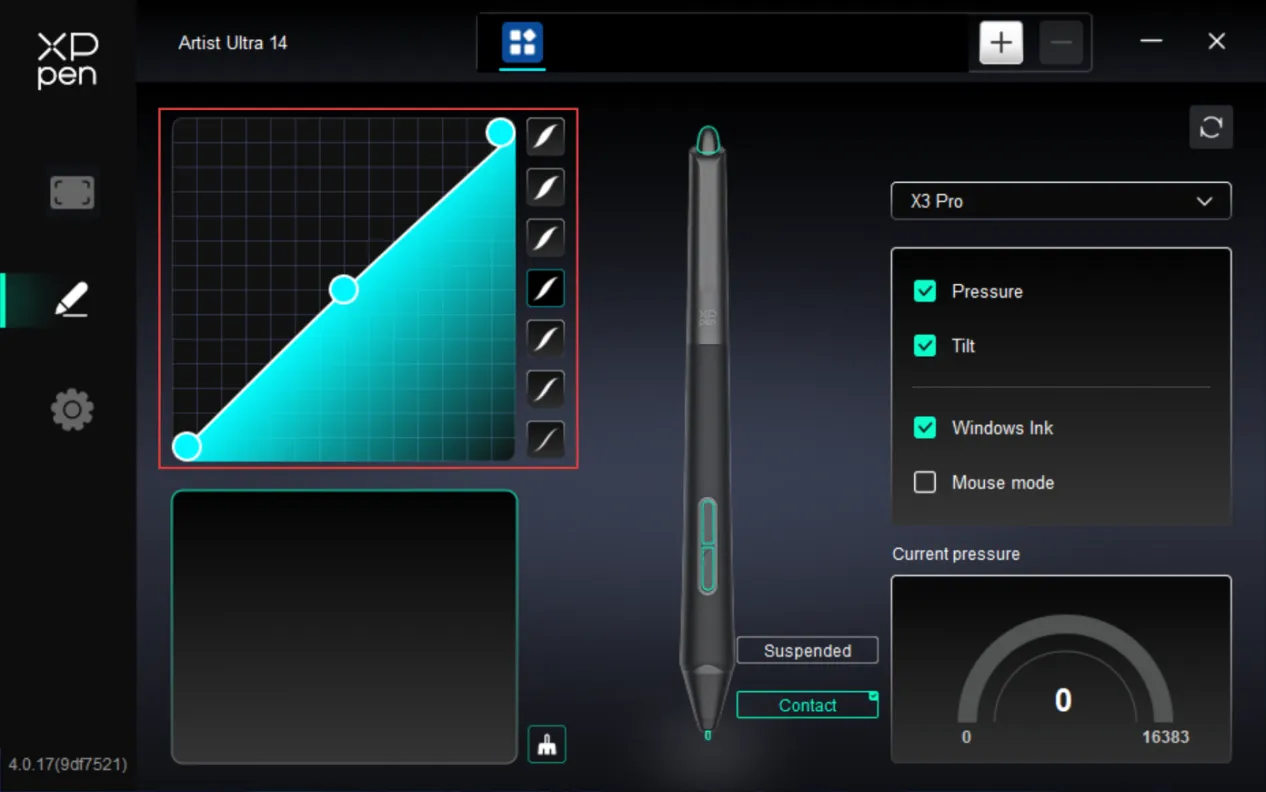
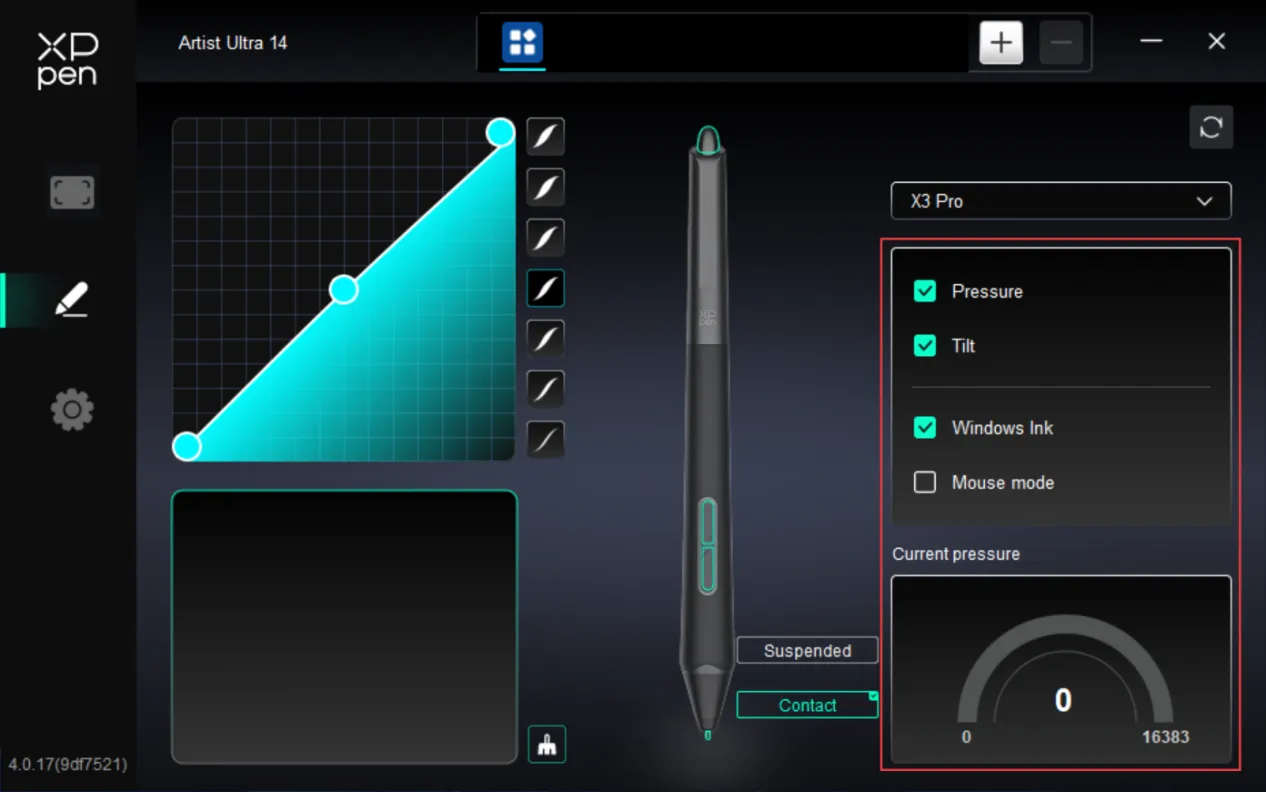
2.2. Pressure Sensitivity
Used to adjust the Pressure Sensitivity curve or select preset pressure sensitivity options.
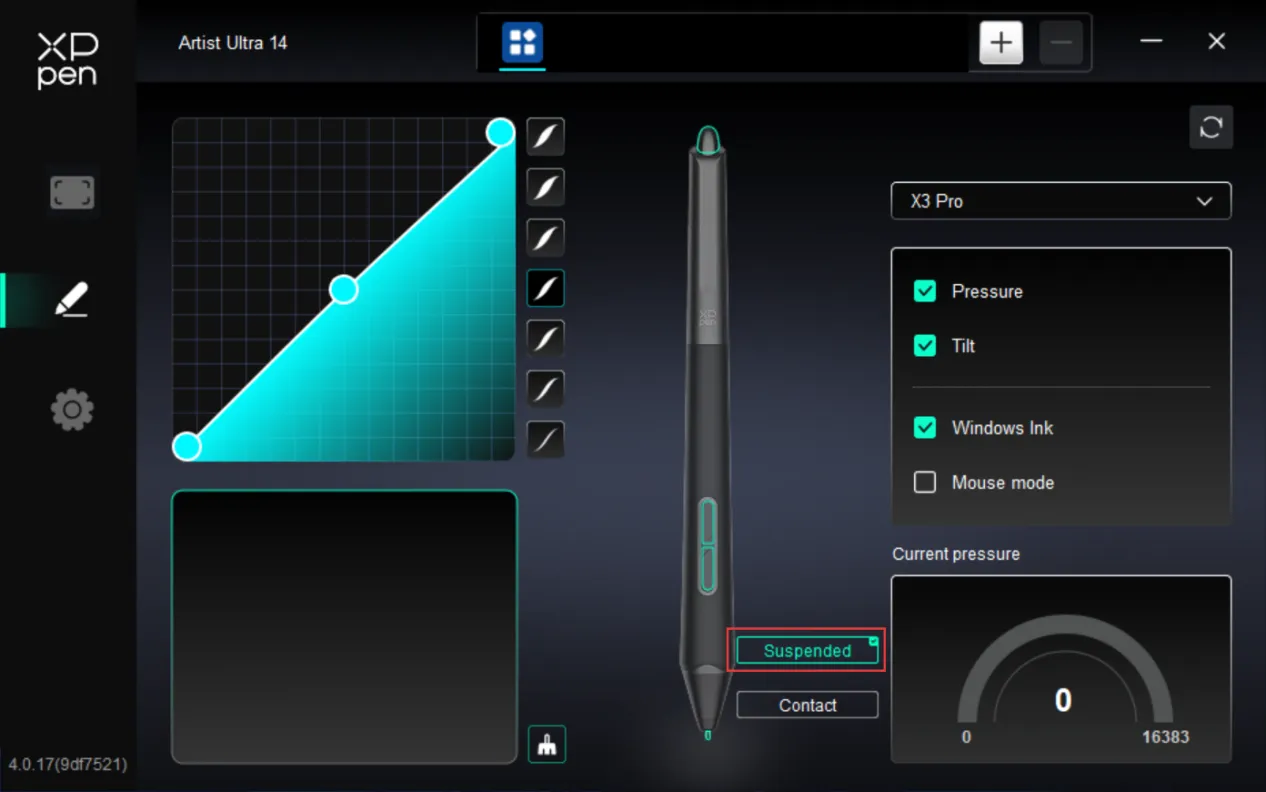
Suspended
The stylus tip does not need to touch the drawing display; pressing the button while hovering invokes the corresponding function.
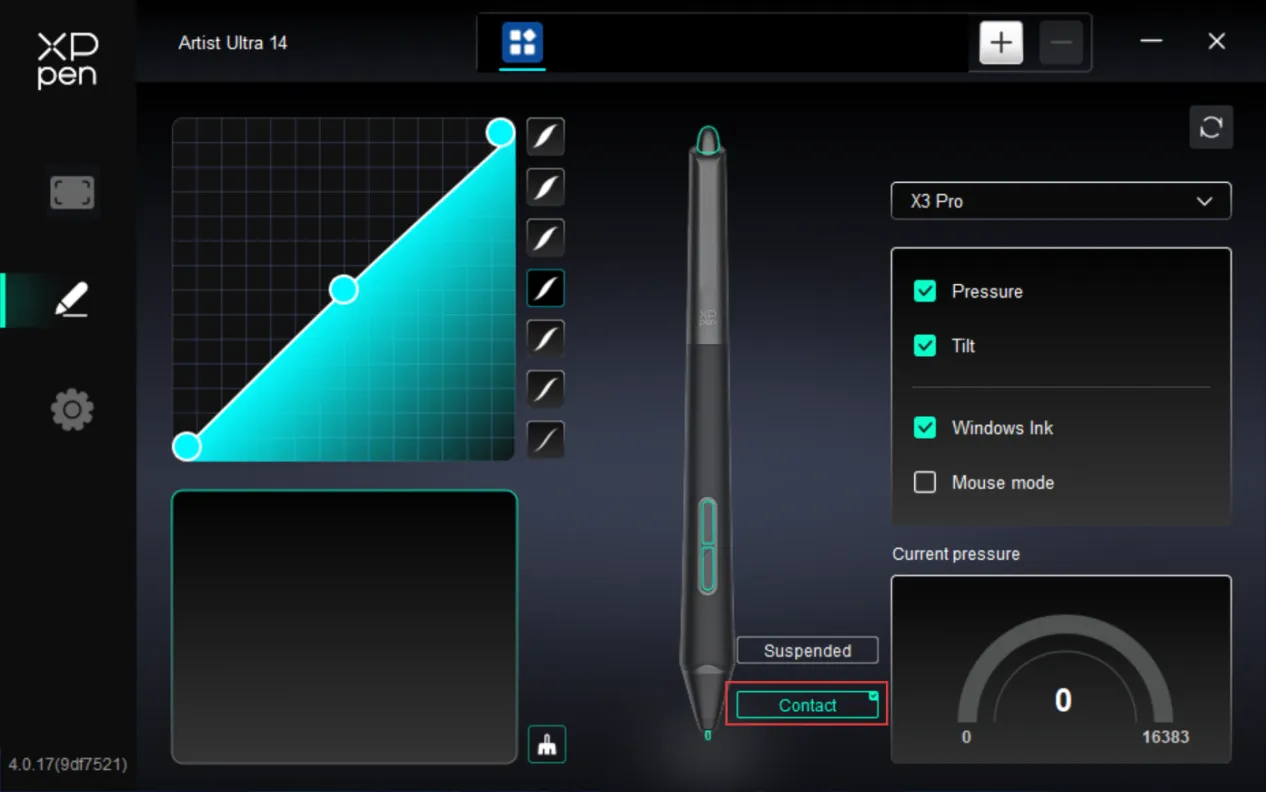
Contact Click
The stylus tip must touch the drawing display for the button press to take effect, preventing accidental activation while hovering.
Pressure Sensitivity:
When disabled, the stylus does not respond to pressure sensitivity.
Tilt:
When disabled, the stylus's tilt feature is not activated.
Windows Ink (for Windows only):
Windows supports stylus input. To use handwriting features in Microsoft Office/Whiteboard and other software, do not disable this option.
Mouse Mode:
When you lift the stylus, the cursor remains at its last position, behaving like a mouse. When the mode is enabled, you can adjust the cursor speed as you move on the device; when the mode is disabled, it defaults to stylus mode.
Current Pressure Sensitivity:
Used to test the pressure sensitivity of your current stylus input.
2.3. Application
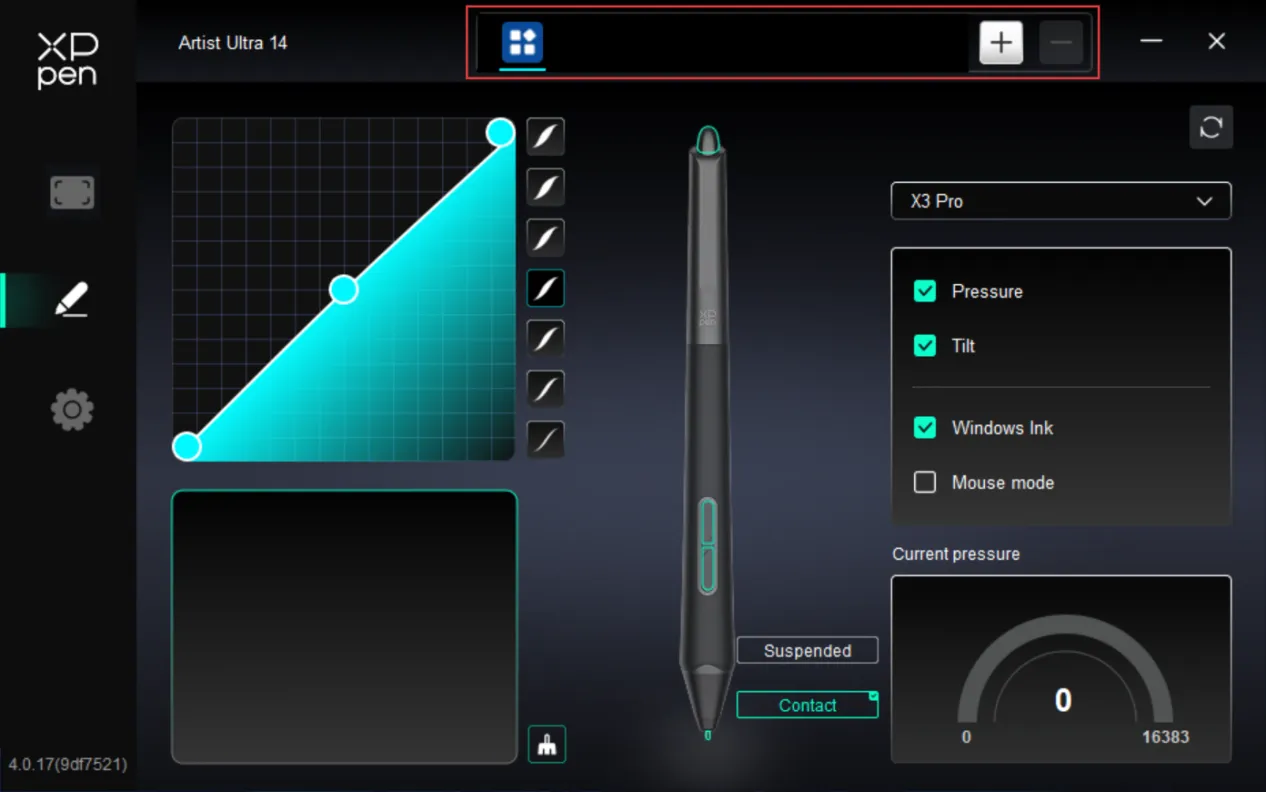
After adding an application to the application list and selecting it, you can customize the key function of your stylus for the selected application.
For example, if you select an application and modify its settings, the modification only applies when you use this application. The driver can automatically detect the switching between different applications. Up to 7 applications can be added.
To add an application, please follow the steps below:
- In the upper right corner of the application bar, click the + icon to open the Application Selection page;
- Select the application to be added from the open application list. Or click Browse to select from the installed applications;
- Click OK to add the selected application to the application bar;
- To remove an added application, select it and click the - icon behind the application bar;
- For all other applications, these settings apply to non-customized applications by default.
3.Driver Settings
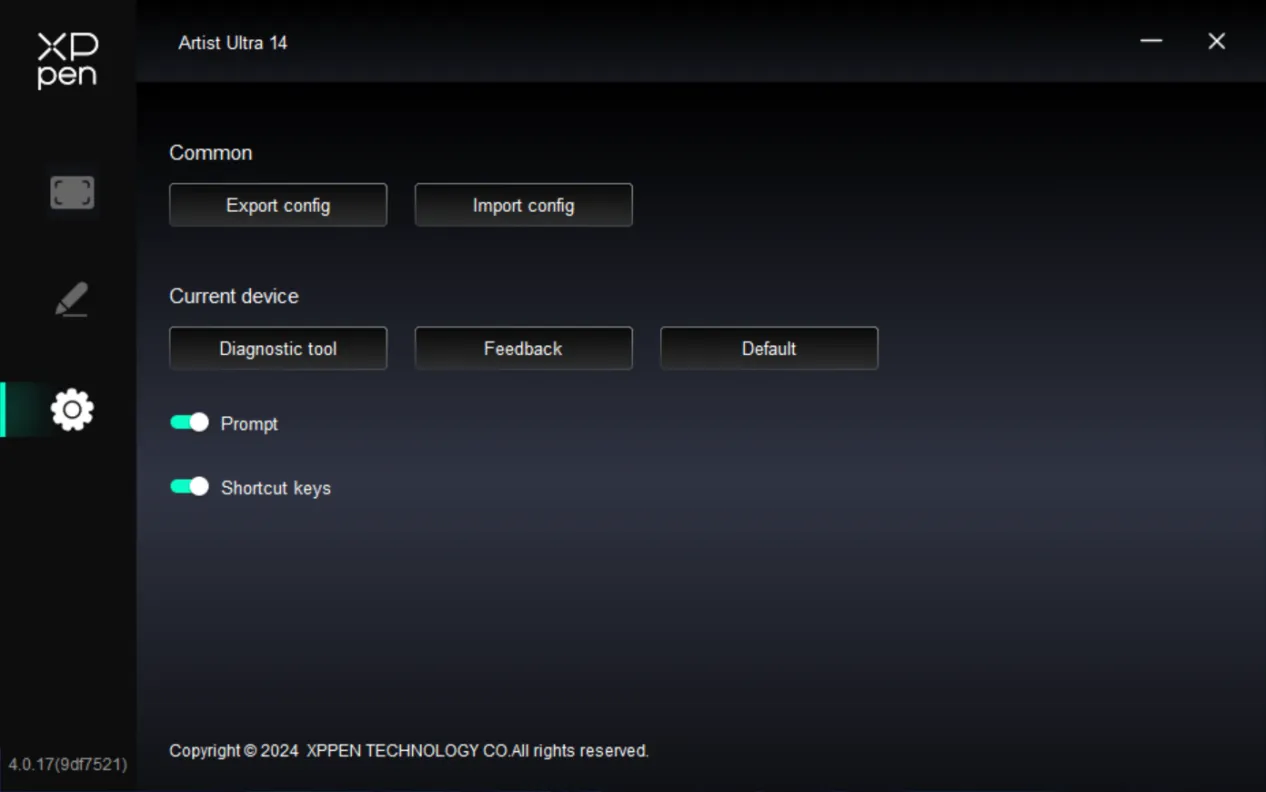
Import & Export Profiles:
Import and export profiles to save or load your customized settings.
This feature is only supported on the same operating system.
Diagnostic Tool:
If problems arise while using the driver, the diagnostic tool can be used to collect hardware and environment data to help determine the root cause. This data may also be provided to customer service or technical support for reference at a later stage.
The product serial number is available for viewing on this page.
Feedback:
If you encounter any issues or have suggestions while using the driver, please provide feedback through this page.
Reset:
Reset all settings (shortcuts, work area, display settings, etc.) to defaults.
Prompt Information:
When disabled, key press prompts do not appear at the bottom of the display.
Shortcut Key:
When disabled, all device key functions are not activated.
4.Wireless Shortcut Remote
4.1. Application
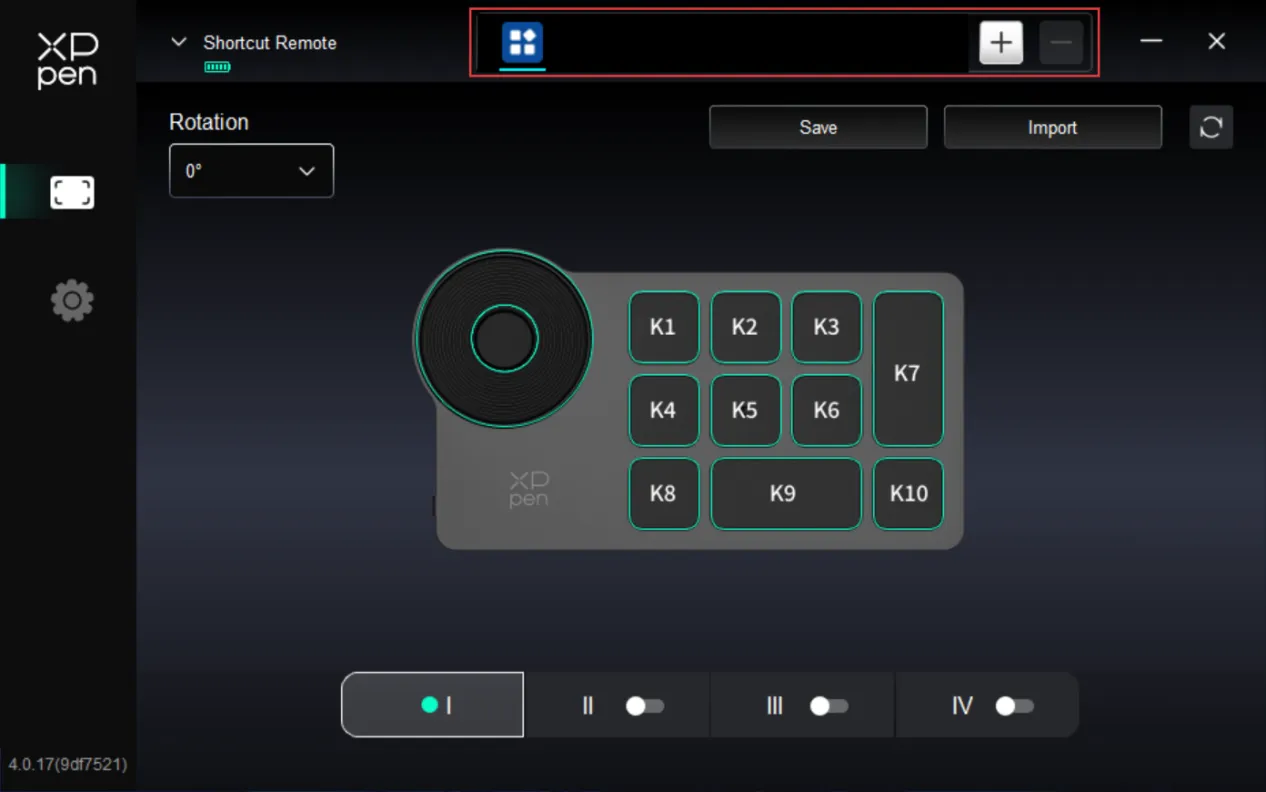
After adding an application to the application list and selecting it, you can customize the key function of your stylus for the selected application.
For example, if you select an application and modify its settings, the modification only applies when you use this application. The driver can automatically detect the switching between different applications. Up to 7 applications can be added.
To add an application, please follow the steps below:
- In the upper right corner of the application bar, click the + icon to open the Application Selection page;
- Select the application to be added from the open application list. Or click Browse to select from the installed applications;
- Click OK to add the selected application to the application bar;
- To remove an added application, select it and click the - icon behind the application bar;
- For all other applications, these settings apply to non-customized applications by default.
4.2. Scroller
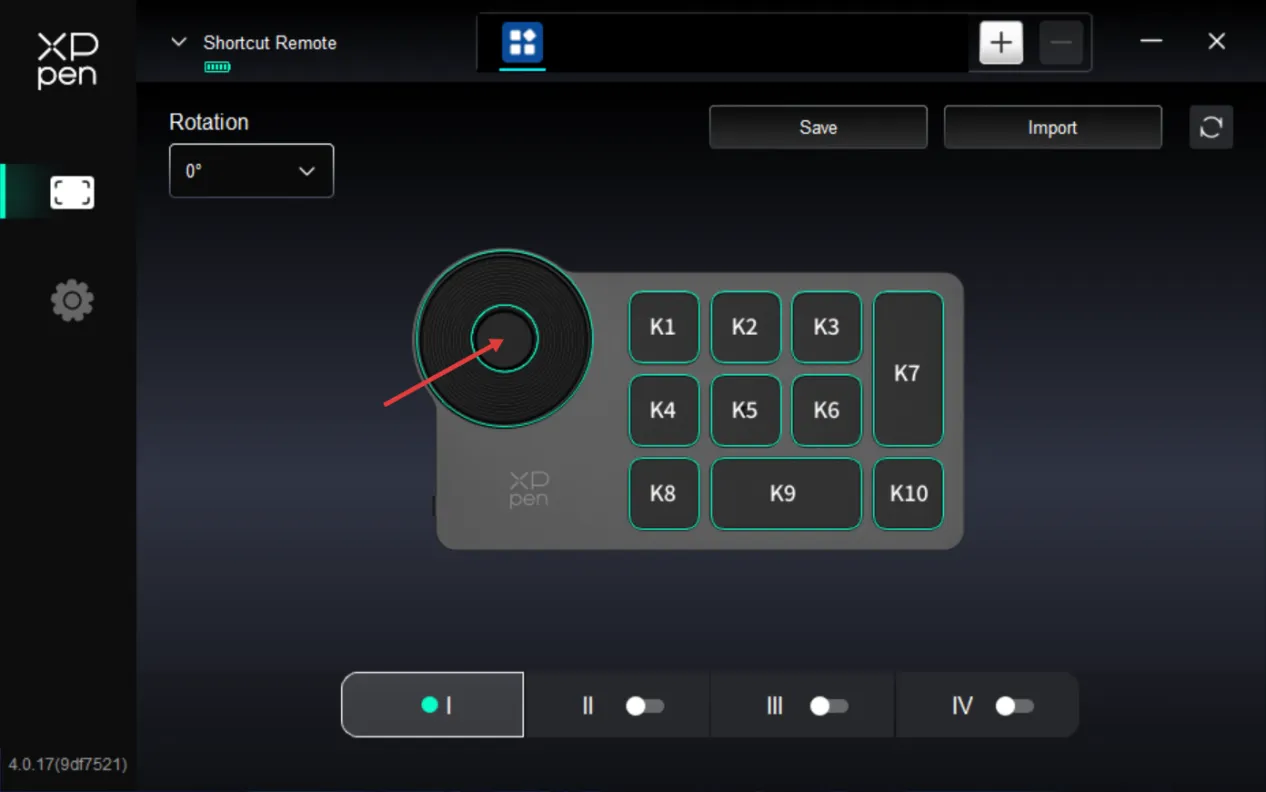
Press the middle scroller key to switch between the scroller's functional groups. The driver supports Zoom (default), Scroll, Brush, and Rotate scroller modes.
Custom:
On the diagram, click the scroller. Select Custom from the preset function drop-down menu. Then enter your desired key/combination to assign clockwise and counterclockwise scroller functions.
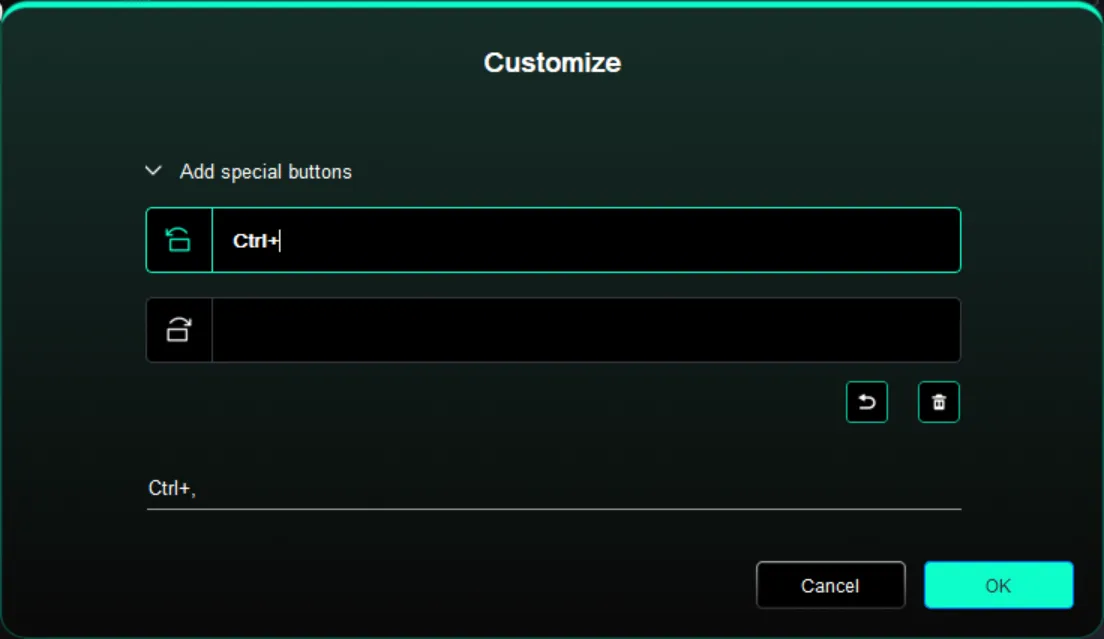
4.3. Shortcut Keys
The driver provides four groups of shortcut keys. Group 1 is enabled by default (cannot be disabled). The initial functions of other inactive groups are the same as those of Group 1. Each key group can be customized with unique functions. Once the group is enabled, use Key Group Toggle ( K1 key by default, customizable) to switch between active groups.
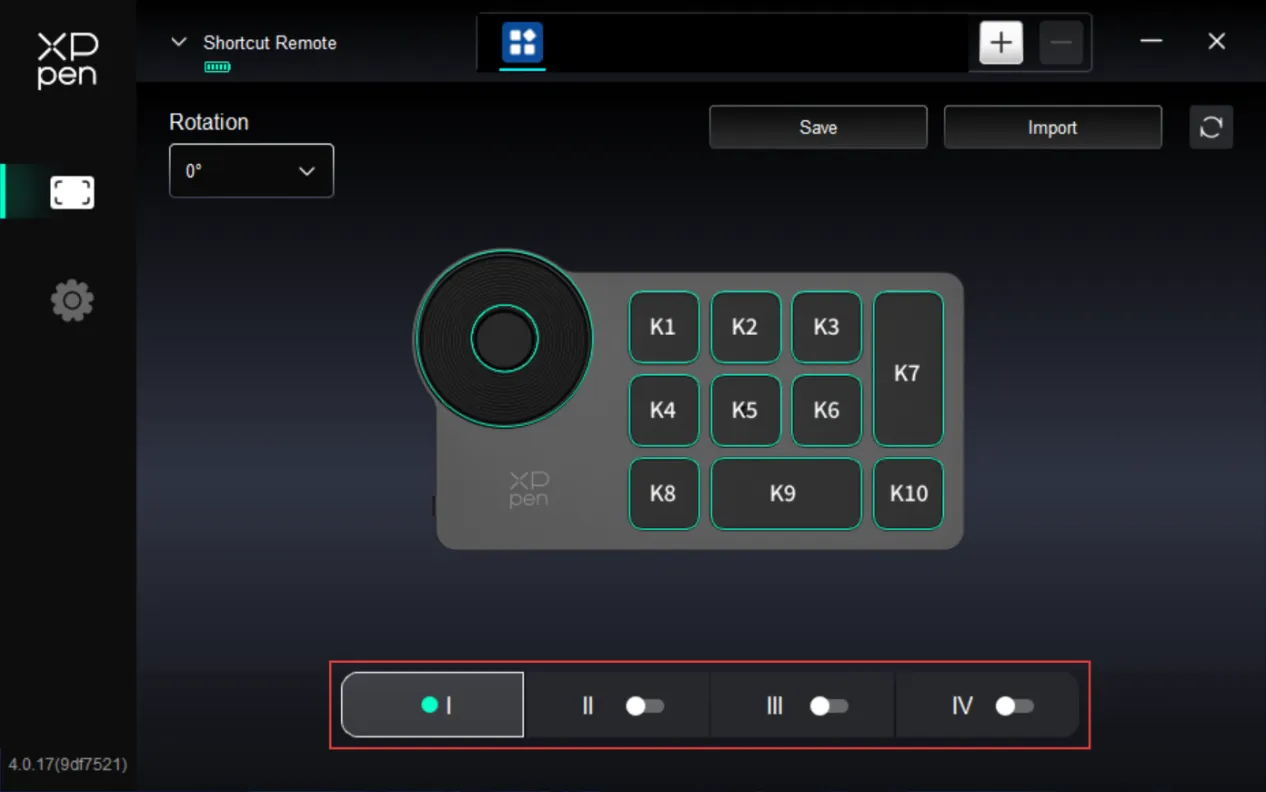
Custom:
On the device diagram, click the corresponding key to customize its function. For the setting method, please refer to the Stylus Keys.
Settings Preview
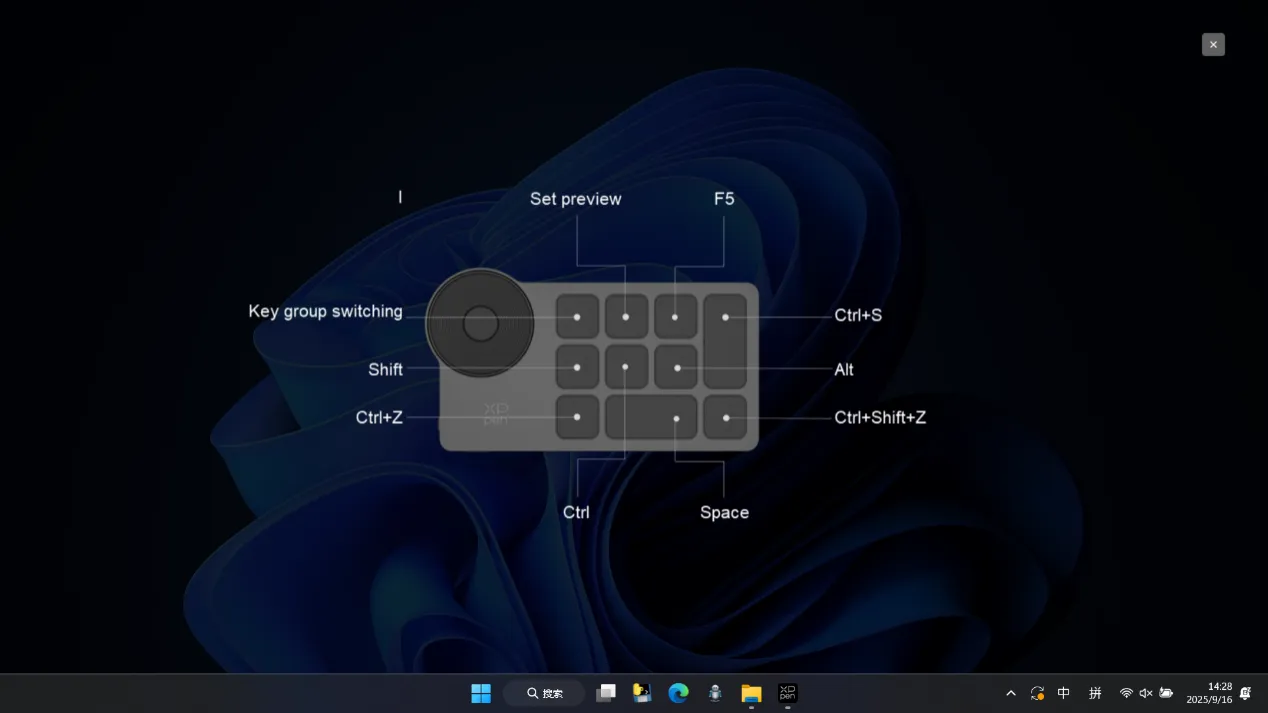
Used to display the functions of the active key group. If you select an inactive group in the driver, it defaults to Group Ⅰ's key assignments. In the upper right corner, click the close icon to close the preview window.
4.4. Import/Save
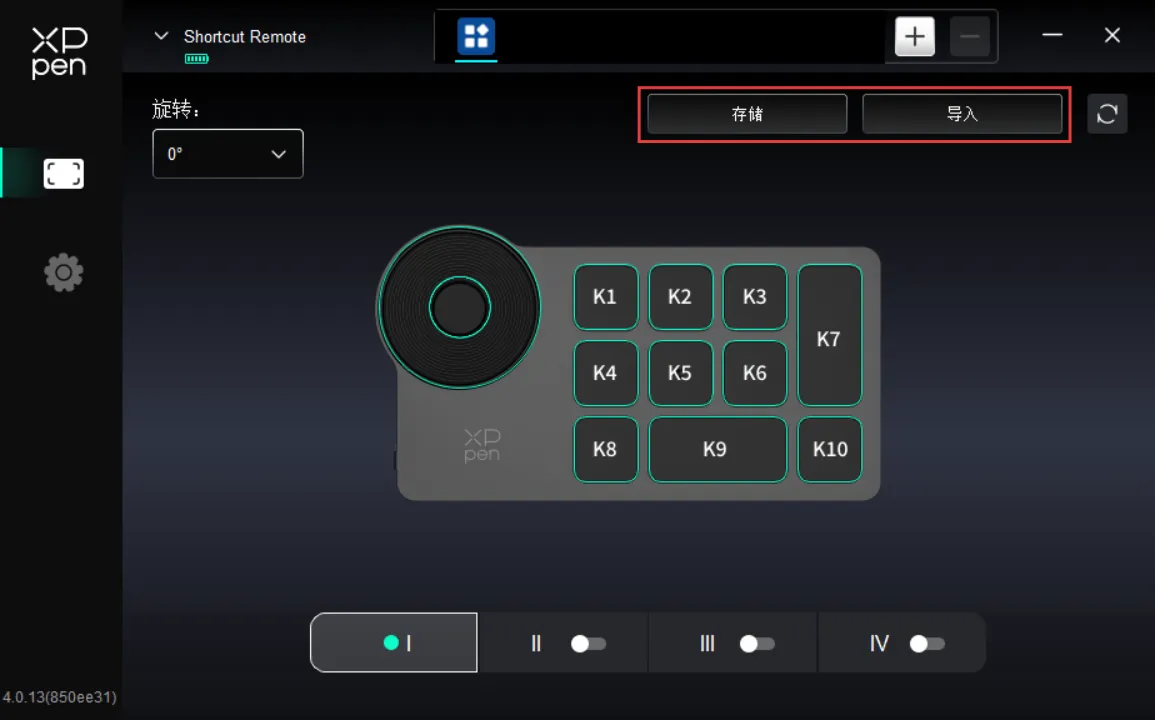
Import:
Used to import the stored configuration in the wireless shortcut remote into the currently selected application in the driver.
Save:
Used to save the configuration of the currently selected application in the driver to the wireless shortcut remote.
Note: Please use the Import and Save features only with a wired connection. The configurations imported and saved do not include the Rotate function and apply only on the same operating system.
Driver Uninstallation
1.Windows
In the Start menu, open Settings -> Applications -> Applications and Features . Locate Pentablet . Click Uninstall . Then follow the prompts for uninstallation.
2.macOS
Navigate to Go -> Applications . Locate XPPen . Click UninstallPenTablet . Then follow the prompts for uninstallation.
3.Linux
DEB: In the command line, enter sudo dpkg -r XPPenLinux . Then execute the command;
RPM: In the command line, enter sudo rpm -e XPPenLinux . Then execute the command;
Tar.gz: Unzip the file first. In the command line, enter sudo . Drag uninstall.sh into it. Then execute the command.
FAQ
1. How to fix a drawing display that is blank or flickering?
1) Please verify the power cable is securely connected. Due to computer power output limitations, when connected via a single USB-C to USB-C cable, the product may experience display flickering or blackouts. At this time, please use a second USB-C cable to connect the drawing display to the power adapter for power supply;
- Please check whether the video signal outputs normally. If it is connected to your computer's USB-C port, ensure the port supports DisplayPort signal output;
- Please refer to the Product Connection section to verify the correct connection method and cable;
- Please check whether the power indicator light is blue. If not, check the cables and restart the device;
- If the signal is unstable, check whether the cable connections are secure.
2. How to fix a device that cannot be recognized by my computer?
1) Check whether the USB port you are using is functioning properly. If not, try another USB port.
3. How to fix a drawing display not displaying 2880 × 1800 at 90 Hz?
- Verify whether your computer's graphics card and video interface support 2880 × 1800 at 90 Hz;
- Is another external monitor connected to the same graphics port? If yes, disconnect all other monitors first, then verify whether the drawing display's resolution can be increased.
4. How to prevent my OLED drawing display from burning in?
- If the same image is displayed continuously or repeatedly on any OLED drawing display, it may result in afterimage retention. Normally, the afterimage will disappear within a few minutes. This is a property of the OLED material, not a product failure;
- If you are not going to use the Artist Ultra 14 for a long time, it is recommended to use a screen saver or turn off the drawing display. You may also consider using the Dark Mode to change the menu bar in your operating system to a black background.
5. Will the OLED drawing display exhibit flickering?
1) The Artist Ultra 14's OLED display utilizes DC-like dimming. At higher brightness levels, the drawing display employs DC dimming to avoid flickering; at lower brightness levels, the drawing display employs high-frequency PWM dimming at 1,920 Hz.
6. How to use the touch feature in Photoshop?
1) In the Preferences > Performance settings, please make sure that the Use Graphics Processor checkbox is checked.
7. How to prevent accidental touches in drawing software?
- The product now supports Stylus Priority Mode, which automatically disables the touch feature when the stylus enters the work area to prevent accidental touches;
- You can customize the Touch Area via the product driver to limit the active touch area and prevent accidental touches;
- You can also wear the included anti-touch gloves to prevent accidental touches during drawing;
- Or simply press the touch switch on the top of the product to globally disable the touch feature during drawing.
8. How to prevent accidental touches in Krita?
1) Krita supports drawing with fingers on the touch screen. When using a touch screen-enabled drawing display, this feature may interfere with the stylus pressure input. Please disable it at this time.
To disable this feature, navigate to Settings -> Configure Krita -> General -> Tools to uncheck Finger Painting: Enable drawing input on touch screen .
In addition, when this option is unchecked, canvas panning remains available via single-finger gestures. To prevent drawing interference, it is recommended to switch to 3-finger gestures for canvas panning.
Navigate to Settings -> Configure Krita -> Canvas Shortcut Keys -> Pan Canvas View -> Gestures to switch to 3-Finger Panning .
9. How to fix a non-responsive stylus?
- Make sure you are using the original stylus of the device;
- Make sure the driver is installed properly and check whether the driver's stylus settings are configured properly.
10. How to fix pressure sensitivity issues in drawing software (cursor moves but no pressure response)?
- Check whether the drawing software supports pressure sensitivity;
- Download the latest driver installation file from the XPPen website. Then check whether the pressure sensitivity is configured properly in the driver settings;
- Before installing the driver, please close all anti-virus software and graphics software;
- Before installation, please uninstall the drivers for other drawing displays;
- After installation, restart your computer;
- If the pressure sensitivity functions properly in the driver settings (for Windows: make sure Windows Ink is enabled in the driver's Stylus Settings ), launch the drawing software and test again.
11. How to calibrate my stylus to align the cursor?
- Make sure the stylus is properly mapped to your Artist Ultra 14;
- On the device settings page of the driver, locate the Calibrate icon. Click it and follow the steps to calibrate the display.
- Please hold the stylus in the standard grip position. To optimize the product for your usage habits, please use your stylus to tap the red cross center on the device display to calibrate the offset between the stylus and cursor.
12. How to fix drawing lag in drawing software?
- Check whether the display output refresh rate of your computer is set to 60 Hz;
- Check whether your computer's hardware configuration (CPU & GPU) meets the recommended configuration requirements of the installed drawing software. If yes, adjust settings as per the official software FAQ guidelines to optimize related performance.
The terms HDMI, HDMI High-Definition Multimedia Interface, HDMI trade dress and the HDMI Logos are trademarks or registered trademarks of HDMI Licensing Administrator, Inc.
Low Blue Light Ratio:
A lower blue light ratio prevents eye fatigue and ensures greater visual comfort.
By default, the product supports hardware-level low blue light, delivering low blue light effects immediately upon startup.