Deco mini7W V2
Contents
Product Overview
List of Accessories
Product Connection
Compatibility
Driver Download and Installation
Floating Menu
Driver Settings
Driver Uninstallation
FAQ
 PDF
PDF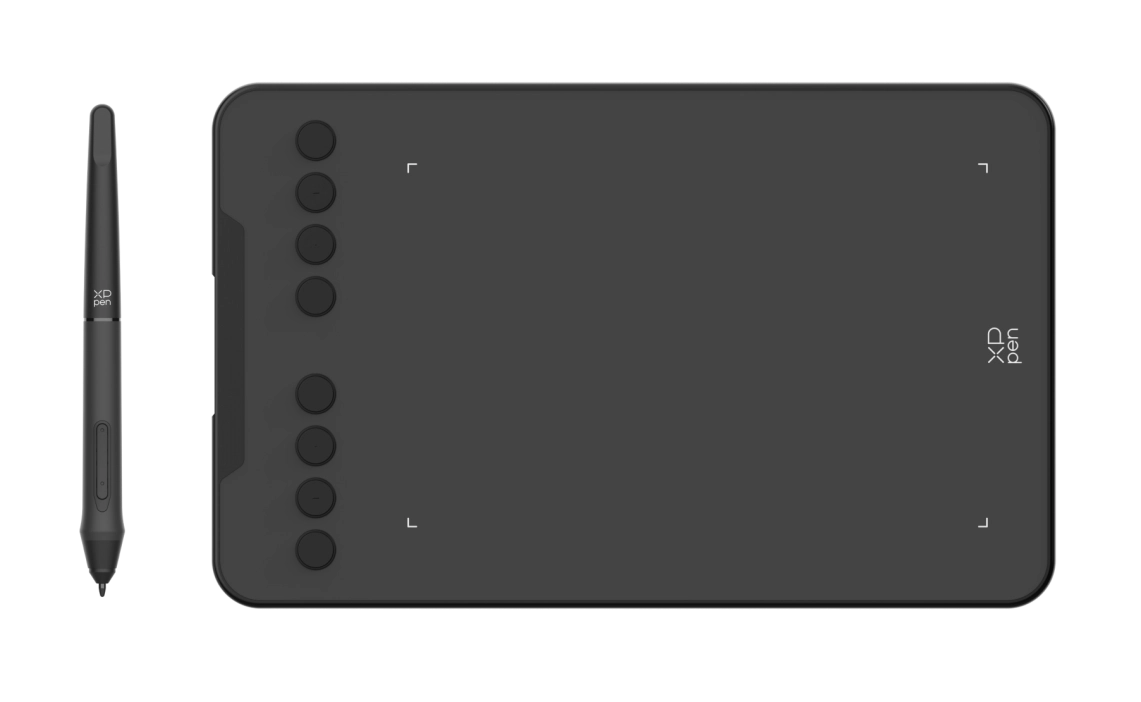
Thank you for choosing the Deco mini7W V2 Drawing Tablet. The portable drawing tablet is specially designed for the convenience of mobile creativity. Engineered with Bluetooth 5.0, it allows you to capture ideas anytime, anywhere, and supports you to create content easily and efficiently. It scales proportionally to phones and tablets with minimal distortion while drawing, and supports 180° rotation for comfortable use by both left‑ and right‑handed users.
To ensure optimal performance and extended service life of your device, please read this Manual thoroughly before use, and adhere to the recommended maintenance and protection guidelines during use.
To support continuous product improvement, physical appearance, colors, and accessories may vary from descriptions, so please refer to the actual product. The Company reserves the right to make technical updates and revise this Manual without prior notice. Thank you for your understanding.
Note: All images in this Manual are for illustrative purposes only.
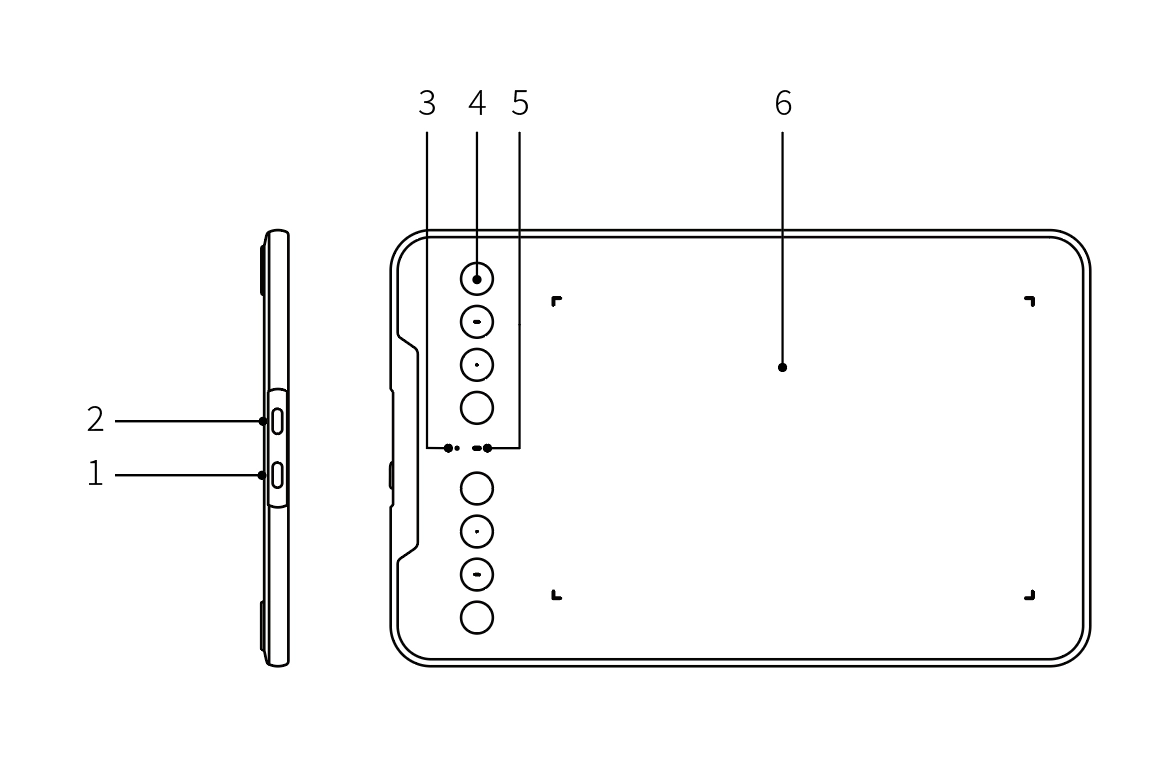
1. Power Button
2. USB-C Port
3. LED 1
a. Flashing: The stylus is within the work area but has not touched the drawing tablet.
b. Solid on: The stylus touches the work area.
c. Off: The stylus is outside the work area.
4. Shortcut Key
5. LED 2
Blue
a. Flashing slow: Bluetooth not connected
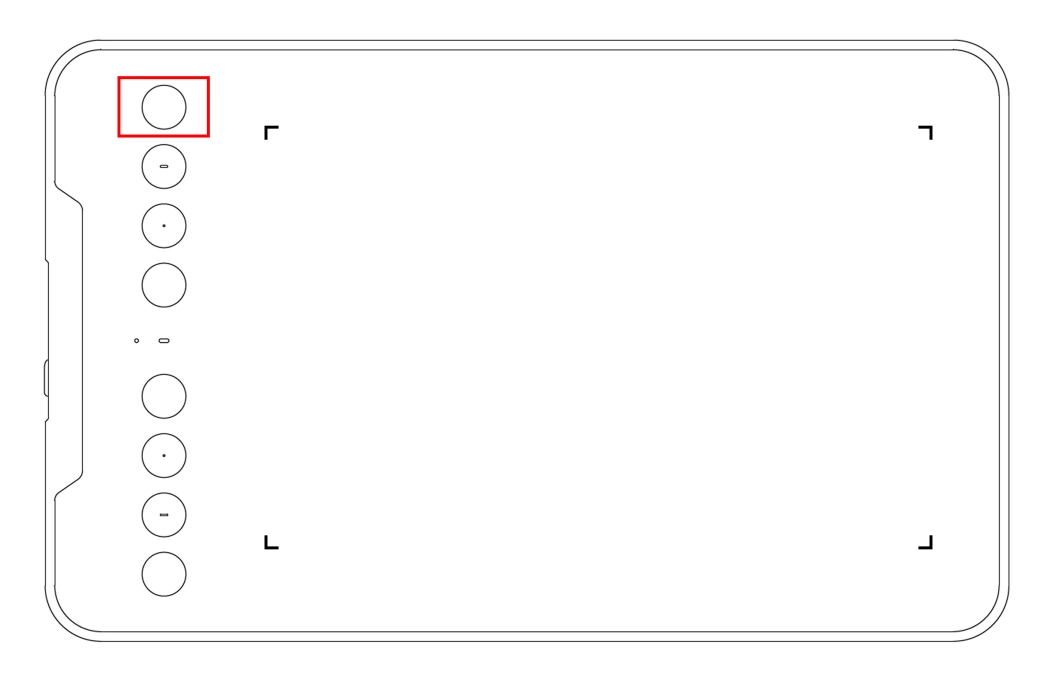
b. Flashing fast: Bluetooth waiting for pairing (press and hold the shortcut key on the left top of the device for 3 seconds)
c. Solid on: Bluetooth paired/connected
Red
a. Flashing: Low battery (≤20%)
b. Solid on: Charging
c. Off: Charging completed or auto-shut due to low battery
Purple when both the red and blue LEDs are on
6. Work Area
Stylus × 1
Pen Nibs × 10
Nib Extractor × 1
USB-A to USB-C Cable × 1
OTG Adapter × 1
Quick Guide × 1
Warranty Card × 1
Fashion Sticker × 1
* The picture and list are for reference only. The actual product shall prevail.
1. Wired Connection
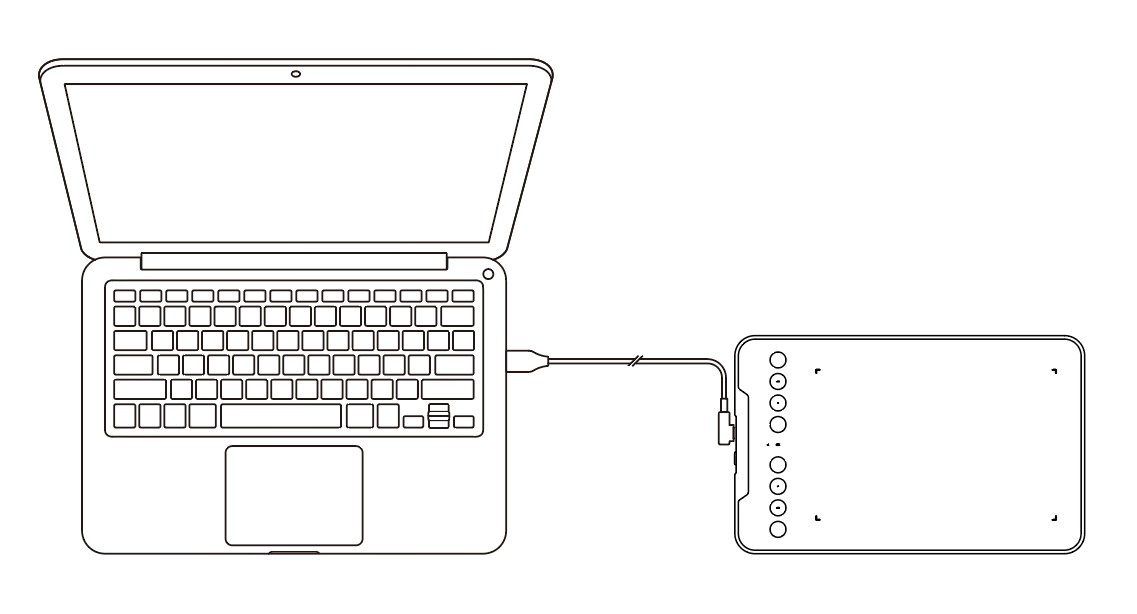
1) Computer Connection
Connect the USB‑A to USB‑C cable to the computer's USB port and to the drawing tablet's USB‑C port respectively.
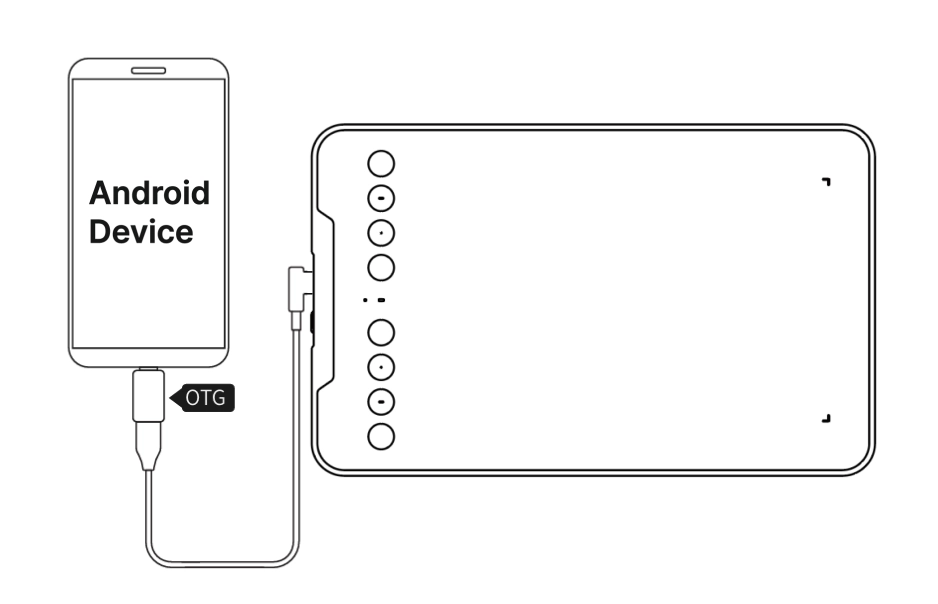
2) Android Phone or Tablet Connection
Connect the drawing tablet to the OTG adapter by using the USB‑A to USB‑C cable, and then connect the OTG adapter to your Android phone or tablet.
a. Android 14 (or later): No app is required for connection and use of the drawing tablet. Earlier Android versions: Go to the XPPen official website ( www.xp-pen.com ), and click "Drivers" in the navigation pane to enter the "Drivers" page. Find your product model, and download/install the corresponding XPPen tools app to configure the drawing tablet.
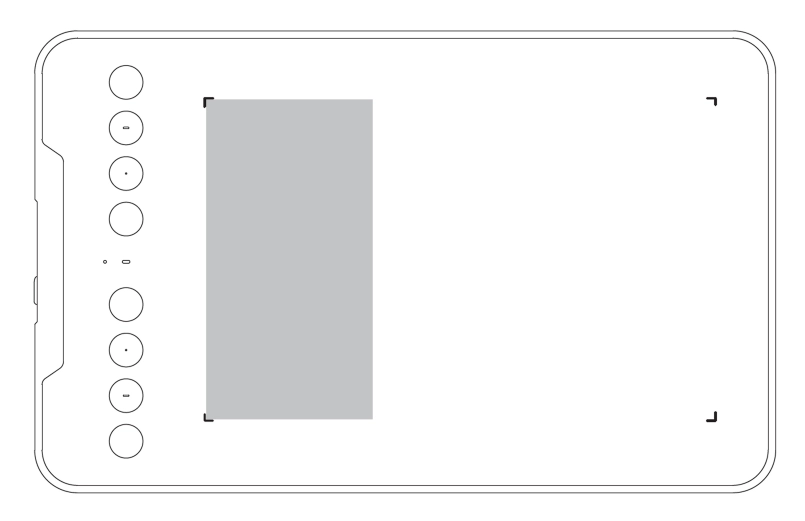
b. The default drawing area is as follows:
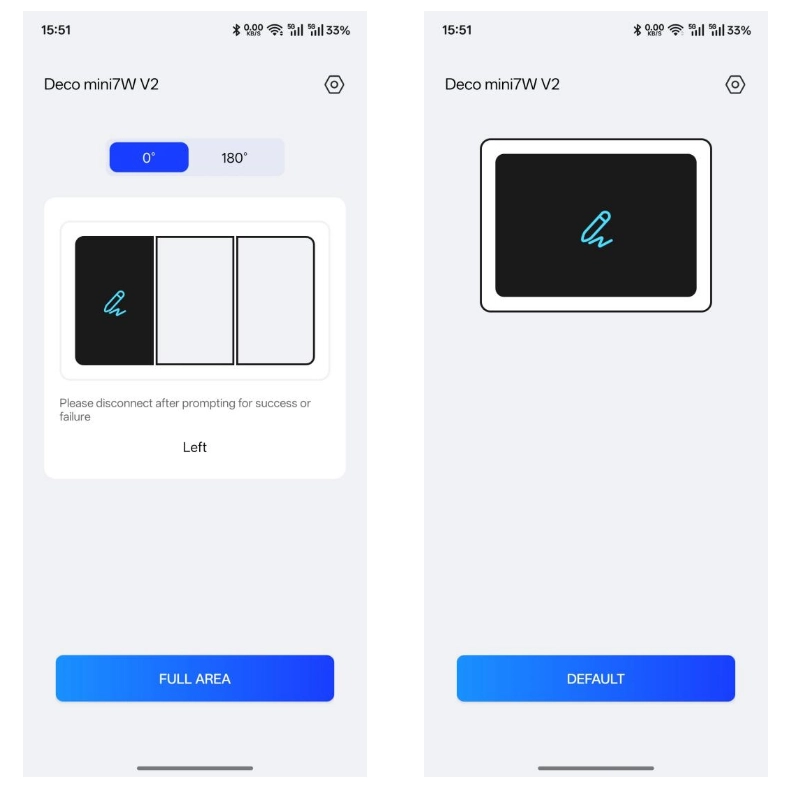
c. XPPen tools APP settings:
1) By default, the tablet orientation is 0°, and the drawing area is on the left. You can set the drawing area on the left, center, and right.
2) The supported tablet orientation is 0°/180°.
3) Tap "FULL AREA" to switch the drawing area to the full area from the left area. Tap "DEFAULT" to restore the drawing area to the left area.
2. Bluetooth Wireless Connection
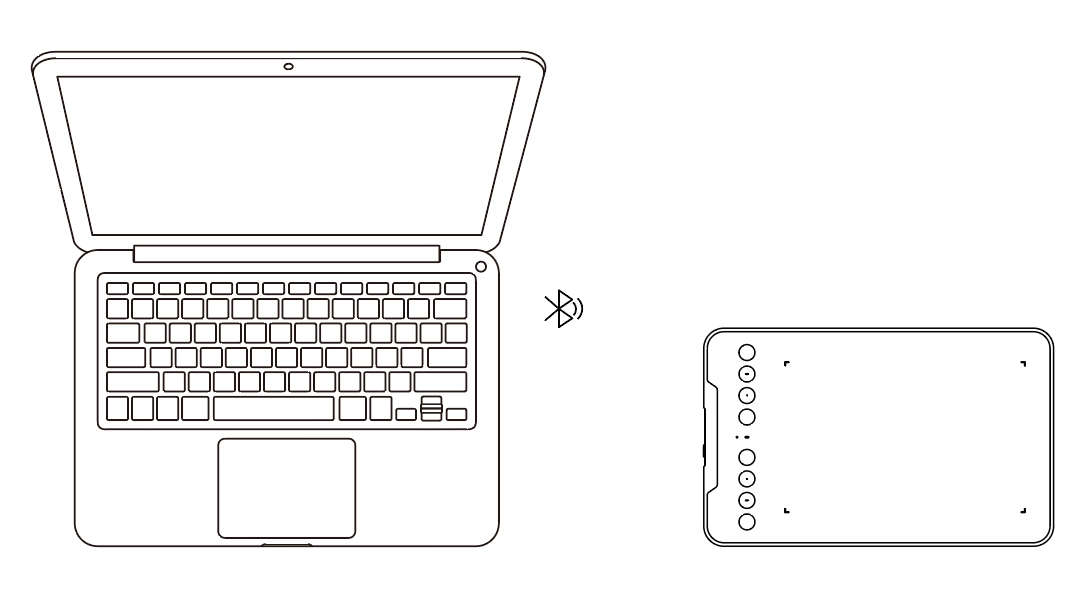
1) Computer Connection
Press and hold the power button for 3 seconds to turn the drawing tablet on. Then, press and hold the shortcut key on the left top of the device for 3 seconds to enter the pairing mode. At this time, LED 2 is flashing blue fast. On your computer, enable Bluetooth, add a device, and select "Deco mini7W V2" when it appears. After successful pairing, LED 2 is solid blue.
2) Phone or Tablet Connection
Set the drawing tablet to the pairing mode. Enable Bluetooth on your phone or tablet, add a device, and select "Deco mini7W V2" when it appears.
3. iOS Connection
Step 1: Download APP
Search "ibis Paint X" or "ibis Paint" in the app store, and download and install it. It is recommended to update it to the latest version to be compatible with XPPen.
* Please visit use of the APP.
Step 2: Connect Drawing Tablet via iOS device
Step 3: Turn on the drawing tablet
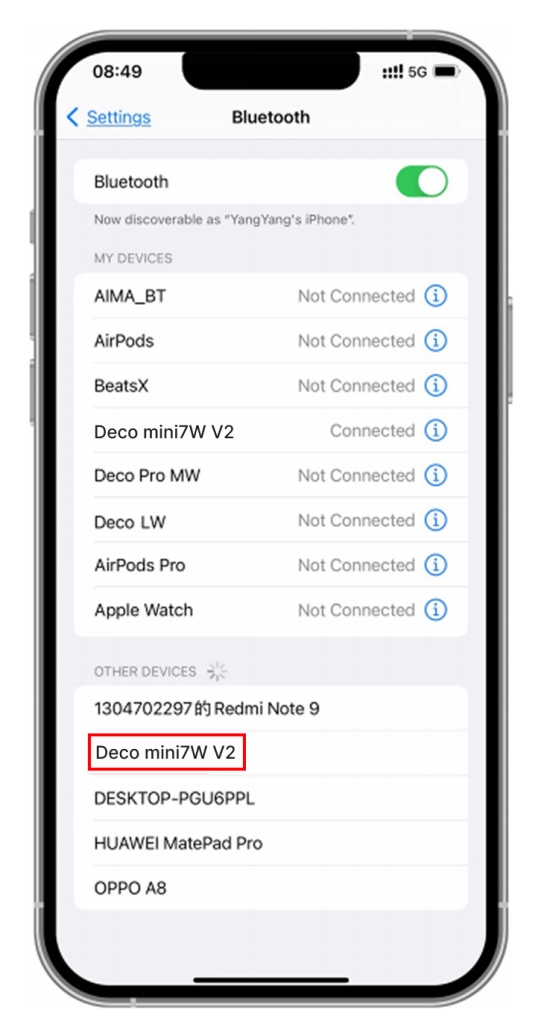
Step 4: Bluetooth connection
1. Press and hold the shortcut key on the left top of the device for 3 seconds to enter pairing state (blue light on and flashing fast).
2. Turn on iOS device Bluetooth, and select the drawing tablet to complete pairing (blue light on upon successful pairing).
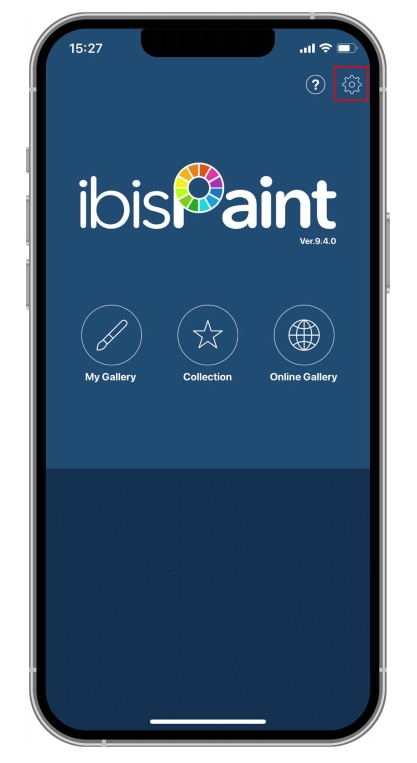
Step 5: Set APP
1. Connect XPPen Drawing Tablet. Open ibis Paint, and click "Settings".
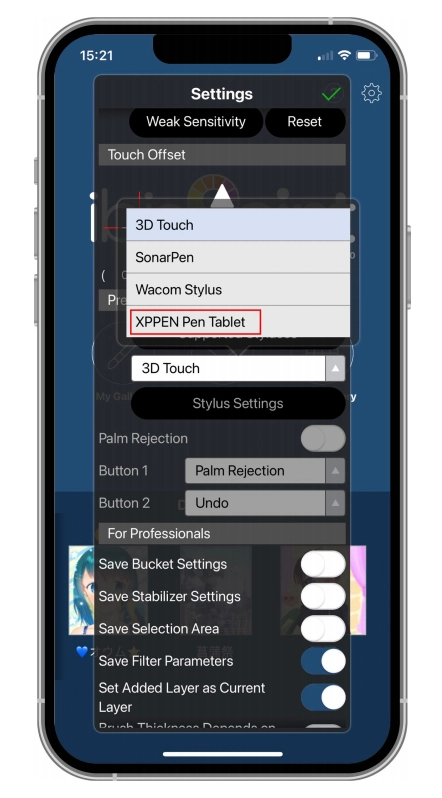
2. Find "Supported Handwrite Stylus" in Settings, and select XPPen Pen Tablet.
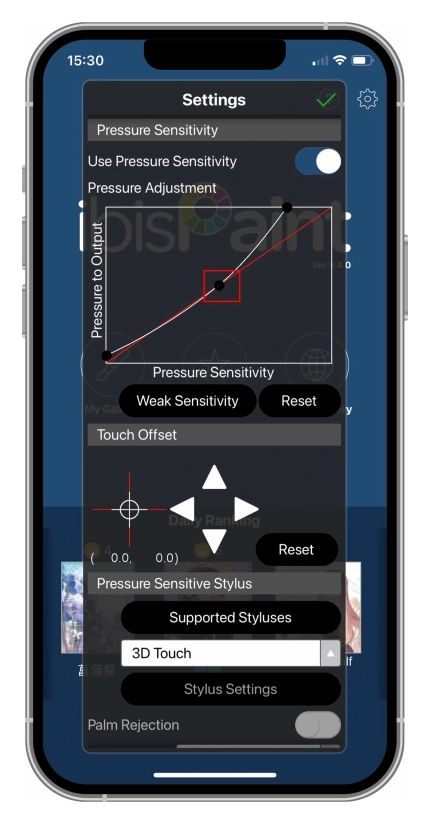
Step 6: Set pen pressure
1. Turn on the pen pressure function.

2. Drag the dot on the pressure sensitivity line to adjust pen pressure sensitivity.
Step 7: Set pen key functions
1. Set functions corresponding to the pen key.

2. Create a canvas and start your creation.
Notes:
Please make sure that the Bluetooth permission under the APP is enabled. You can check it through your mobile phone - Settings -APP- Bluetooth
The stylus has shortcut keys and pressure sensitivity functions which can be customized in the APP.
The shortcut keys and wheel on the drawing tablet are temporarily unavailable. The driver settings are temporarily unavailable, so the mapping area cannot be customized.
Sleep states:
State 1: Power by battery
When Bluetooth connection is not enabled with no operation, the device will go into Sleep mode after 5 minutes. Press shortcut key to wake it up.
When Bluetooth connection is enabled with no operation, the device will go into Sleep mode after 30 minutes. Press shortcut key to wake it up.
State 2: Power by external power supply or computer
When Bluetooth connection is not enabled and no operation is done after 5 minutes, the device will go into Sleep mode after battery is fully charged. Press shortcut key to wake it up.
When Bluetooth connection is enabled and no operation is done after 30 minutes, the device will go into Sleep mode after battery is fully charged. Press shortcut key to wake it up.
How to address abnormal Bluetooth connection
If Bluetooth connection is abnormal, you can try to recover connection by the methods below.
Reset Bluetooth by repeating the connection steps. The paired device will be automatically cleared in this process. Pair the device again.
If more than one iOS device has been paired, disconnect the Bluetooth connection between the drawing tablet and other devices before using the current device.
Wired connection:
Windows 7 (or later)
macOS 10.13 (or later)
Android 10.0 (or later)
ChromeOS 88 (or later)
HarmonyOS 2 (or later)
Linux
Bluetooth connection:
Windows 10 (or later)
macOS 10.13 (or later)
Android 10.0 (or later)
iOS 15.0 (or later)
iPad OS 15 (or later)
(Only available with specific software)
1. Driver Download
1. Make sure your drawing tablet is properly connected to the computer.
2. Visit the official website: www.xp-pen.com .
3. Enter the "Drivers" page. Find your product model, and enter to download and install the appropriate driver for your operating system.
4. Launch the driver. Configure parameters and test product features.
* It is recommended to use the latest version of the driver for optimal performance.
2. Driver Installation
Notes:
Before installation, please close all active anti-virus software and drawing software;
If your computer has drivers for other brands of drawing tablets/displays installed, please uninstall them first.
After driver installation, please restart your computer.
For optimal device performance, it is recommended to use the latest version of the driver.
1) Windows
Unzip and run the .exe file with administrator privileges. Follow the prompts to complete the installation.
2) Mac
Unzip and run the .pkg file. Follow the prompts to complete the installation. Add the required security settings (System Preferences -> Privacy & Security -> Accessibility). After authorization and unlocking, make sure the "XPPenDriver" and "XPPenTablet" options are checked. Otherwise, the device and driver may fail to function properly.
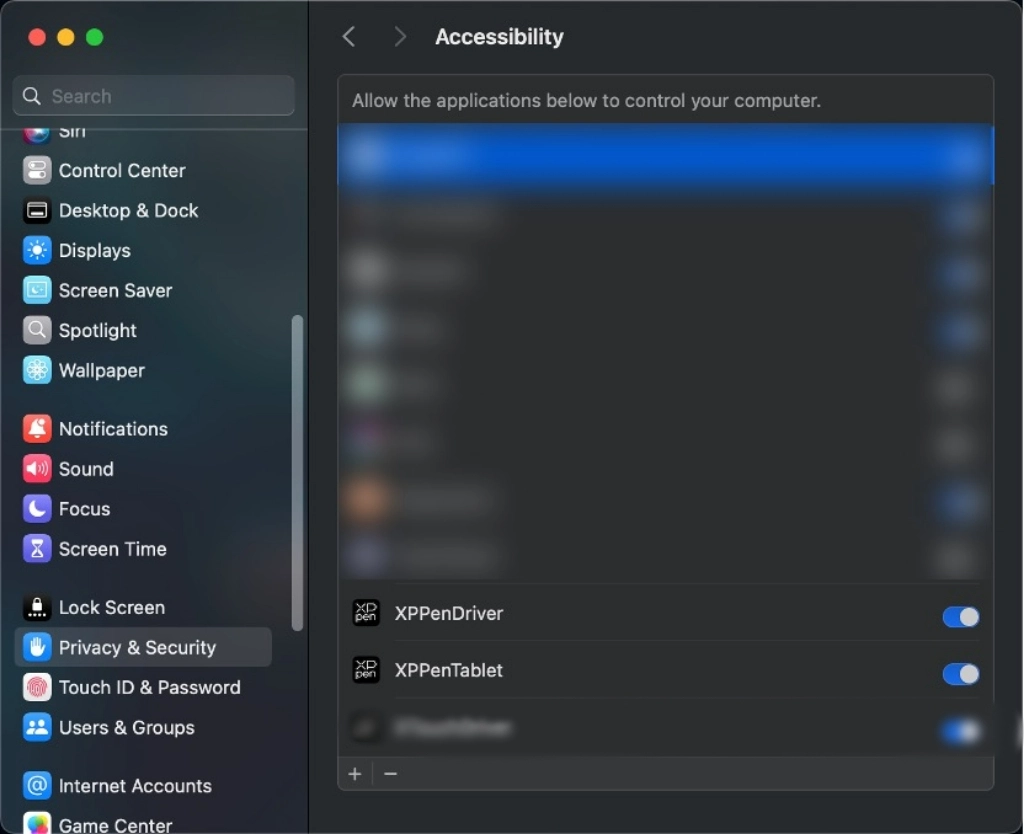
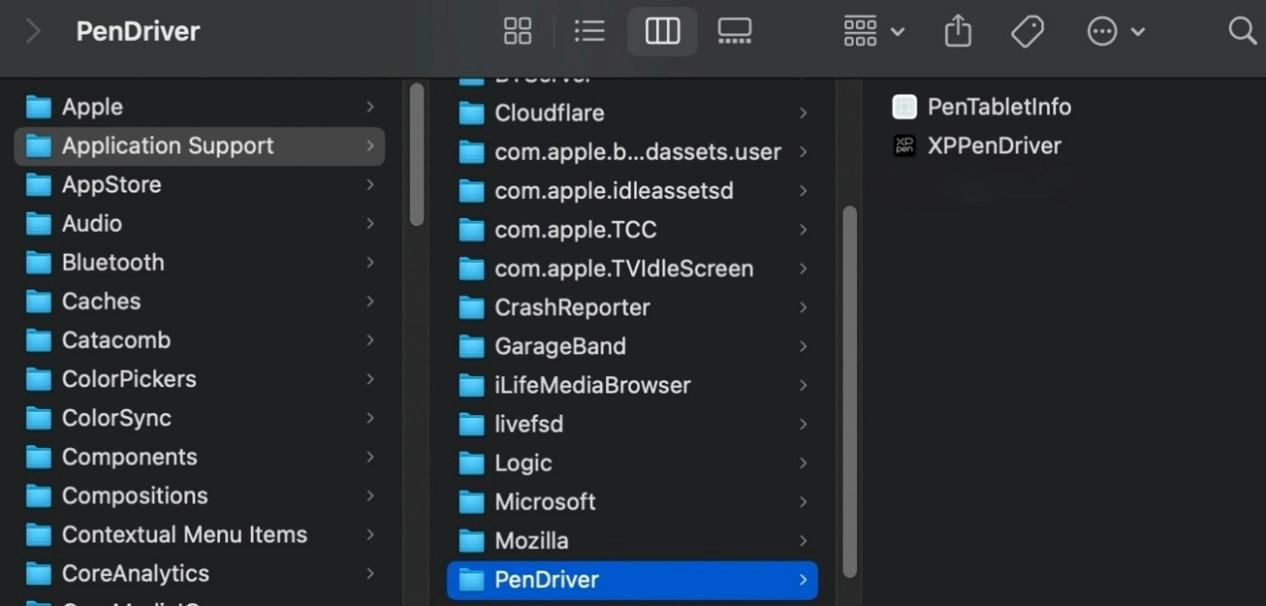
If there is no relevant option in the list, please navigate to the Library -> Application Support -> PenDriver to add it manually.
3) Linux
DEB: In the command line, enter "sudo dpkg –i". Drag the installation file into the window. Then execute the command;
RPM: In the command line, enter "sudo rpm -i". Drag the installation file into the window. Then execute the command;
Tar.gz: Unzip the file first. In the command line, enter "sudo". Drag "install.sh" into it. Then execute the command.
3. Driver Overview
After driver installation completes, the software launches automatically. If automatic launch fails, please manually navigate to the driver installation directory and open the driver.
Windows access path: Start -> Pentablet
macOS access path: Applications -> XPPen -> PenTablet
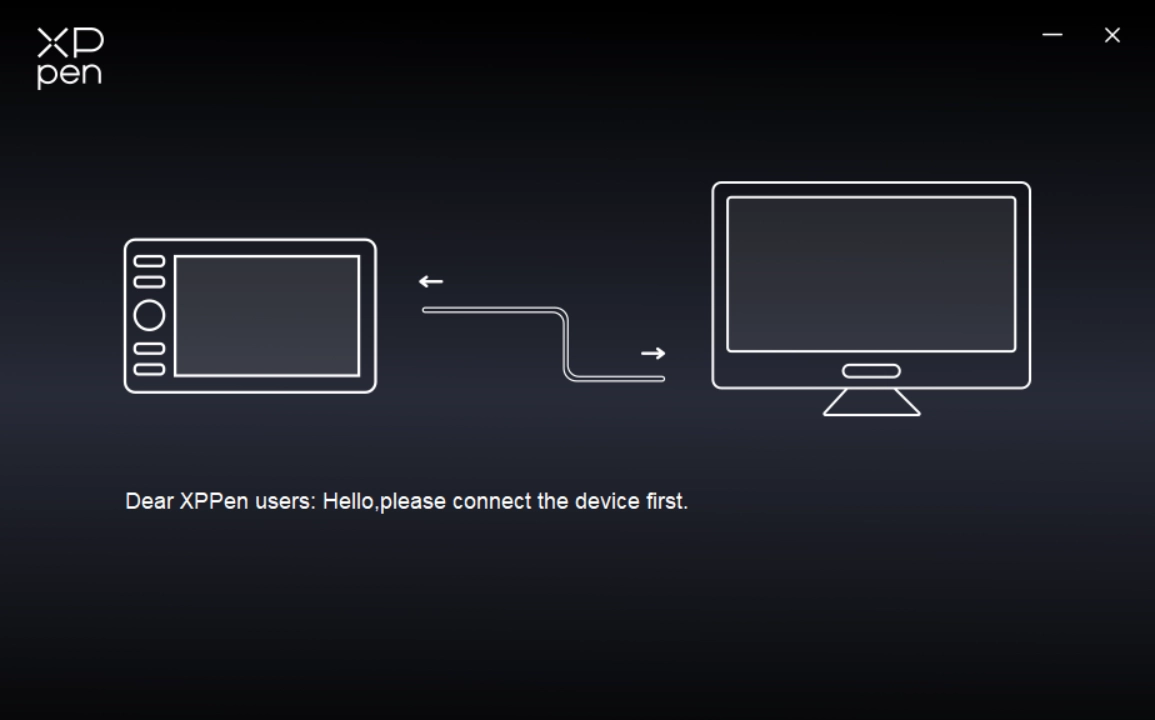
For no device detected or connection unsuccessful, the following prompt is displayed. Please try to reconnect the device and restart the computer or driver before trying again, or contact customer support for assistance.
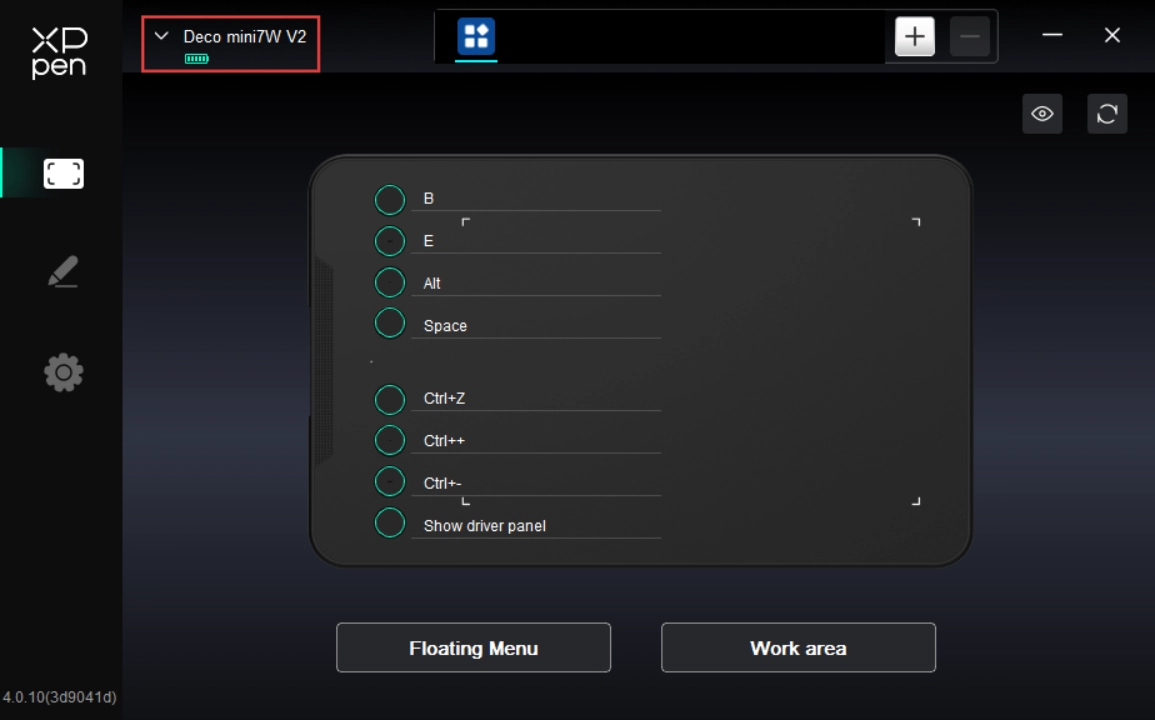
If the device is successfully connected to your computer, the device name is displayed in the upper left corner of the driver.
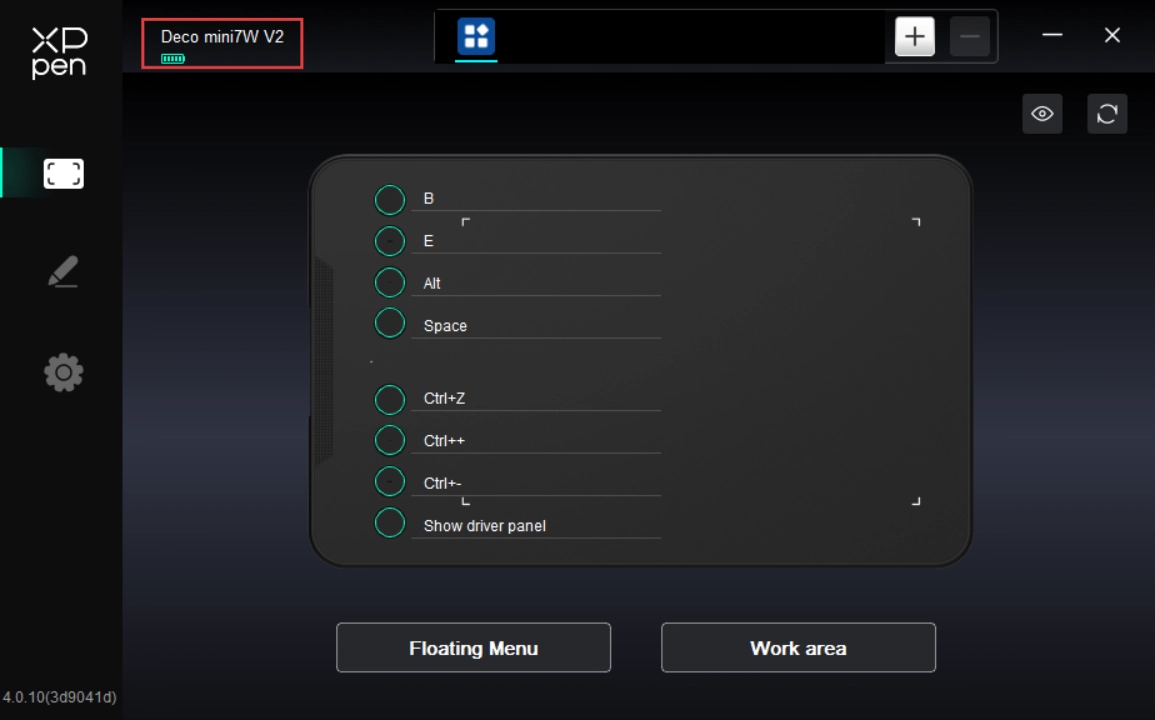
The driver can support up to three devices at the same time. After switching one of them, you can customize settings for the currently selected device, and these settings only apply to the device.
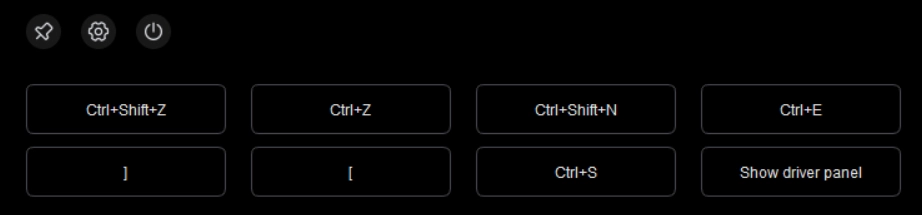
The floating menu can display floating shortcut keys on the computer monitor. You can set common operations on the floating menu. Then tap the button with your stylus or mouse to perform the set operation. To customize the display and features of the floating menu, click "Floating Menu" button on the driver's homepage.
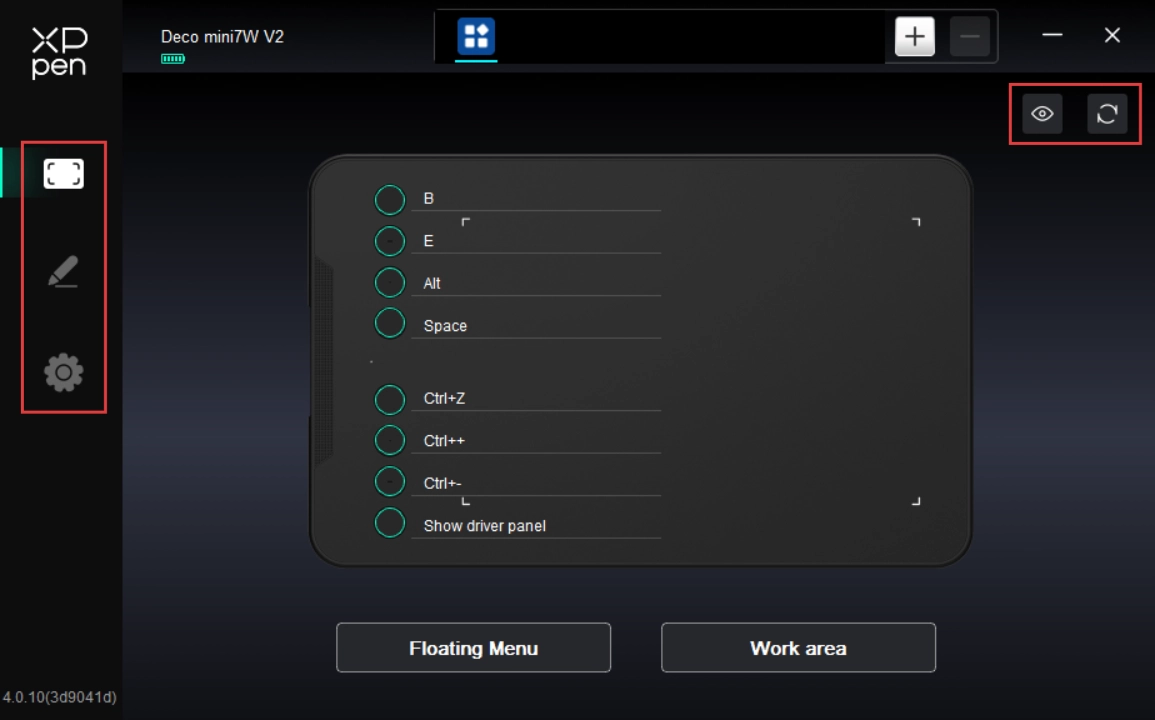
By clicking the icon on the left side of the driver, you can switch the driver features to set the relevant settings of the drawing tablet, including:
1. Device settings
2. Stylus settings
3. Driver settings
Click the Hide/Show button on the top right of the device to disable/enable the shortcut key function preview.
Click the Default button on the top right of the device to restore the device to its default settings.
1. Device Settings
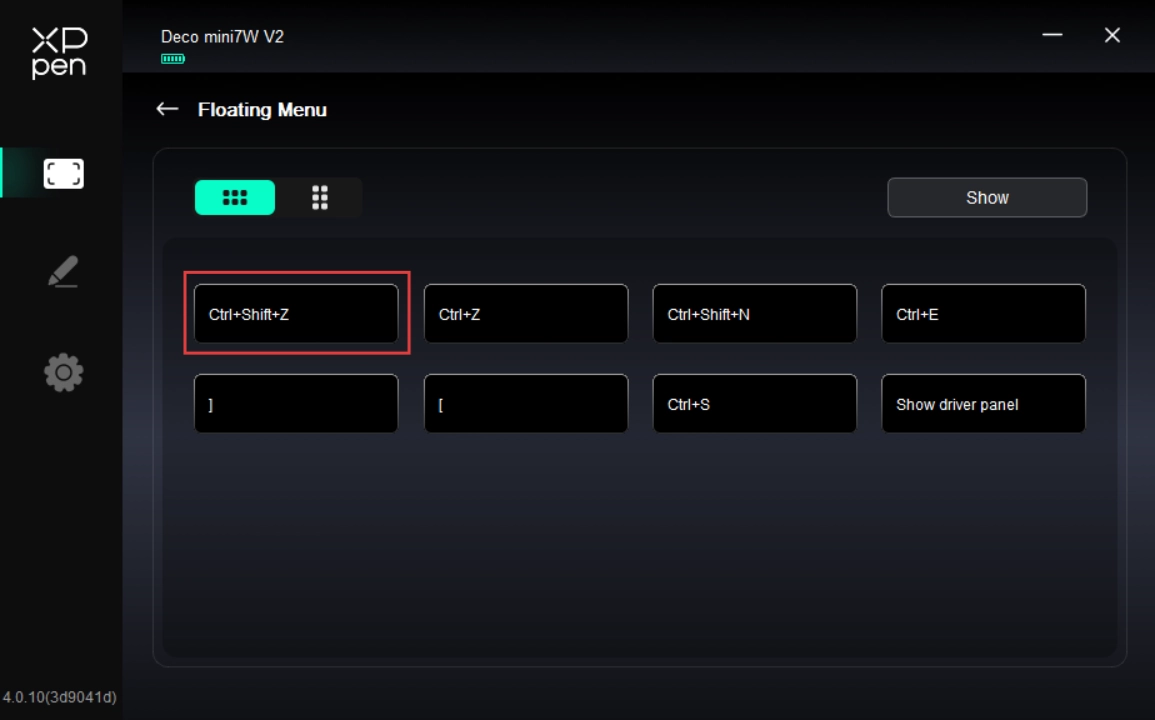
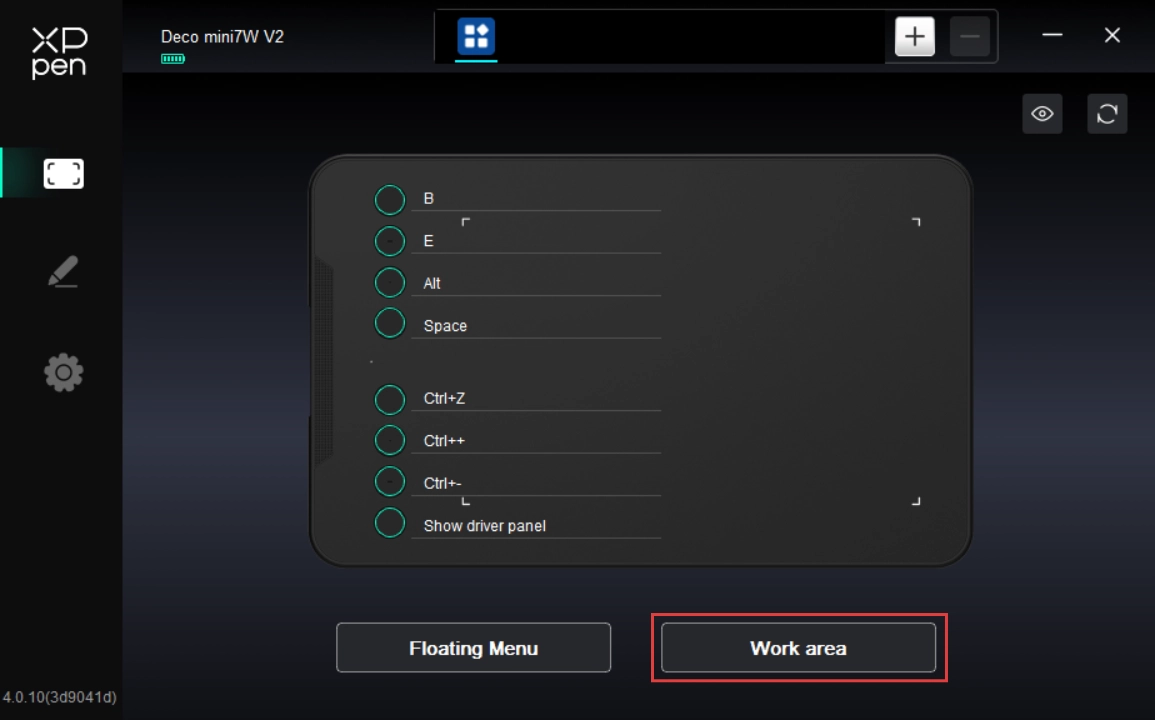
1.1. Floating Menu
The floating menu can display floating shortcut keys on the computer monitor. You can set common operations on the floating menu. Then tap the button with your stylus or mouse to perform the set operation.
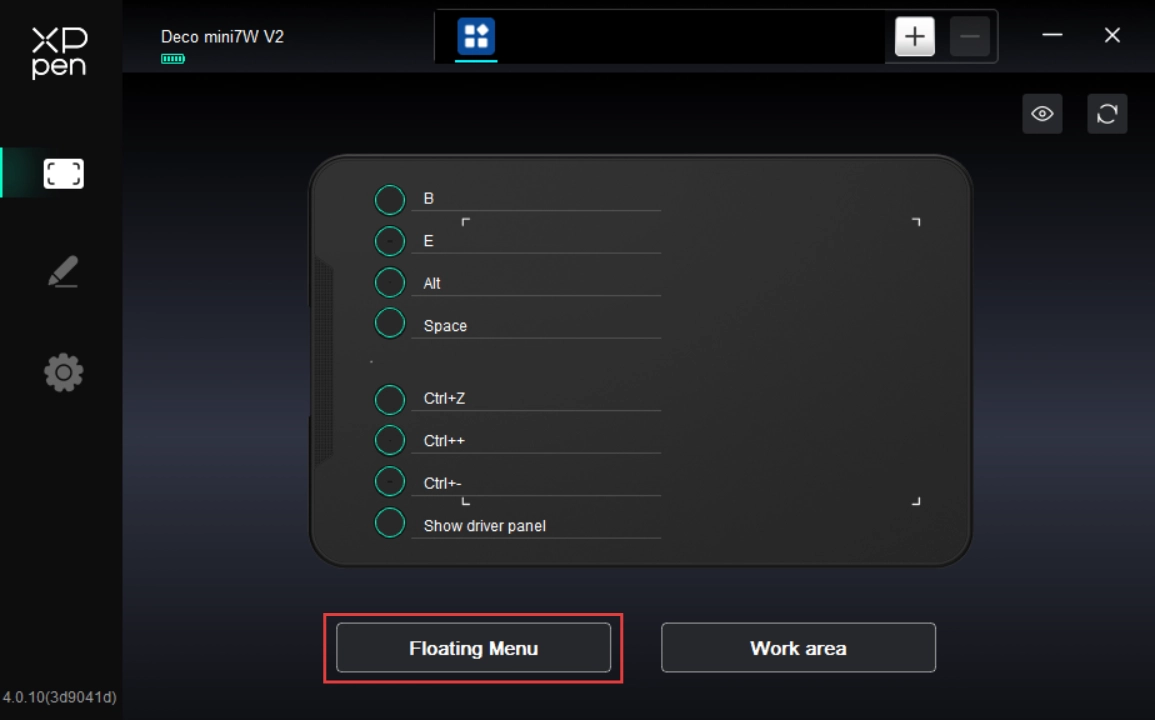
The floating menu supports horizontal and vertical layouts. Click the upper left corner area to switch between layouts. On the upper right corner, click the Show button. Then the floating menu is displayed on the desktop.

On the floating menu, click any shortcut key to configure its function. You can set it as a Shortcut Key, Others, or Execute Application.
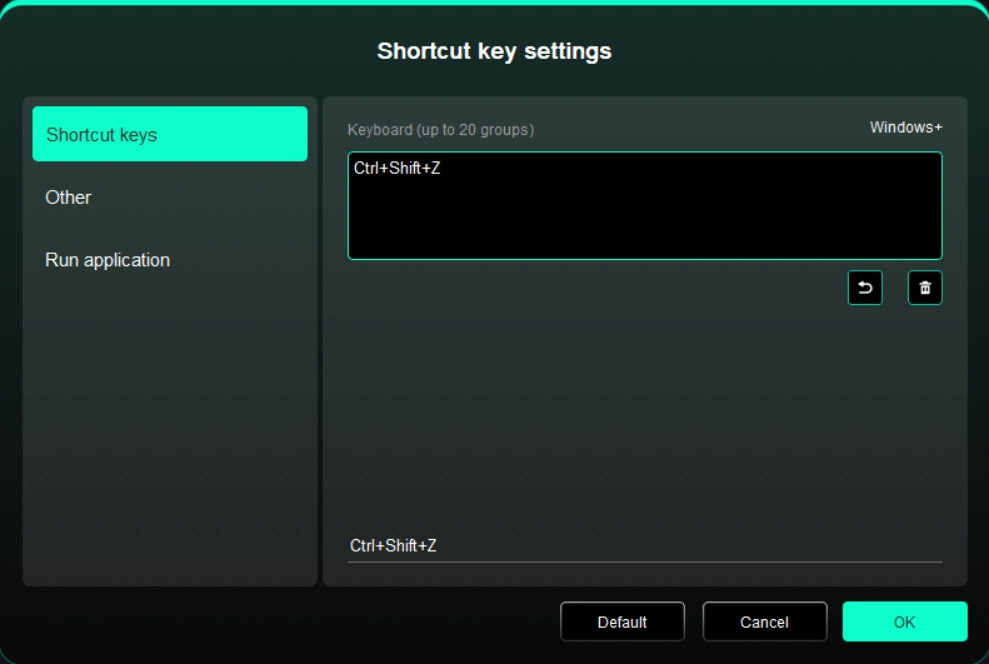
Shortcut Key:
Configure shortcut keys. For example, in 3D MAX software, set to Alt + A to activate the Align tool.
Shortcut keys can be configured in multiple groups. For example, type Ctrl + C and Ctrl + V. When you press the corresponding shortcut keys, all assigned functions within the group execute sequentially.
Windows (Command): Add system key combinations. For example, to type Win (Cmd) + Shift + 3, press Shift + 3. Then the driver automatically includes the system key.
Custom Name: At the bottom of the driver interface, use the Custom Name to assign a display name for your current configuration.
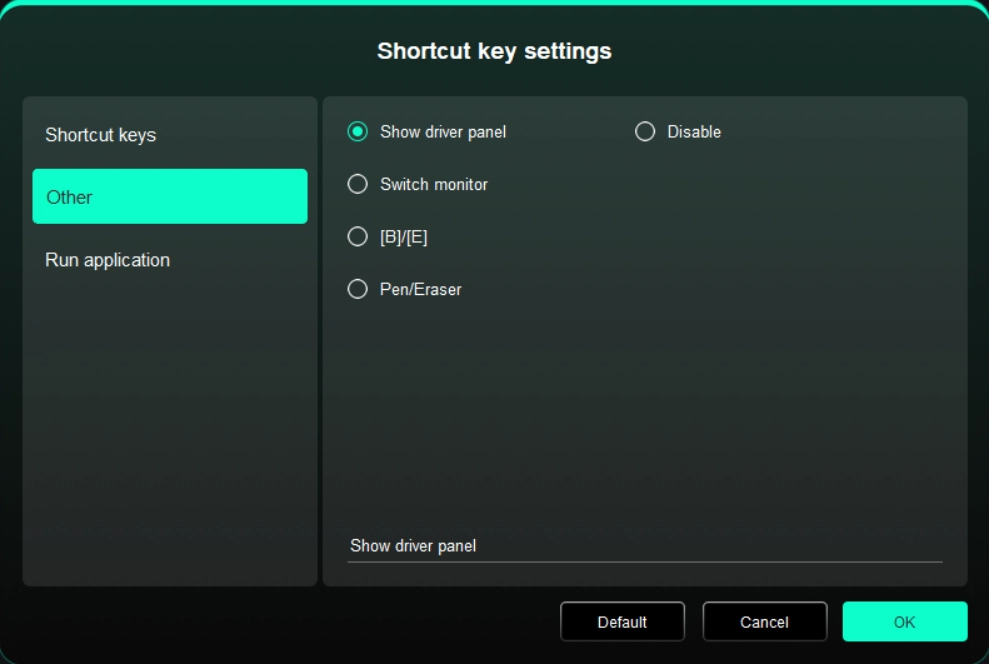
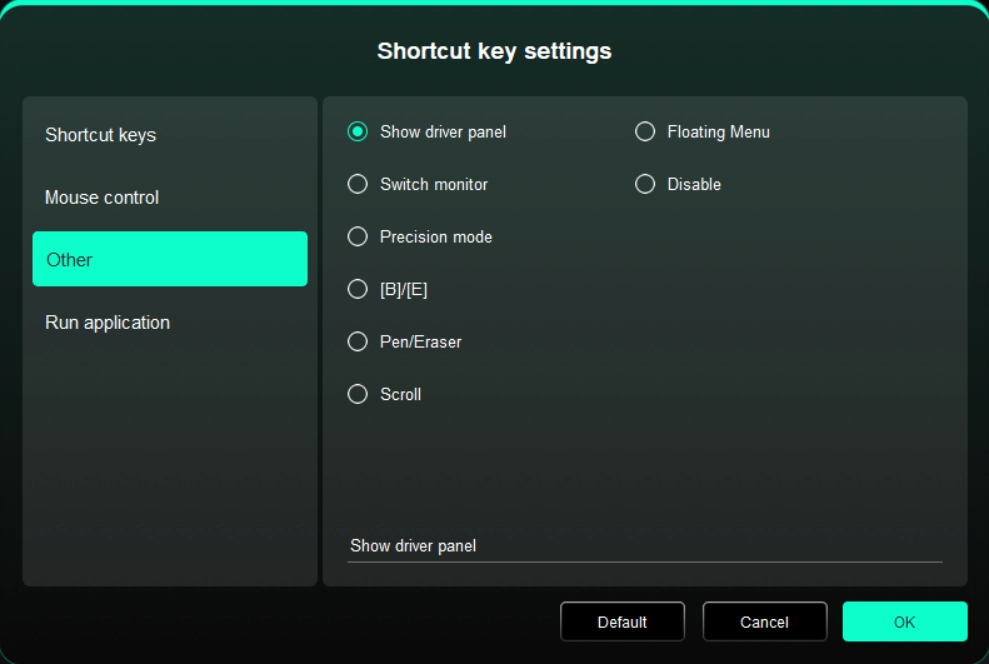
Others:
Show Driver Panel: Used to quickly access the driver settings panel
Switch Monitors: Used to map the cursor to alternate monitors when multiple monitors are connected
[B]/[E]: Used to switch repeatedly between B and E keys
Pen/Eraser: Used to switch repeatedly between Pen and Eraser modes
No Action: Performs no function
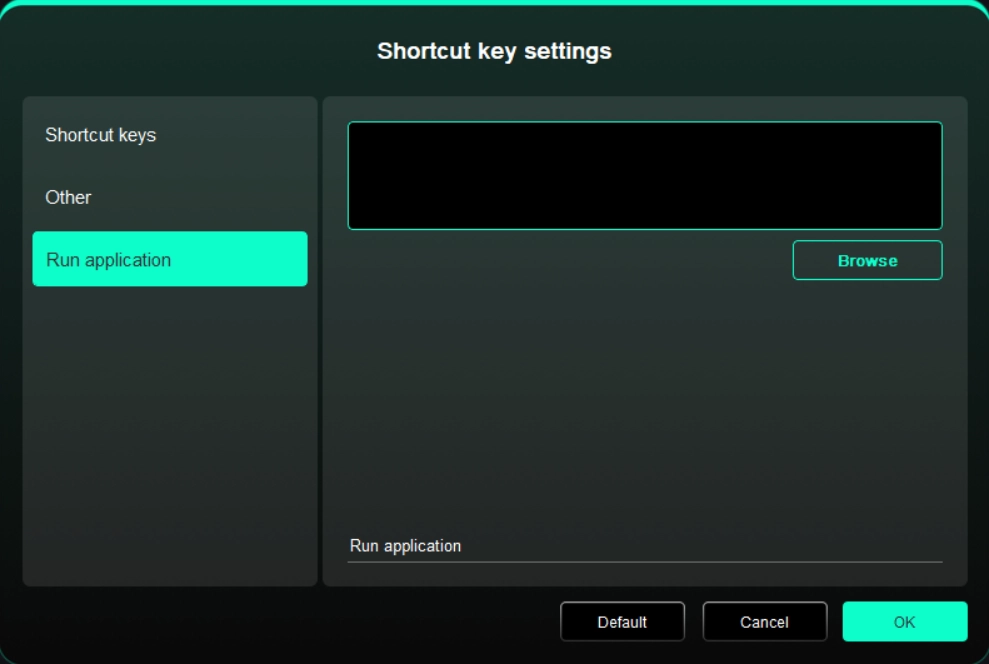
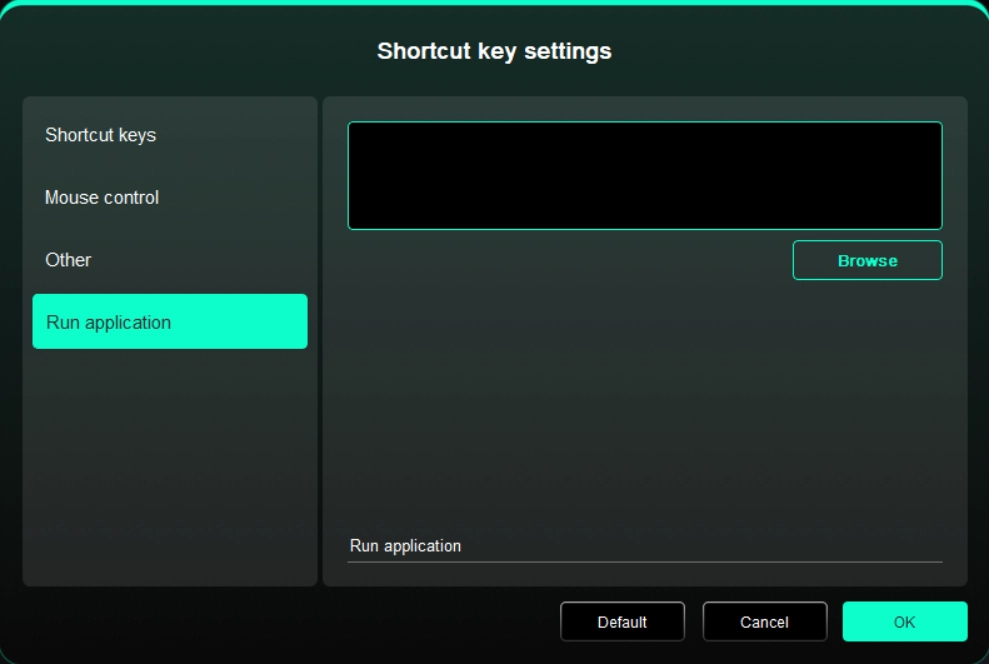
Run Application
Use shortcut keys to quickly launch the corresponding applications
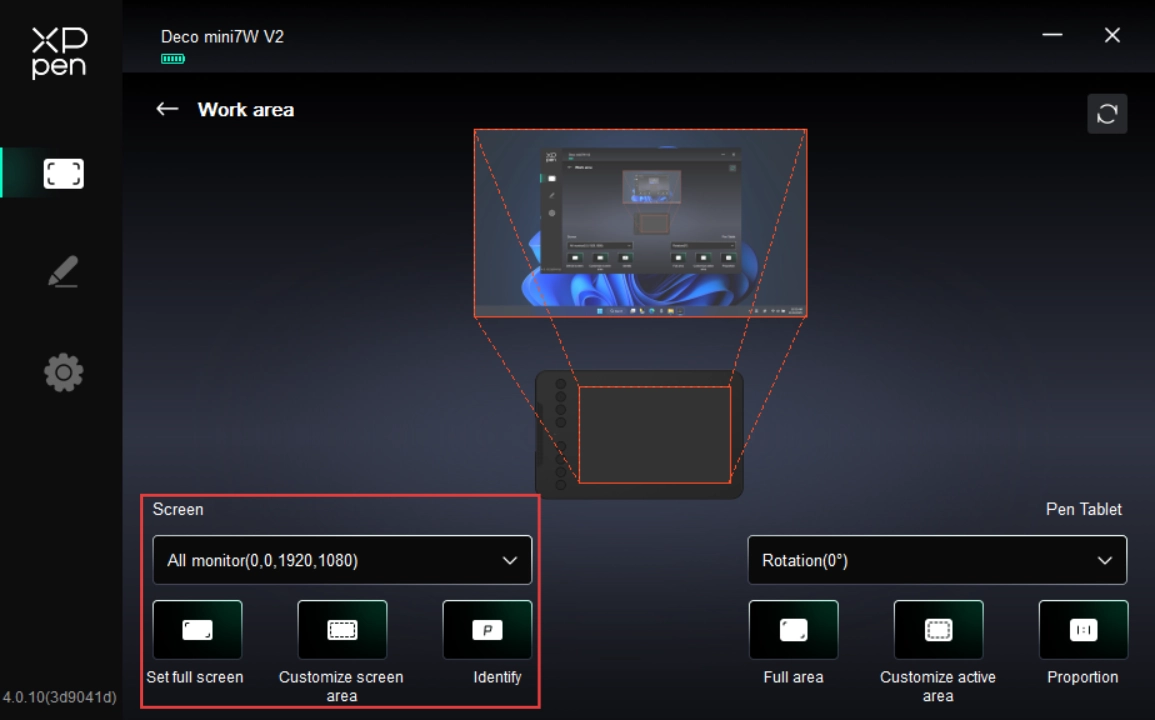
1.2. Work Area
Used to define the mapping relationship between the drawing display's work area and the screen's display area.
Screen
Used to define the mapping relationship between the current monitor's display area and the device.
If you are using multiple monitors in Duplicate Mode, the drawing display's work area is mapped to all monitors. The cursor moves simultaneously on every monitor as the stylus moves within the work area.
If you are using multiple monitors in Extended Mode, in the Screen tab, select which monitor the drawing display's work area is mapped to.
Set the monitor's mapping area:
1. Full-Screen Area: The entire area of the monitor is selected.
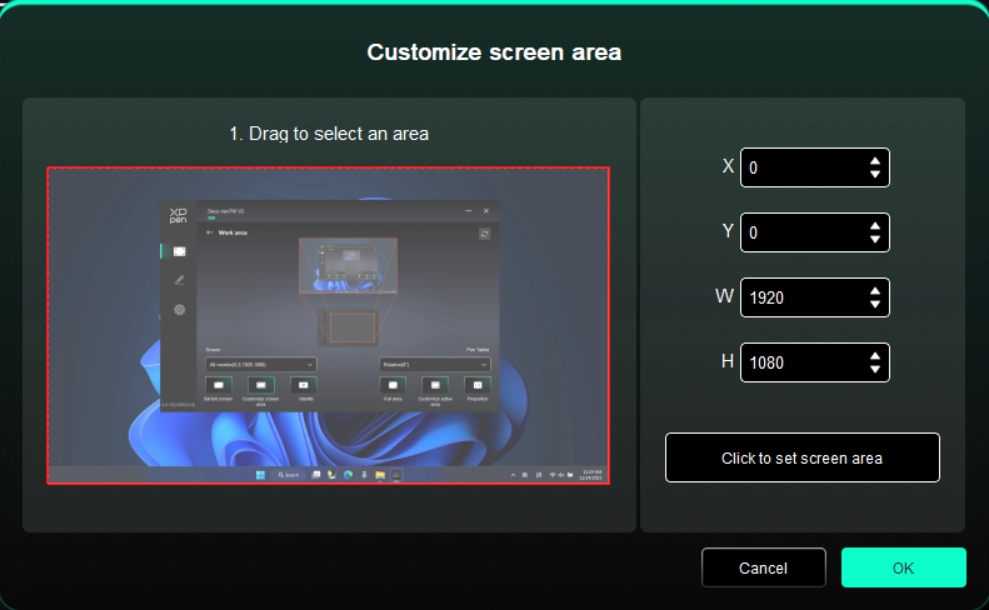
2. Custom Screen Area: Supports three configuration modes.
Drag Mode: On the screen preview, drag the cursor from one point to another.
Coordinate Mode: In the corresponding input fields next to X, Y, W, and H, enter coordinates.
Click Mode: Click "Click to Select Screen Area" button. Then, on the monitor screen, click the upper-left and lower-right corner positions to be selected.
3. Screen Identification:
Used to identify all connected monitors, with numeric identifiers shown in the lower left corner of each monitor screen.
Drawing tablet
Used to set the work area of your current drawingp tablet.
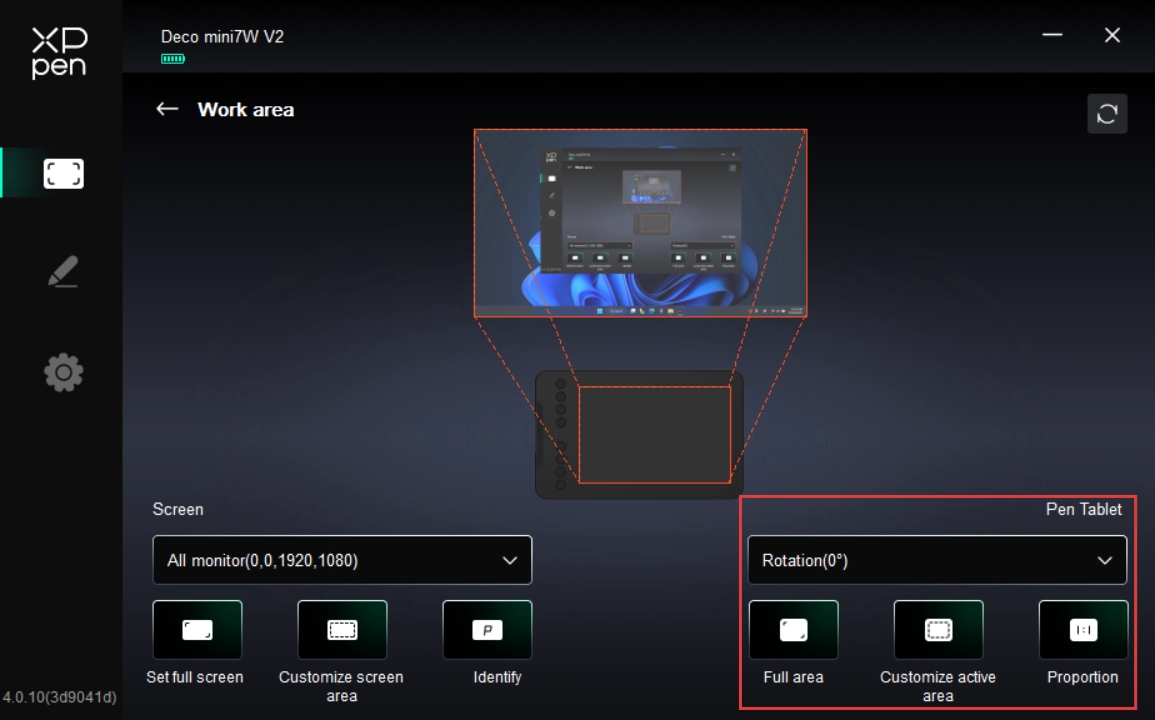
Set the drawing display's work area:
1. Full-Tablet Area: The entire work area of the drawing display;
2. Custom Tablet Area: Supports three configuration modes.
Drag Mode: On the drawing display preview, drag the cursor from one point to another;
Coordinate Mode: In the corresponding input fields next to X, Y, W, and H, enter coordinates;
Click Mode: Click "Click to Select Tablet Area" button. Then, on the drawing display's work area, use your stylus to tap the upper-left and lower-right corner positions to be selected;
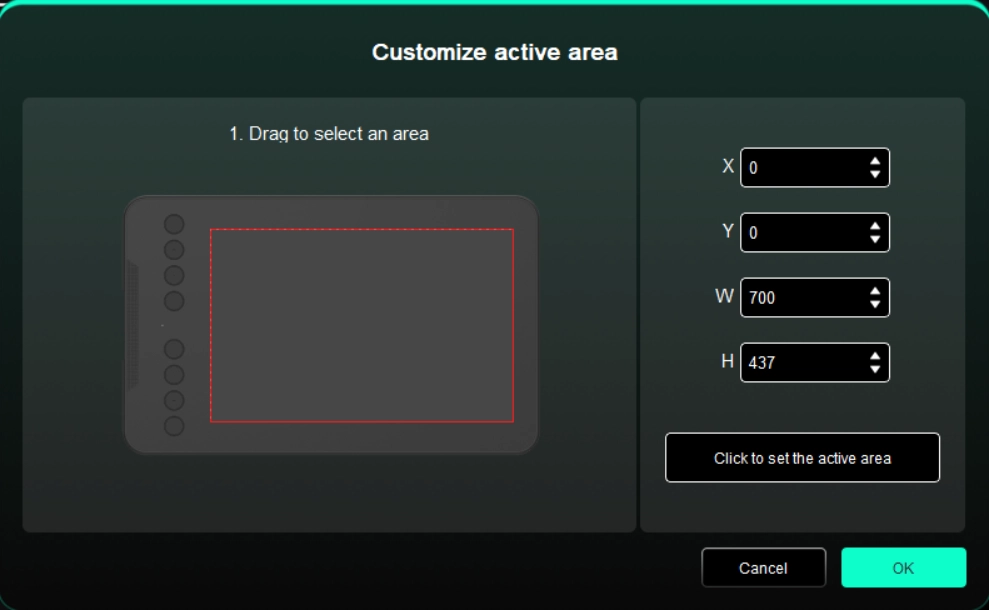
3. Screen Ratio: Match the drawing display's work area proportionally to the entire display area of the selected monitor.
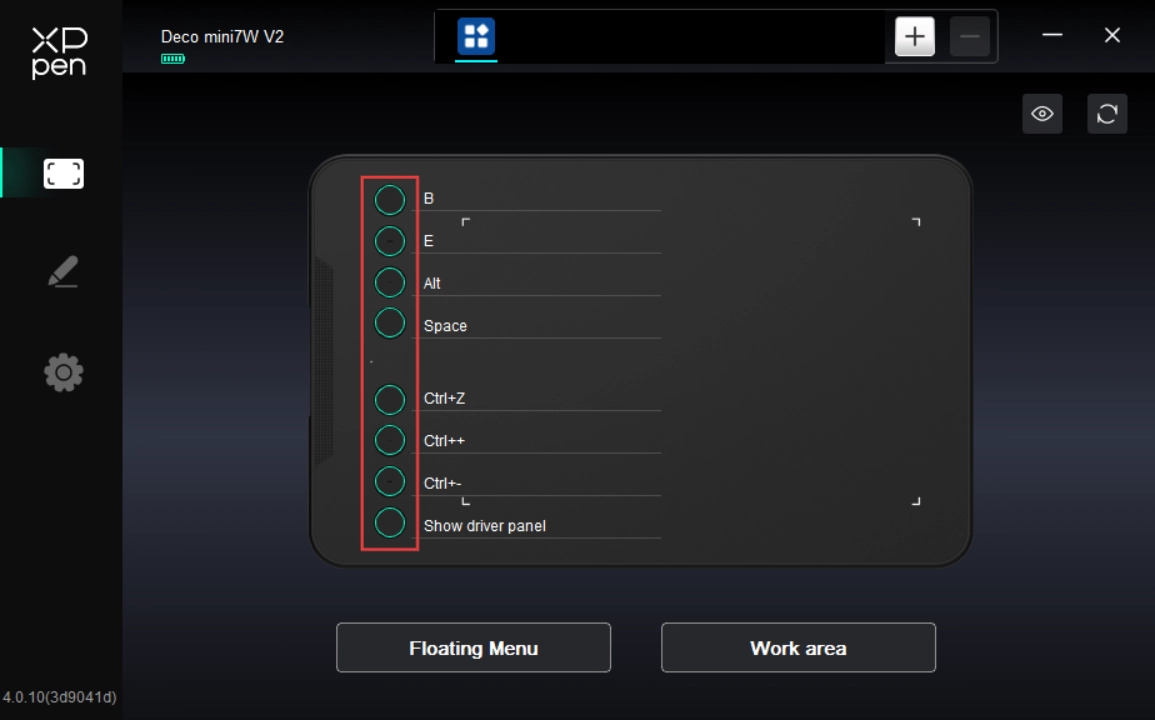
1.3. Shortcut Key
Click the corresponding shortcut key on the device figure to open the hotkey setting page and set custom functions.
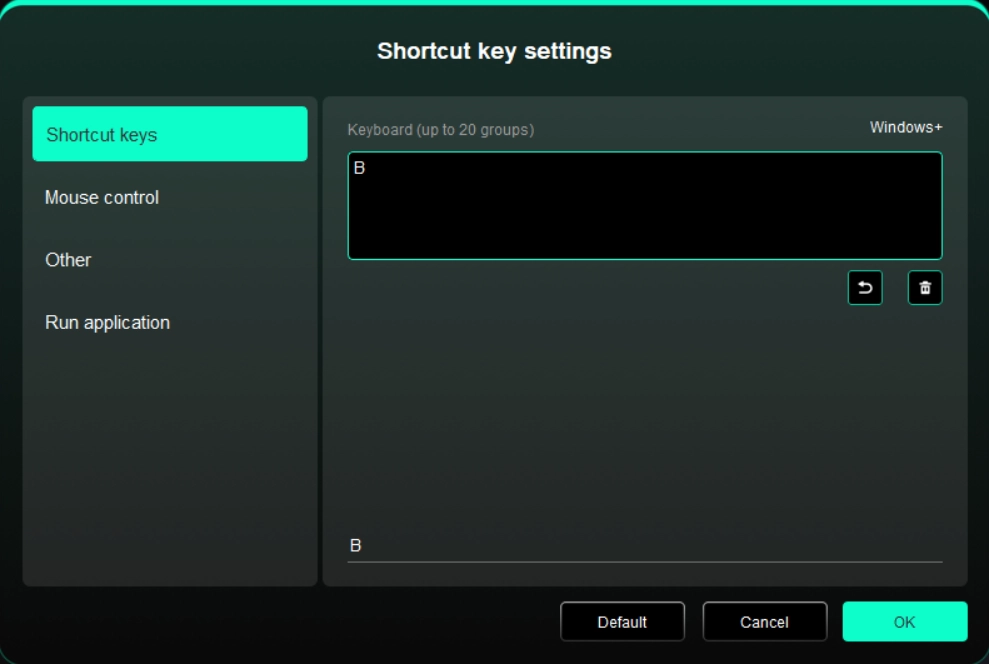
Shortcut Key
Configure shortcut keys. For example, in 3D MAX software, set to Alt + A to activate the Align tool.
Shortcut keys can be configured in multiple groups. For example, type Ctrl + C and Ctrl + V. When you press the corresponding shortcut keys, all assigned functions within the group execute sequentially.
Windows (Command): Add system key combinations. For example, to type Win (Cmd) + Shift + 3, press Shift + 3. Then the driver automatically includes the system key.
Custom Name: At the bottom of the driver interface, use the Custom Name to assign a display name for your current configuration.
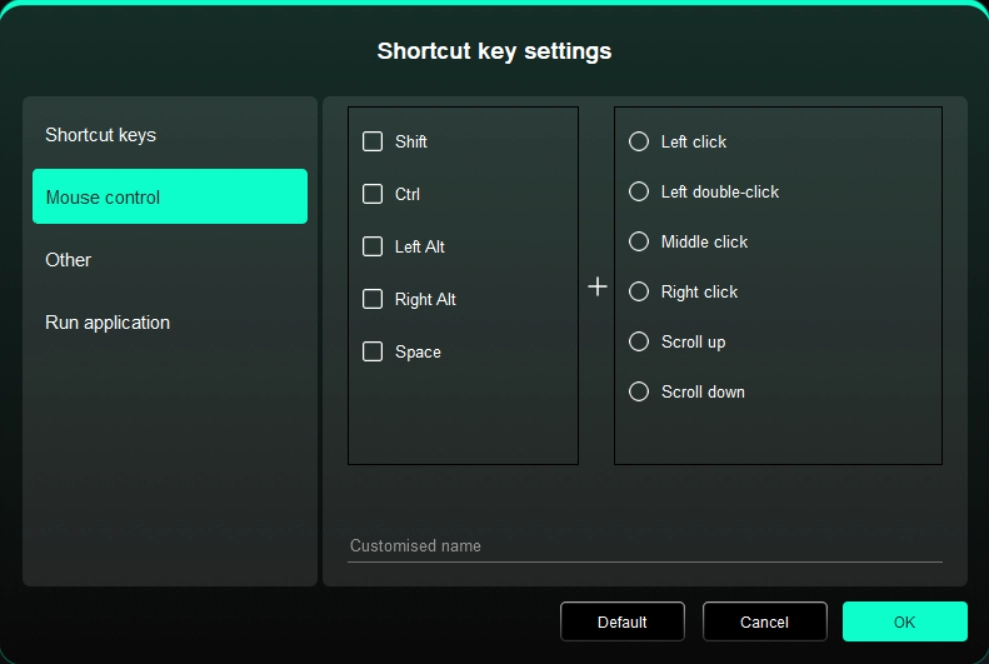
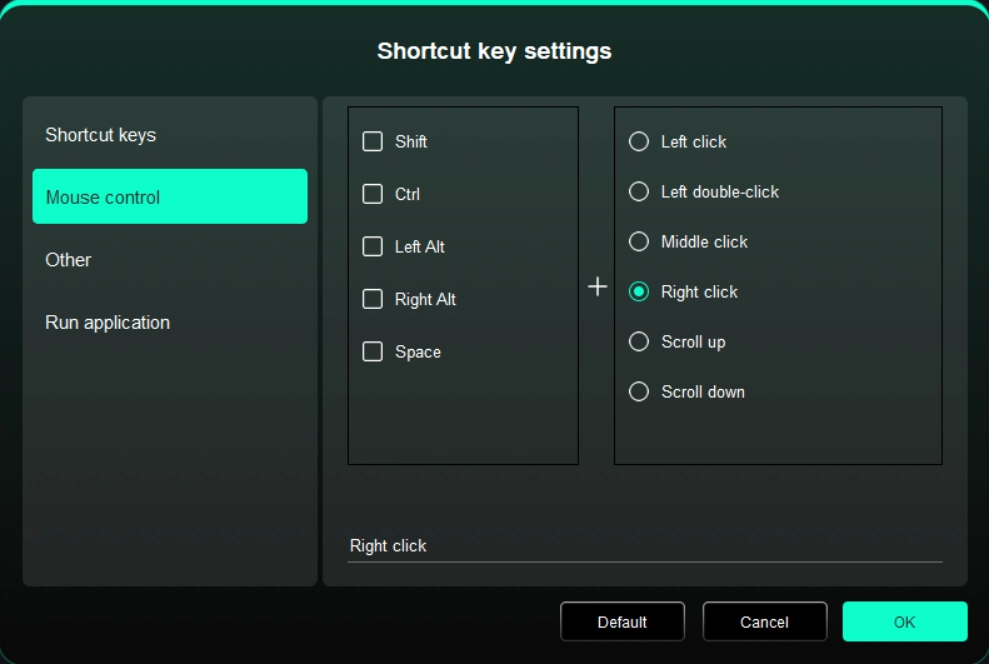
Control via a Mouse
Set mouse and keyboard combinations. For example, selecting "Shift" + "Click" enables this shortcut in supported applications.
Others
Show Driver Panel: Used to quickly access the driver settings panel
Switch Monitors: Used to map the cursor to alternate monitors when multiple monitors are connected
Precision Mode: Used to limit the active display area to a certain range, enabling detailed drawing within the limited area
[B]/[E]: Used to switch repeatedly between B and E keys
Pen/Eraser: Used to switch repeatedly between Pen and Eraser modes
Scroll: Press and hold the assigned key, and move the stylus to scroll.
Floating Menu: Used to activate the floating menu
No Action: Performs no function
Run Application
Use shortcut keys to quickly launch the corresponding applications
2. Stylus Settings
When the stylus is within the work area, it will be automatically recognized and added to the driver.

2.1. Stylus Key
On the diagram, click the stylus key to customize its function.

Shortcut Key
Configure shortcut keys. For example, in 3D MAX software, set to Alt + A to activate the Align tool.
Shortcut keys can be configured in multiple groups. For example, type Ctrl + C and Ctrl + V. When you press the corresponding shortcut keys, all assigned functions within the group execute sequentially.
Windows (Command): Add system key combinations. For example, to type Win (Cmd) + Shift + 3, press Shift + 3. Then the driver automatically includes the system key.
Custom Name: At the bottom of the driver interface, use the Custom Name to assign a display name for your current configuration.

Control via a Mouse
Set mouse and keyboard combinations. For example, selecting "Shift" + "Click" enables this shortcut in supported applications.
Others
Show Driver Panel: Used to quickly access the driver settings panel
Switch Monitors: Used to map the cursor to alternate monitors when multiple monitors are connected
Precision Mode: Used to limit the active display area to a certain range, enabling detailed drawing within the limited area
[B]/[E]: Used to switch repeatedly between B and E keys
Pen/Eraser: Used to switch repeatedly between Pen and Eraser modes
Scroll: Press and hold the assigned key, and move the stylus to scroll.
Floating Menu: Used to activate the floating menu
No Action: Performs no function

Run Application
Use shortcut keys to quickly launch the corresponding applications

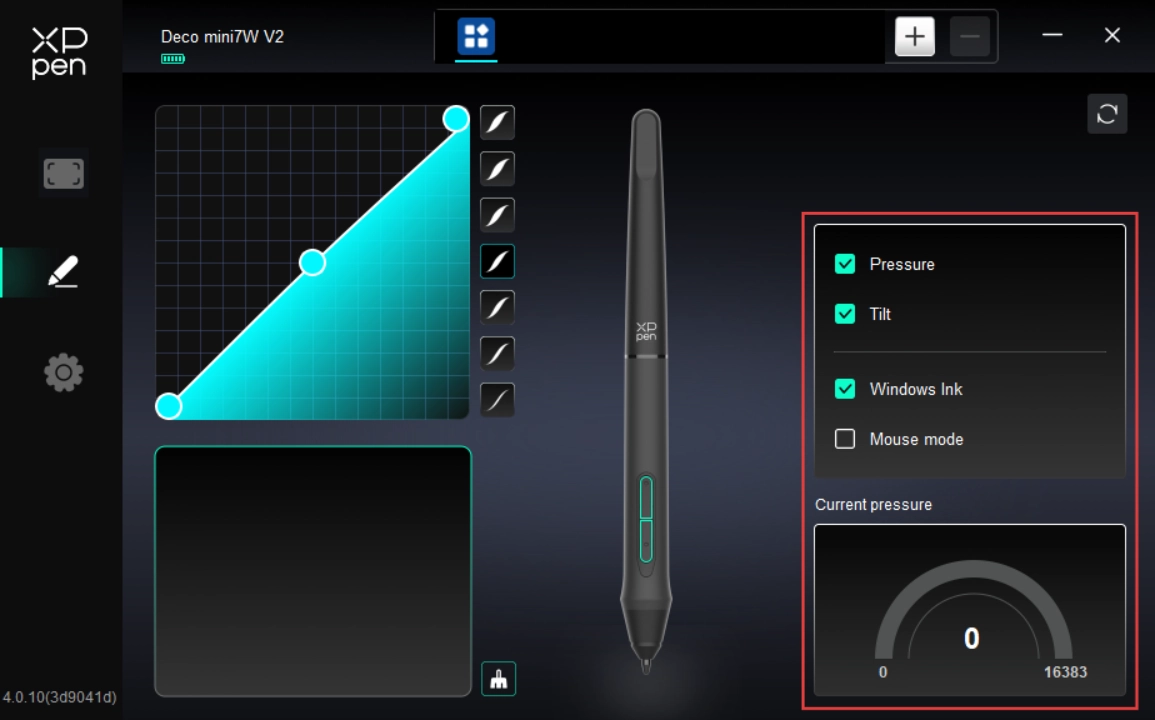
2.2. Stylus Pressure
Used to adjust the Pressure Sensitivity curve or select preset pressure sensitivity options.
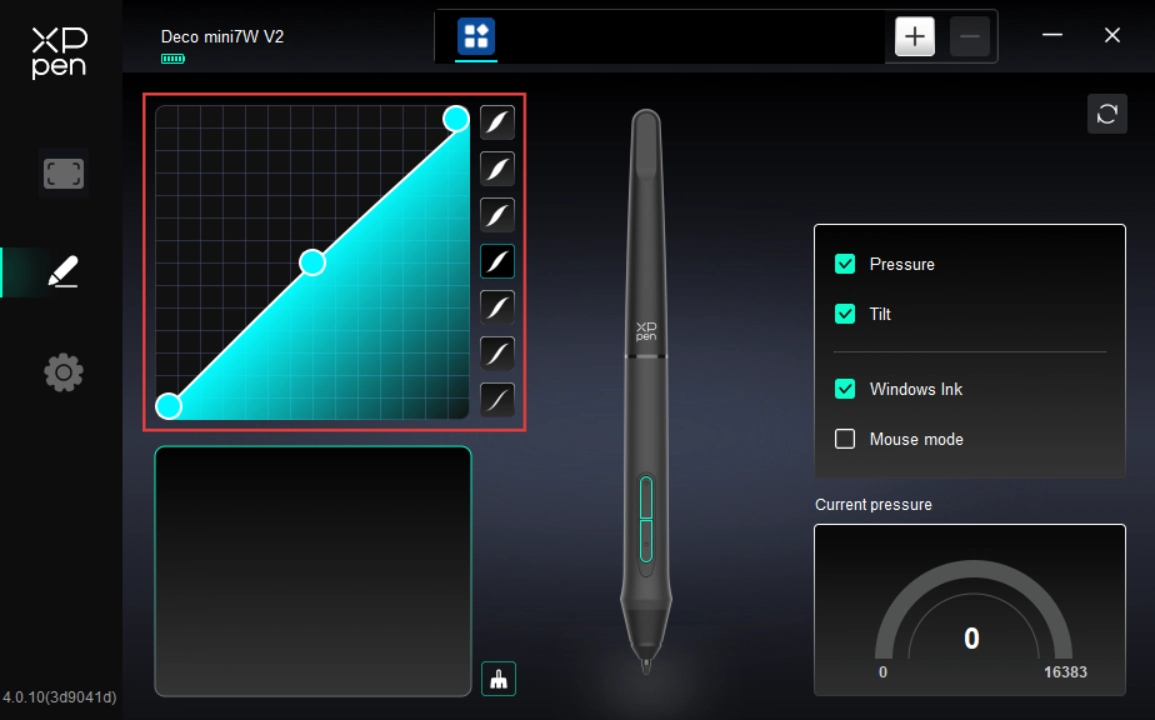
Pressure Sensitivity:
When disabled, the stylus does not respond to pressure sensitivity.
Tilt:
When disabled, the stylus's tilt feature is not activated.
Windows Ink (for Windows only):
Windows supports stylus input. To use handwriting features in Microsoft Office/Whiteboard and other software, do not disable this option.
Mouse Mode:
When you lift the stylus, the cursor remains at its last position, behaving like a mouse. When the mode is enabled, you can adjust the cursor speed as you move on the device; when the mode is disabled, it defaults to stylus mode.
Current Pressure Sensitivity:
Used to test the pressure sensitivity of your current stylus input.
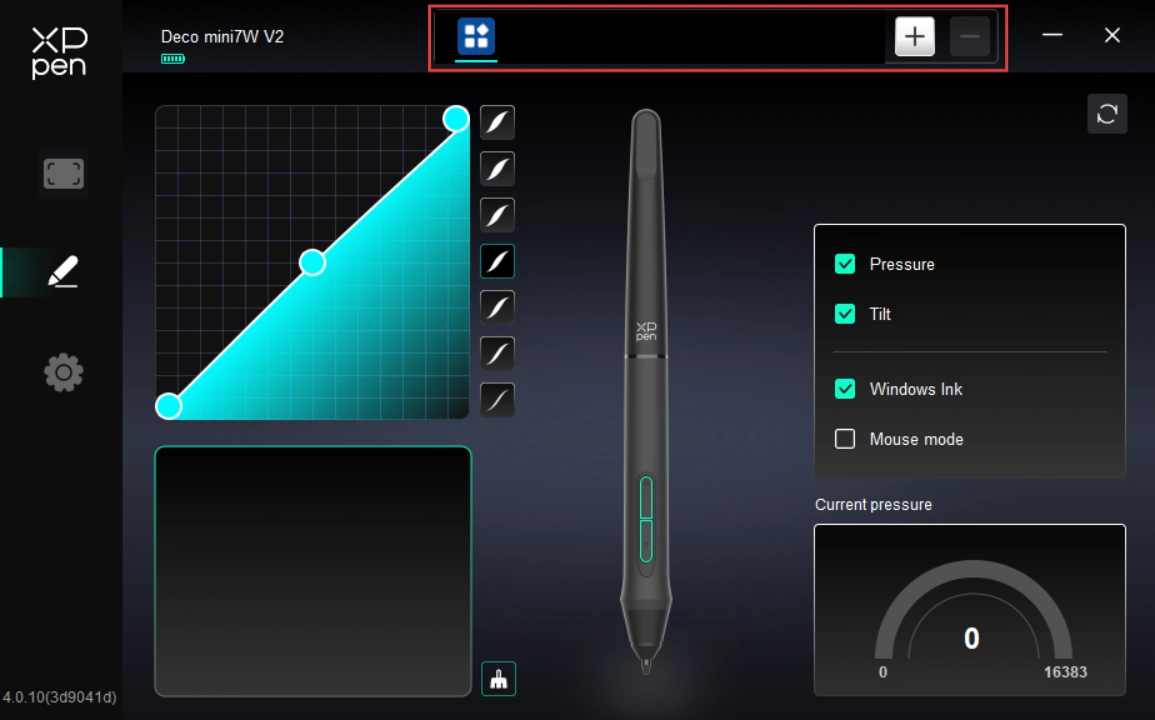
2.3. Application
After adding an application to the application list and selecting it, you can customize the key function of your stylus for the selected application.
For example, if you select an application and modify its settings, the modification only applies when you use this application. The driver can automatically detect the switching between different applications. Up to 7 applications can be added.
To add an application, please follow the steps below:
1. In the upper right corner of the application bar, click "+" icon to open the Application Selection page;
2. Select the application to be added from the open application list. Or click "Browse" to select from the installed applications;
3. Click "OK" to add the selected application to the application bar;
4. To remove an added application, select it and click "-" icon behind the application bar;
5. For all other applications, these settings apply to non-customized applications by default.
2. Driver Settings
Import & Export Profiles:
Import and export profiles to save or load your customized settings.
This feature is only supported on the same operating system.
Diagnostic Tool:
It can be used when problems occur during the use of the driver.
Feedback:
If you encounter any issues or have suggestions while using the driver, please provide feedback through this page.
Reset:
If you encounter any issues or have suggestions while using the driver, please provide feedback through this page.
Prompt Information:
When disabled, key press prompts do not appear at the bottom of the display.
Shortcut Key:
When disabled, all device key functions are not activated.

1. Windows
In the Start menu, open Settings -> Applications -> Applications and Features. Locate "PenTablet". Click "Uninstall". Then follow the prompts for uninstallation.
2. Mac
Navigate to Go -> Applications. Locate XPPen. Click "UninstallPenTablet". Then follow the prompts for uninstallation.
3. Linux
DEB: In the command line, enter "sudo dpkg -r XPPenLinux". Then execute the command;
RPM: In the command line, enter "sudo rpm -e XPPenLinux". Then execute the command;
Tar.gz: Unzip the file first. In the command line, enter "sudo". Drag "uninstall.sh" into it. Then execute the command.
1. How to fix a device that cannot be recognized by my computer?
Check whether the computer's USB port is working properly. If not, try a different USB port.
2. How to fix a stylus that is not working?
1) Check whether the stylus is the one supplied with the product.
2) Install the driver and check the stylus settings page in the driver for proper operation.
3. What to do if the drawing software fails to detect pen pressure?
1) Check whether the drawing software supports pressure sensitivity.
2) Download and install the latest driver on the XPPen official website and test whether pen pressure works.
3) Before installation, please close all anti-virus software and drawing software.
4) If your computer has drivers for other brands of drawing tablets/displays installed, please uninstall them first.
5) After installation, please restart your computer.
6) If the pen pressure test is normal (Windows: in the driver's stylus settings, ensure Windows ink is enabled), and then open the drawing software and test again.
4. How to fix drawing lag in drawing software?
Check whether your computer's specifications (CPU & GPU) meet the recommended requirements of the drawing software you are using. Check the software maker's FAQ on their official website for recommended settings and optimization tips.
This device complies with Part 15 of the FCC Rules. Operation is subject to the following two conditions:
(1) This device may not cause harmful interference.
(2) This device must accept any interference received, including interference that may cause undesired operation.
This device complies with Industry Canada licence–exempt RSS standard(s).
Operation is subject to the following two conditions:
(1) this device may not cause interference, and
(2) this device must accept any interference, including interference that may cause undesired operation of the device.
For any questions, please contact us in the following ways:
Email: service@xp-pen.com
Website: www.xp-pen.com