Deco Pro Series Drawing Tablet (Gen 2) Manual
Contents
Introduction
Product Settings
FAQS

Thank you for choosing XPPen Deco Pro(Gen 2) Drawing Tablet. This user manual is specially designed to detail the productтs functions and features. Please read this manual before using the product to ensure safe and proper use.
Due to the latest product improvements, content may differ from the final product and is subject to change without prior notice.
Note: The pictures in the User Manual are for reference only. The User Manual supplied with the device may vary depending on the model.
Product Overview
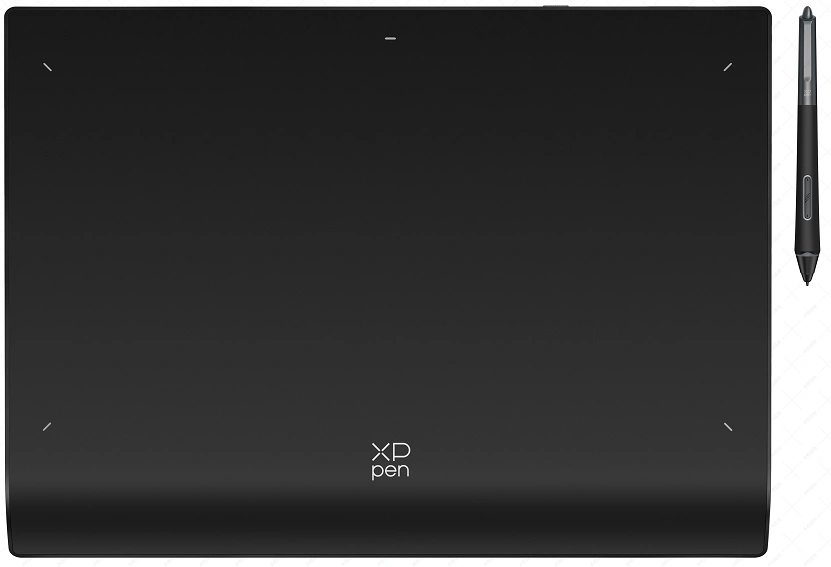
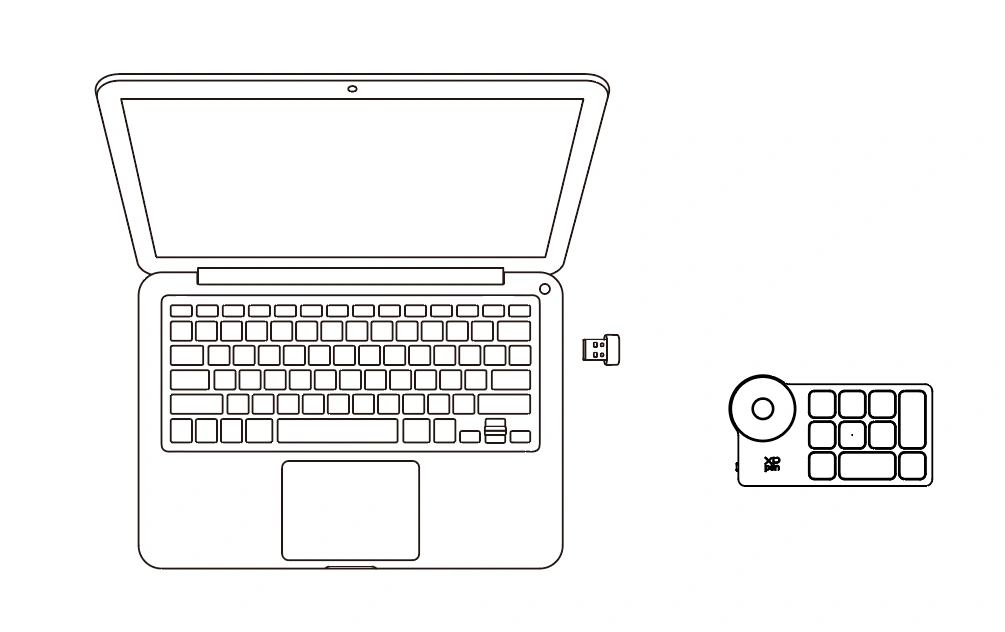
Drawing Tablet
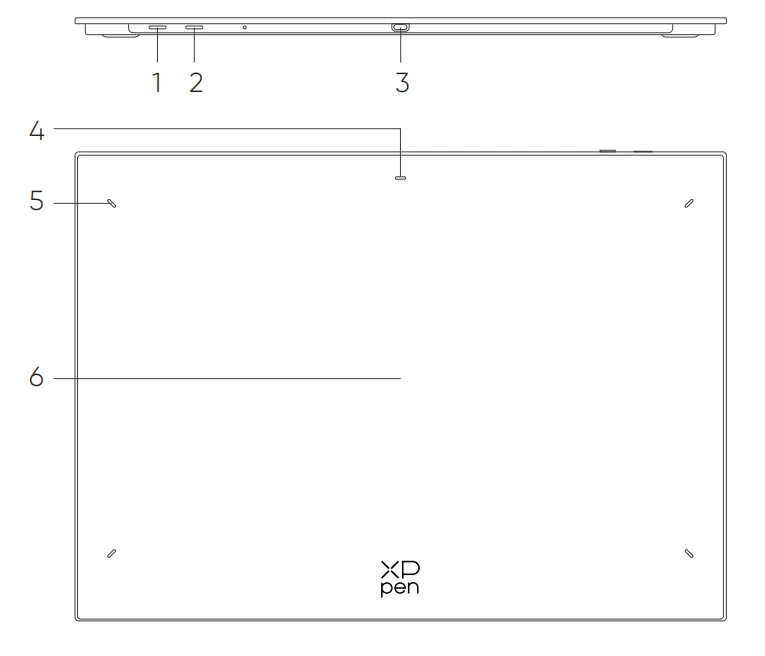
1. Power Key
a. Long press for 3 secondsяМPower on or off
b. Long press for 6 secondsяМBluetooth pairing mode
2. Bluetooth Switching Button
3. USB -C port
4. Indicator 1
In blue status:
a. Flashing slowly: Waiting for Bluetooth connection
b. Flashing quickly: Waiting for Bluetooth pairing
(Long press the Power Key for 6 seconds)
c. Always On: Successfully paired
In red status:
a. Flashing: Low battery (тЄ 20%)
b. Always On: Charging
c. Off: Fully charged
The purple status indicates that the red and blue indicators are both On simultaneously.
5. Indicator 2
a. Off: The stylus is beyond the active area
b. Always On: The stylus enters into the active area
6. Active Area
Included with your product
Drawing Tablet x1
Stylus x1
Pen Nibs x4
Felt Nibs x4
Pen Case x1
USB-C to USB-C Cable x1
USB-C to USB-A Cable x1
Wireless Shortcut Remote x1**
Bluetooth Receiver x1 (use with Wireless Shortcut Remote)***
Glove x1
* The list is for illustrative purposes only. Please refer to the actual product.
** Due to different product specifications, the Wireless Shortcut Remote may not be standard. Please refer to the actual product.
*** Due to different product specifications, the Bluetooth receiver may not be standard. Please refer to the actual product.
Wireless Shortcut Remote
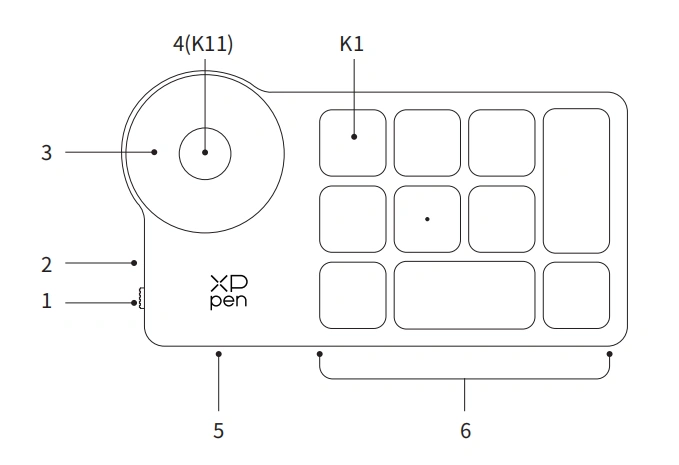
1. Power Slide Switch
2. Indicator light
In blue status:
a. Flashing slowly: No Bluetooth connected.
b. Flashing quickly: Waiting for Bluetooth pairing.
c. Always on: Successfully paired (Always on for 30 seconds and then off)
In red status:
a. Flashing: Low battery (тЄ20%)
b. Always on: Charging
c. Off: Fully charged.
A purple color indicates that the red and the blue indicator are both on simultaneously.
3. Roller
4. Roller Switch Key (Long press for 6 seconds to enter Bluetooth pairing)
5. USB-C Port
6. Shortcut Key Group
4 customizable groups of 10 keys per application for a total of 40 shortcut keys. You can disable sets if they are not needed.
Group One is enabled by default, and K1 is the toggle key. Click to switch between Group.
* The list is for illustrative purposes only. Please refer to the actual product.
Connection
Wired Connection
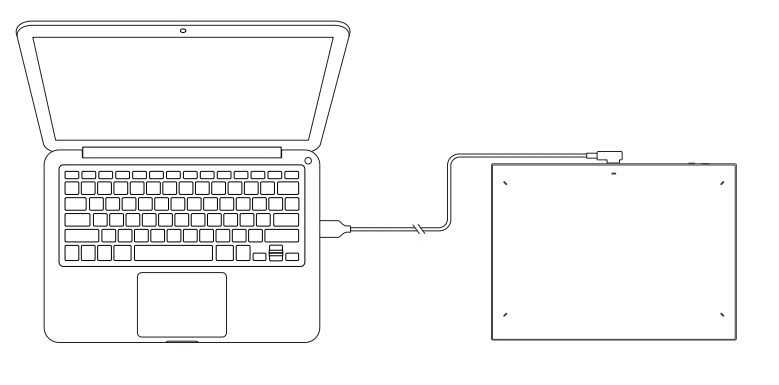
Drawing Tablet
Please connect the USB-C to USB-C cable or the USB-C to USB-A cable to the USB port on the computer and the USB-C port on the tablet respectively.
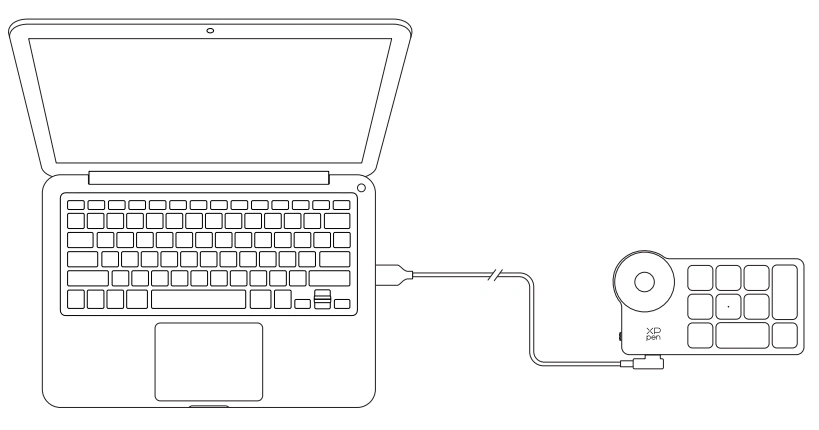
Wireless Shortcut Remote
Please connect the USB-C to USB-C cable or the USB-C to USB-A cable to the USB port on the computer and the USB-C port on the Wireless Shortcut Remote respectively.
Connect to Android Phone or Tablet
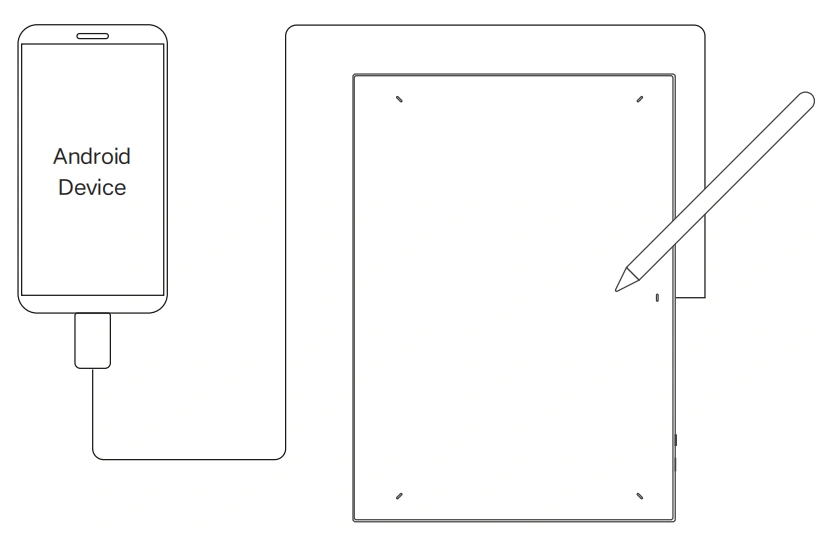
1. Please connect the USB-C to USB-C cable to the Android device and the drawing tablet respectively.
2. Please place the XPPen drawing tablet and the Android device upright, and open an Android App with support for pressure sensing.
3. Please disable the auto-rotate function in the Android device, and keep the screen in portrait mode.
* Currently, the drawing tablet can only be used normally when the Android device is in portrait mode. It will not be used normally when in landscape mode.
Wireless Connection
A. Direct Bluetooth Connection
Drawing Tablet
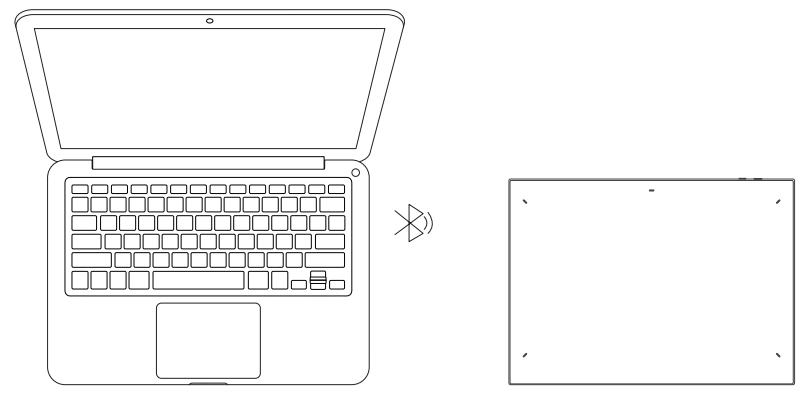
1. Press and hold the power switch for 3 seconds to turn on the drawing tablet, and the indicator light 1 flashes in blue; then long press the power switch for 6 seconds to enter Bluetooth pairing and the indicator light 1 flashes in blue quickly.
2. Turn on the Bluetooth on the computer, add Bluetooth device, search for the device name "Deco Pro *** ", and click to complete the Bluetooth pairing, with the blue indicator light 1 always on.
3. Press and hold the power switch for 3 seconds to shut down. Indicator 1 will be off.
Wireless Shortcut Remote
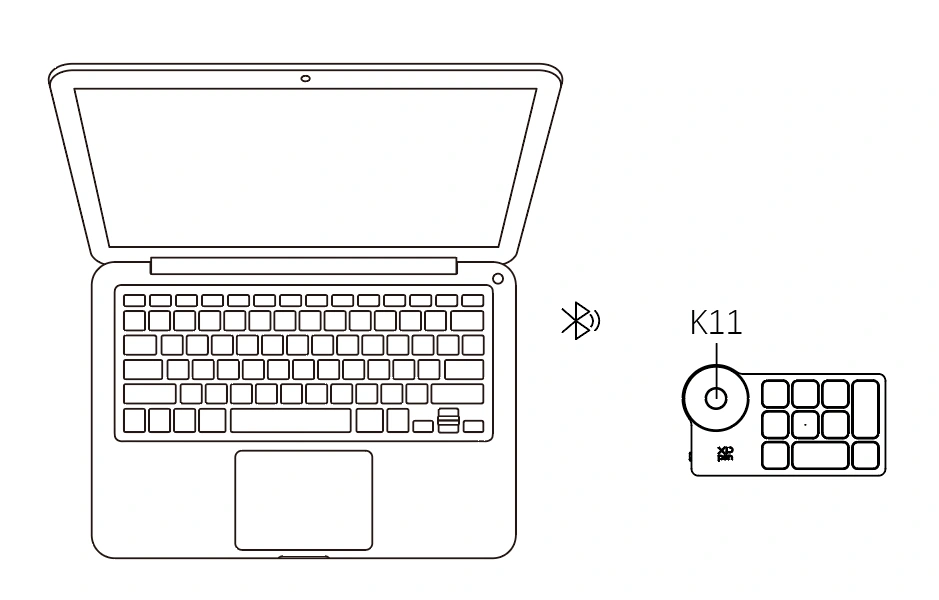
1. Slide the Wireless Shortcut Remote power switch and the blue indicator light flashes slowly. Then long press the K11 shortcut key for 6 seconds to enter Bluetooth pairing and the blue indicator light flashes quickly.
2. Turn on the Bluetooth on the computer, add Bluetooth device, search for device name тShortcut Remoteт and complete Bluetooth pairing by clicking the device name тShortcut Remoteт, with the blue indicator always on. The indicator will be off after 30 seconds.
3. Slide the power switch again to turn off the device.
B. Connection via Bluetooth Receiver
Only Wireless Shortcut Remote Supported
Plug the Bluetooth receiver into the computer and slide the power switch, with the indicator light always on in blue. The blue indicator will be off after 30 seconds.
*If the Bluetooth receiver needs to re-pair with the device, please download the wireless pairing tool from the official website of XPPen (https://www.xp-pen.com) according to the product model, and refer to the operation guide for pairing connection.
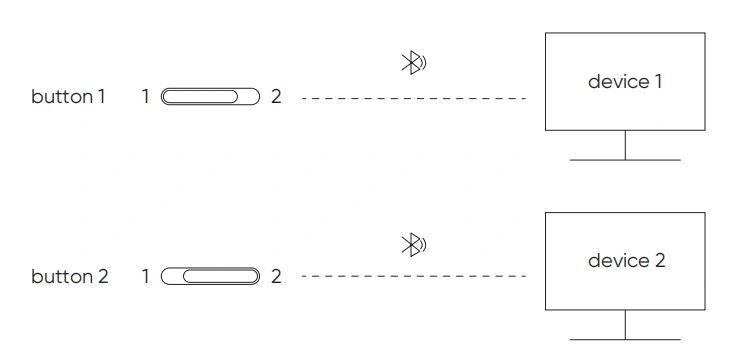
Bluetooth Device Switching
The drawing tablet supports connection to two Bluetooth devices.
1. With the drawing tablet on, toggle the Bluetooth switching button to position 1, long press the power button for 6 seconds, and the drawing tablet is paired with device 1.
2. With the drawing tablet on, toggle the Bluetooth switching button to position 2, press and hold the power key for 6 seconds, and the drawing tablet is paired with device 2.
3. Toggle the Bluetooth switching button to switch the Bluetooth connection between the two devices.
Compatibility
Drawing Tablet
Wired Connection;
Windows 7 (or later), macOS 10.12 (or later), Android 10.0 (or later),
Chrome OS 88 (or later), Harmony OS, Linux.
Bluetooth Connection:
Windows 10 (or later), macOS 10.12 (or later).
Wireless Shortcut Remote
Wired or Dongle Connection;
Windows 7 (or later), macOS 10.12 (or later), Linux.
Bluetooth Connection:
Windows 10 (or later), macOS 10.12 (or later).
Driver Installation
To ensure the device works properly, please install the driver before using it.
Please download the driver suitable for your product model from XPPen website (https://www.xp-pen.com).
Notes:
1. Before installing the driver, please turn off all antivirus software and graphics software.
2. Uninstall drivers (if any) for other drawing displays/tablets before the installation.
3. Restart your computer after the installation is completed.
4. For the best performance for your device, we recommend you to install the latest driver.
Windows:
Unzip file. Run the "exe" file as administrator, and follow the prompts to complete the installation.
Mac:
Unzip file, run the "dmg" file and follow the prompts to complete the installation. Go to System Settings -> Privacy & Security -> Accessibilities; Wireless: System Settings -> Privacy & Security -> Accessibilities & Bluetooth, please ensure that the PenTabletDriver option is checked; Otherwise, the device and driver may not function properly.
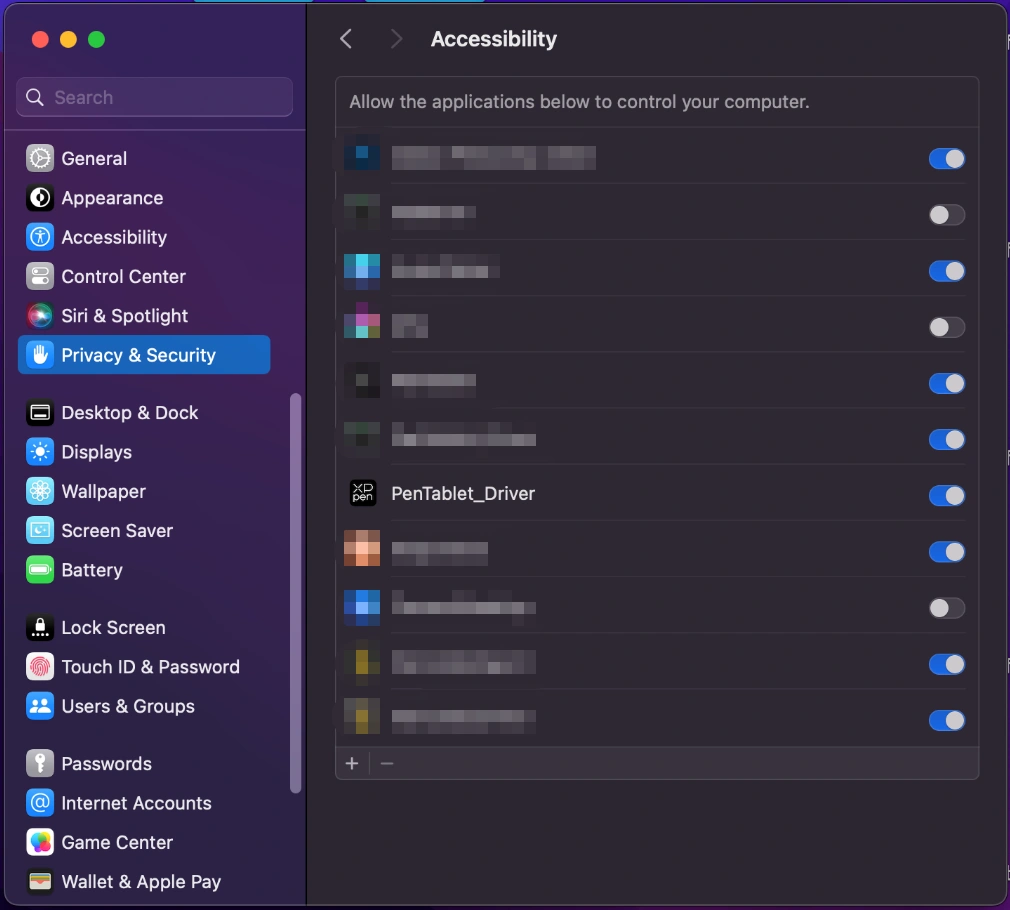
If there is no PenTablet_Driver on the list, go to Library -> Application Support -> PenDriver to add the driver manually.

Linux:
Deb: Enter command sudo dpkg -i. Drag the installation file to the window and execute the command;
Rpm: Enter command sudo rpm -i. Drag the installation file to the window and execute the command;
Tag.gz: Unzip file. Enter command sudo. Drag install.sh to the window and execute command.
Introduction to Driver
The driver will run automatically after being installed. If it does not run automatically, please run it manually.
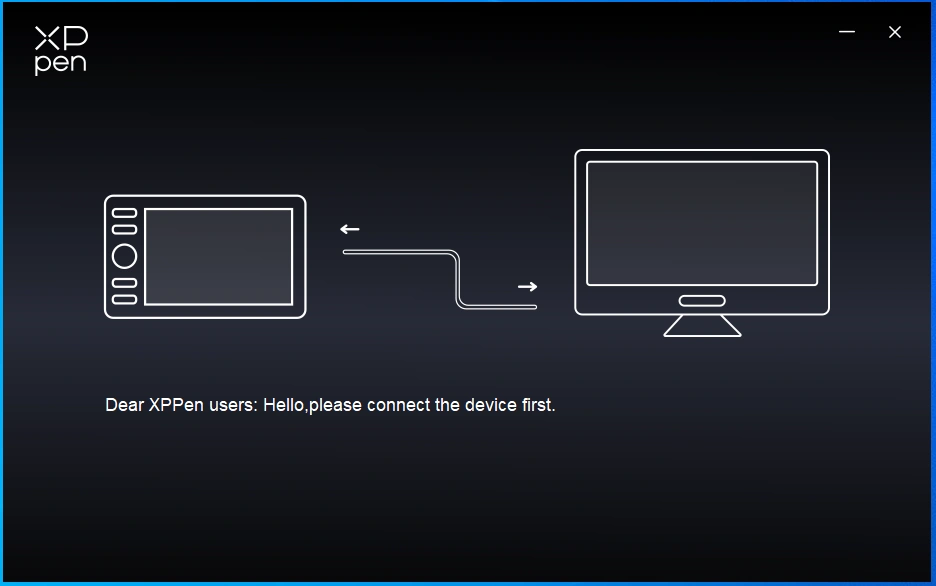
If the device is not connected or the connection fails, you can see the following prompt. In this case, try to restart your computer or the driver, or contact our service staff for support.
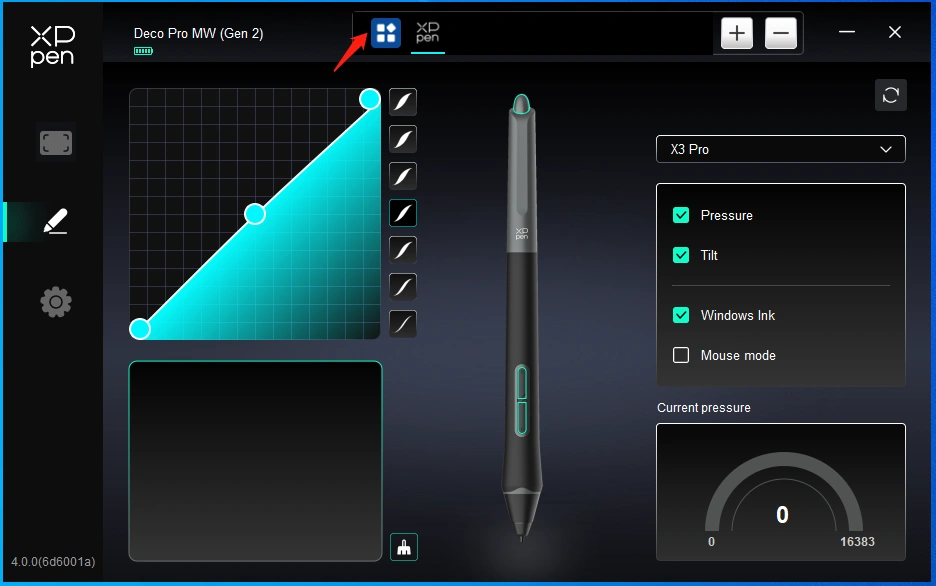
If the device is connected to your computer successfully, the device name will be displayed in the upper left corner of the driver.
You can connect up to multiple devices via the driver at the same time. Customize a specific device's settings after switching to that device, and all changes made will only apply to that device.
Device Settings
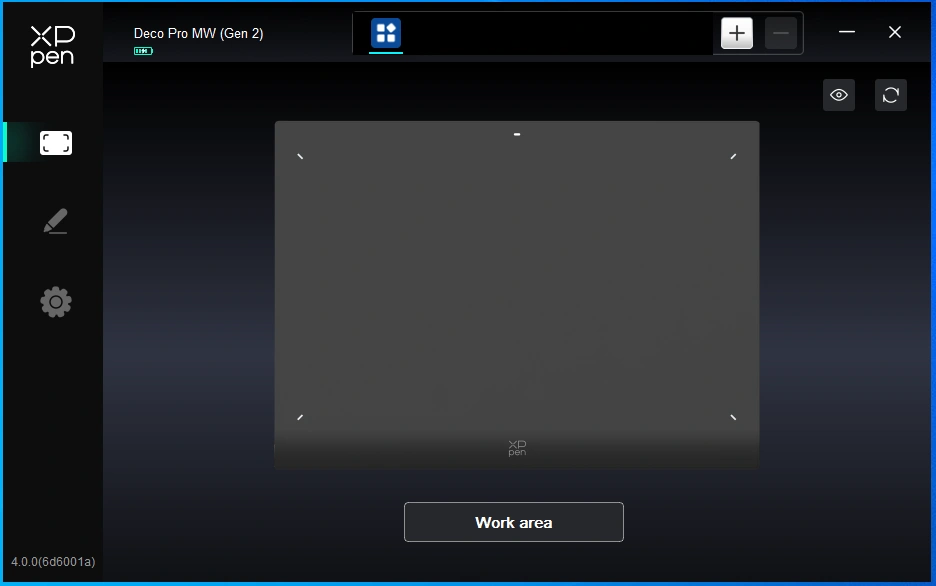
Work Area
Go to Work area and define the mapping between the device's work area and the screen display area.
Screen
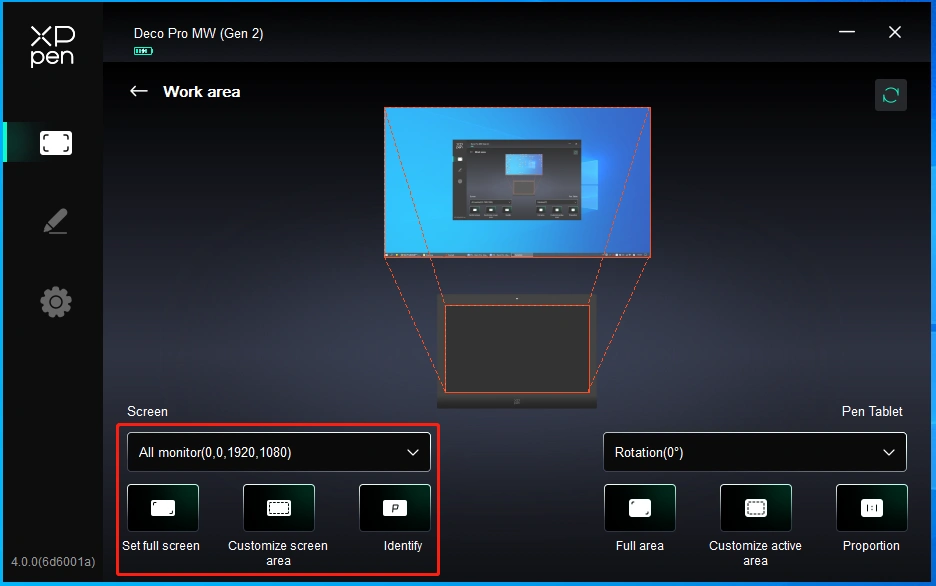
You can set the mapping between the display area of the current screen and the device.
If multiple monitors are used in duplicate mode, the work area of the device will be mapped to all monitors. When the pen moves in the work area, the cursor on all monitors will move at the same time.
If multiple monitors are used in extend mode, go to monitor tabs to select one of the monitors that the work area of the device will be mapped to.
There are two available options to set the screen mapping area:
1)Set full screen: After you select it, the device will be mapped to the whole area of the selected monitor.
2)Customize screen area: There are three ways to customize the screen area:

a) Drag to select an area: Drag the cursor from one point to another on the Screen.
b) Click to set screen area: Click the upper left corner position and lower right corner position to select on the monitor.
c) Coordinates: Manually enter coordinates in the corresponding input boxes for X, Y, W and H.
3) Identify: Identify all connected monitors. The numeric identifier will be displayed in the lower left corner of each monitor.
Drawing Tablet
The driver enables the following ways to set the work area of the device:
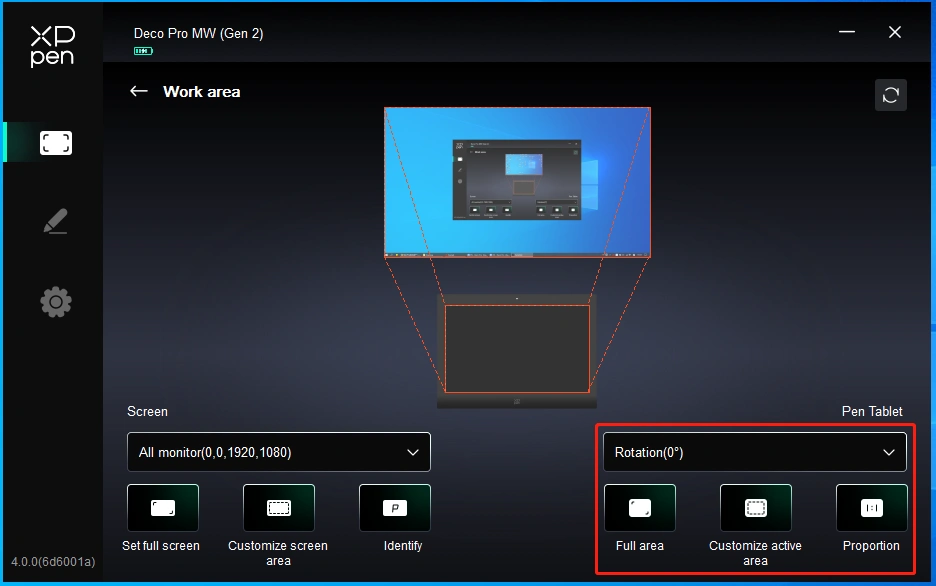
1) Full area: The whole work area of the device is available.
2) Customize active area: Three ways.
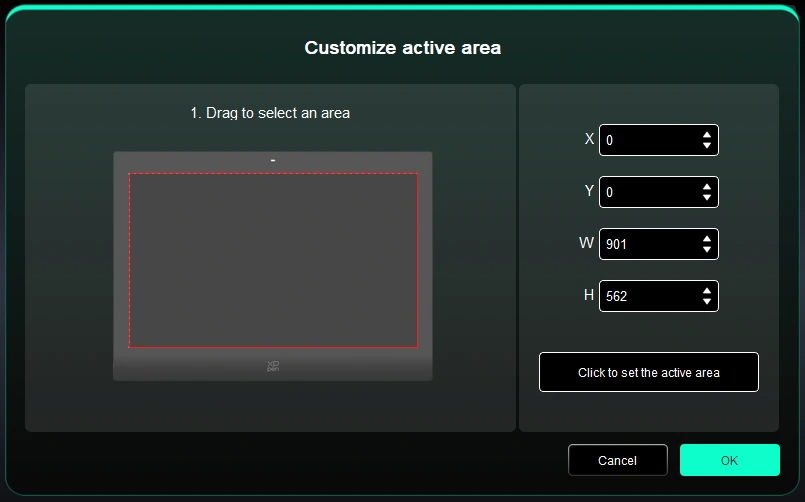
a) Drag to select an area: Drag the cursor from one point to another on the device.
b) Click to set active area: Use stylus to click the upper left corner position and lower right corner position on your device.
c) Coordinates: Manually enter coordinates in the corresponding input boxes for X, Y, W and H.
3) 3.Proportion: Scale your device's work area and selected display area proportionately.
For example: After selecting proportion, if your draw a circle on the device, a circle will appear on the screen, but some part of the work area may not be used. But if you donтt choose the proportion and draw a circle, then the circle may change into an ellipse on the screen.
Rotation:
You can set the device to 0ТА, 90ТА, 180ТА and 270ТА clockwise for use.
Left-handed mode: Rotate 180ТА.
Application
The driver allows you to set different functions for diffrent applications.
Add an application from the list of applications, tick the application, and then customize pen keys functions.
For example, if you select an application and change its configuration, the change is valid only when you use the application. When you switch to another application, the driver will recognize it automatically. You can add up to 7 applications.
1. Click the + icon on the top right of the application bar to open the application list;
2. Select an application to be added from the running applications or click Browse to add from the installed applications;
3. Click "OK" to add the selected application;
4. Select an added application, and click the - icon on the top right of the application bar to delete the application.
If you select all other applications, it will apply to other uncustomized applications.
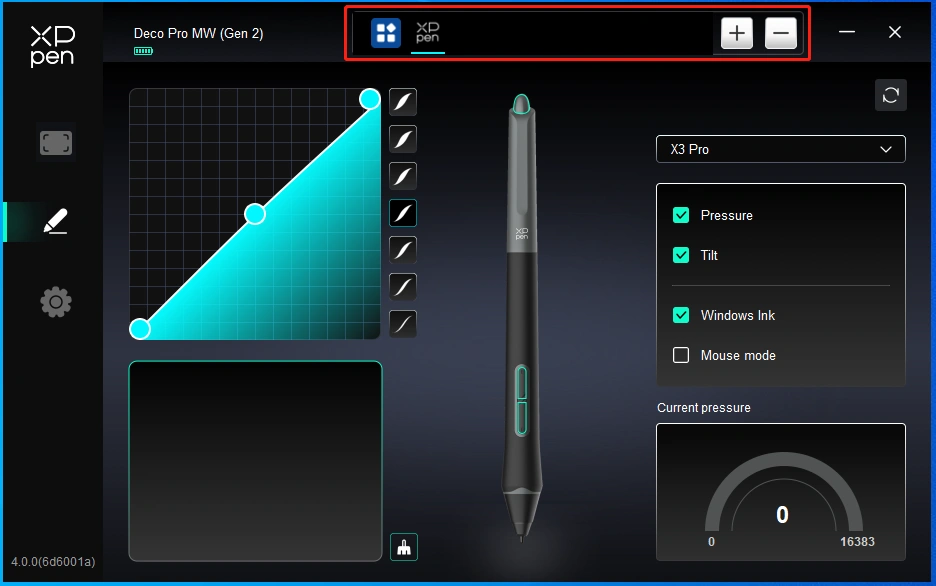
Pen settings
When the stylus is within the work area, the device will recognize the stylus and add it to the driver. The stylus used should be compatible with the device.
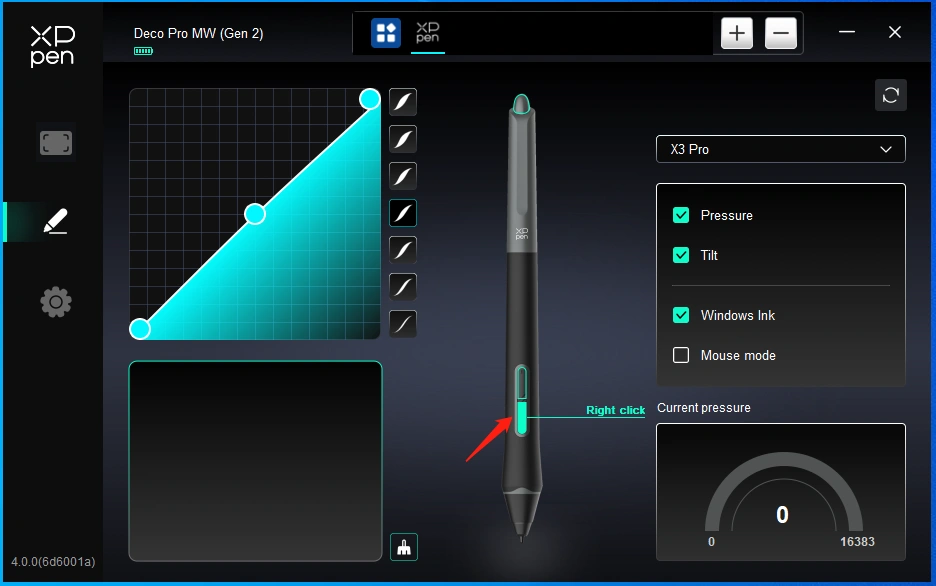
Click on the pen button position on the image to customize its function.
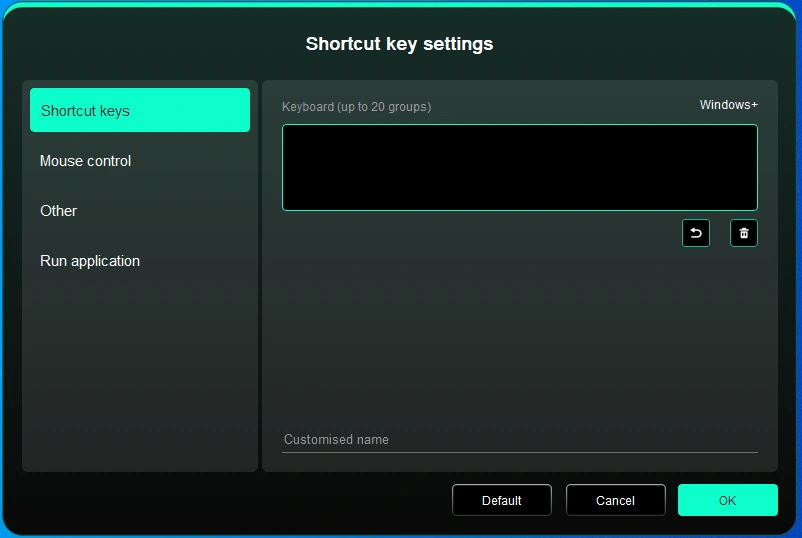
Keyboard:
You can set keyboard shortcut, for example, set it as тAlt+Aт in 3D MAX, so the alignment tool can be used.
Multiple groups of shortcut keys can be set. For example, type Ctrl+C, Ctrl+V, and when you press the key, the shortcut key functions set will all run once.
Windows (Command): You can add a combination key containing system key, for example: to enter Win(Cmd)+Shift+3, you can press Shift+3 and the driver will bring the system key automatically.
Mouse control:
Set the key combination of mouse and keyboard. With the "Shift" and "Left Click" selected, the shortcut actions can be enabled in application that supports such key combinations.
Other-Precision mode:
Limit the deviceтs work area to a certain area. This function may allow you to create more detailed drawings.
Run Application:
Run the selected application.
Customized name:
You can customize the name of the current key settings.
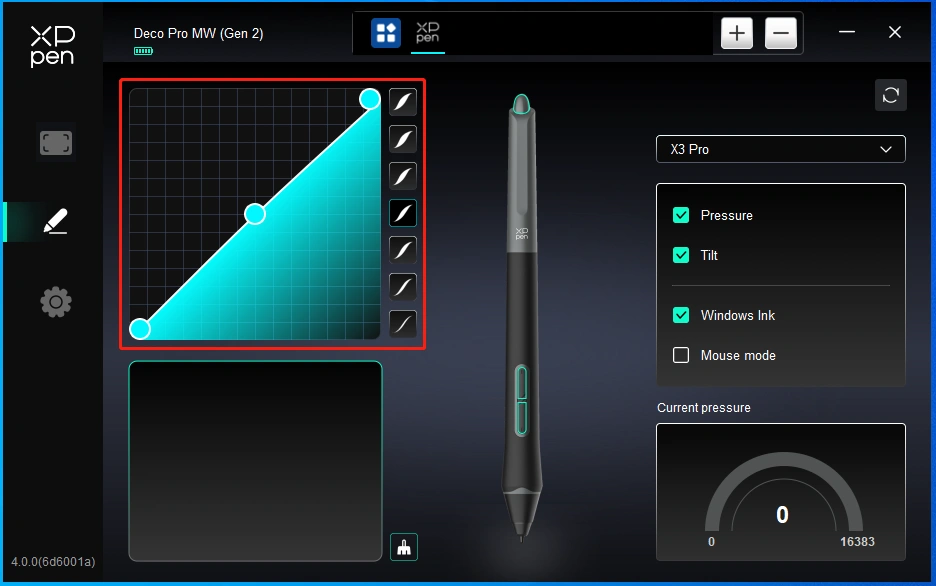
Pressure settings:
By adjusting the "pen pressure" curve or selecting preset pressure options.
Mouse mode:
When you move your pen out of the work area, the cursor will stay where you leave, which is like operating a mouse. Select the mode and you can adjust the speed of the cursor on your device. If you do not select the mode, the pen mode applies by default.
Windows Ink (for Windows only):
Windows supports the handwriting function. If you need to use this function in Microsoft Office/Whiteboard or other software, do not turn it off.
Wireless Shortcut Remote
Application
Please refer to the previous text for settings or usage methods.
Roller
Through the key in the middle of the roller, you can switch between the functions of the roller.
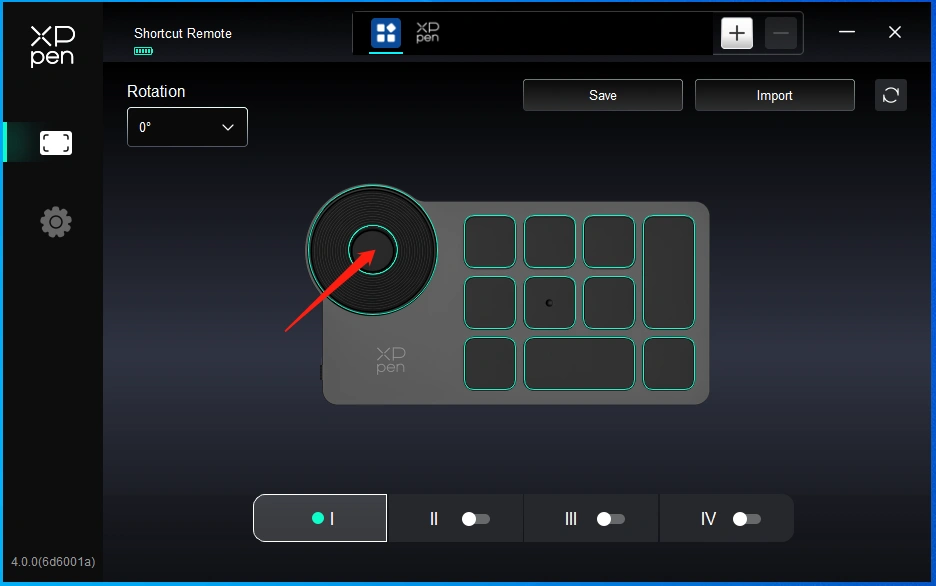
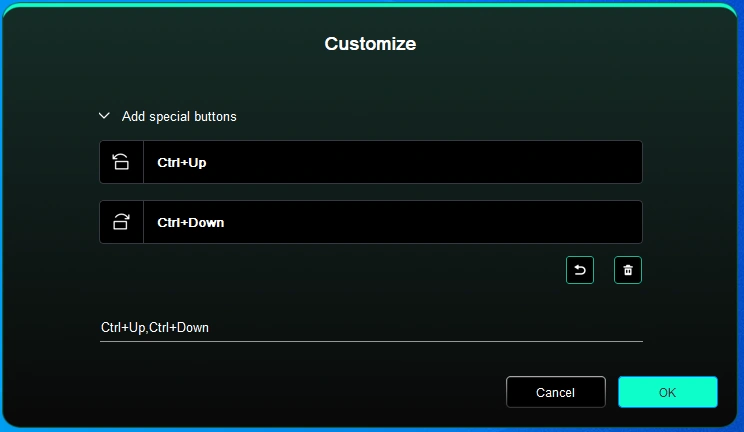
Customize:
Click on the position of the roller on the image, select "Customize" from the preset function drop-down menu, and customize the clockwise and counterclockwise functions of the roller by entering the desired keys or combination keys on the keyboard.
Import/Save
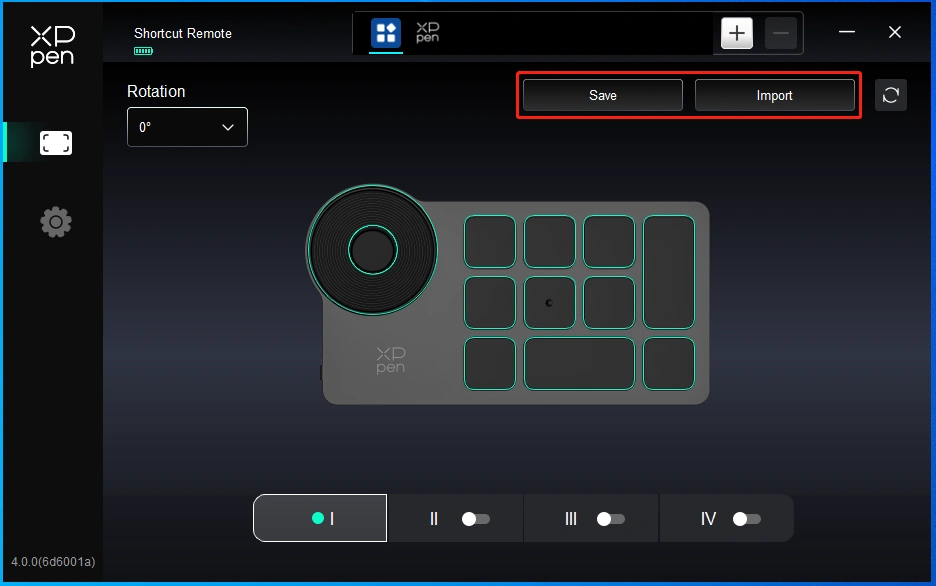
Import:
Import the configuration saved in the device into the driver under the selected application.
Save:
Save the configuration under the currently selected application to the device.
Note: please use the "Import" and "Save" functions in the case of wired connection. The configuration of "Import" and "Save" does not include the rotation setting, and is only valid under the same operating system.
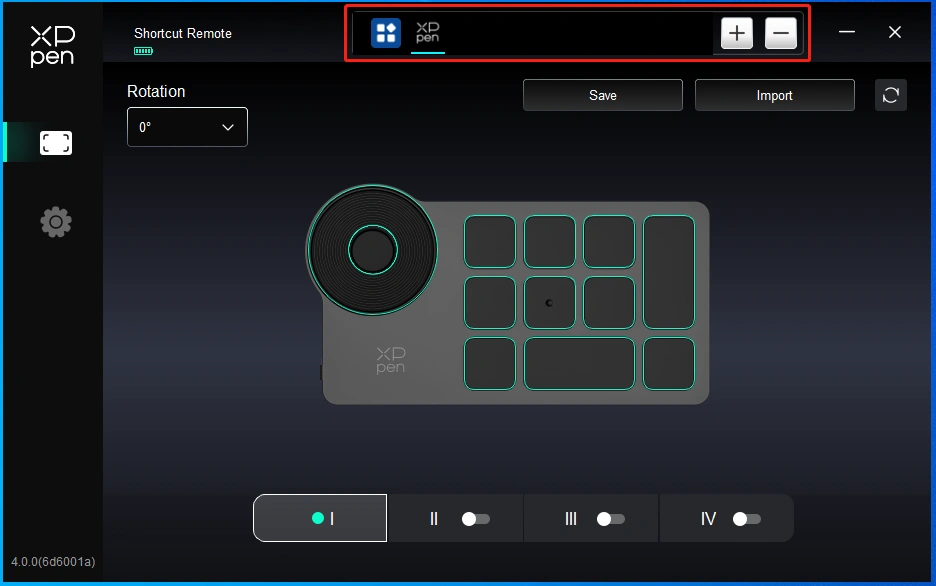
Shortcut keys
The driver provides four groups of shortcut keys. The first group of shortcut keys is used by default (cannot be disabled). Each group of keys can be customized for different functions. After enabling, you can switch between the enabled groups through "key group switching" (the default is K1 key, which can be customized as other keys).
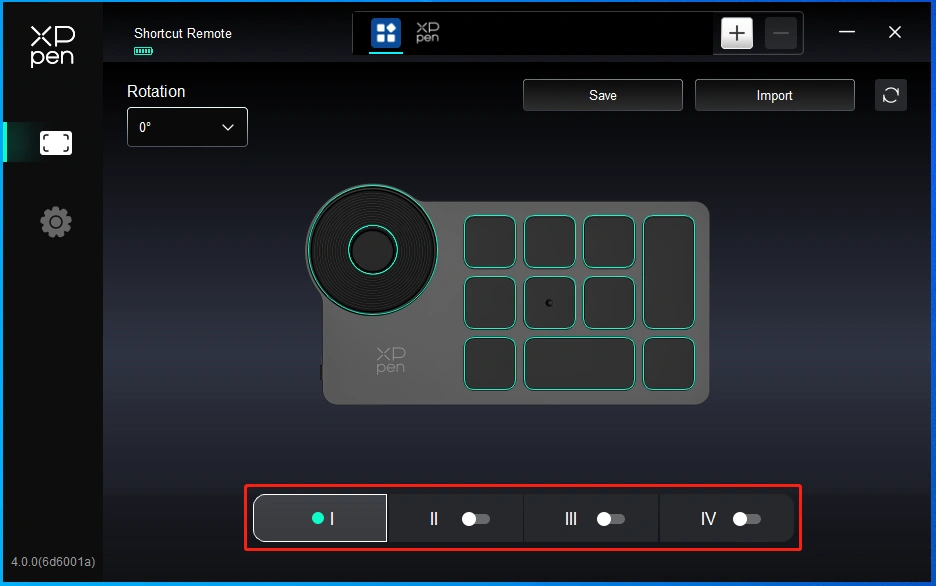
Customize:
Click on the corresponding button position on the device image to customize its function; Please refer to the previous text for settings or usage methods.
Set preview
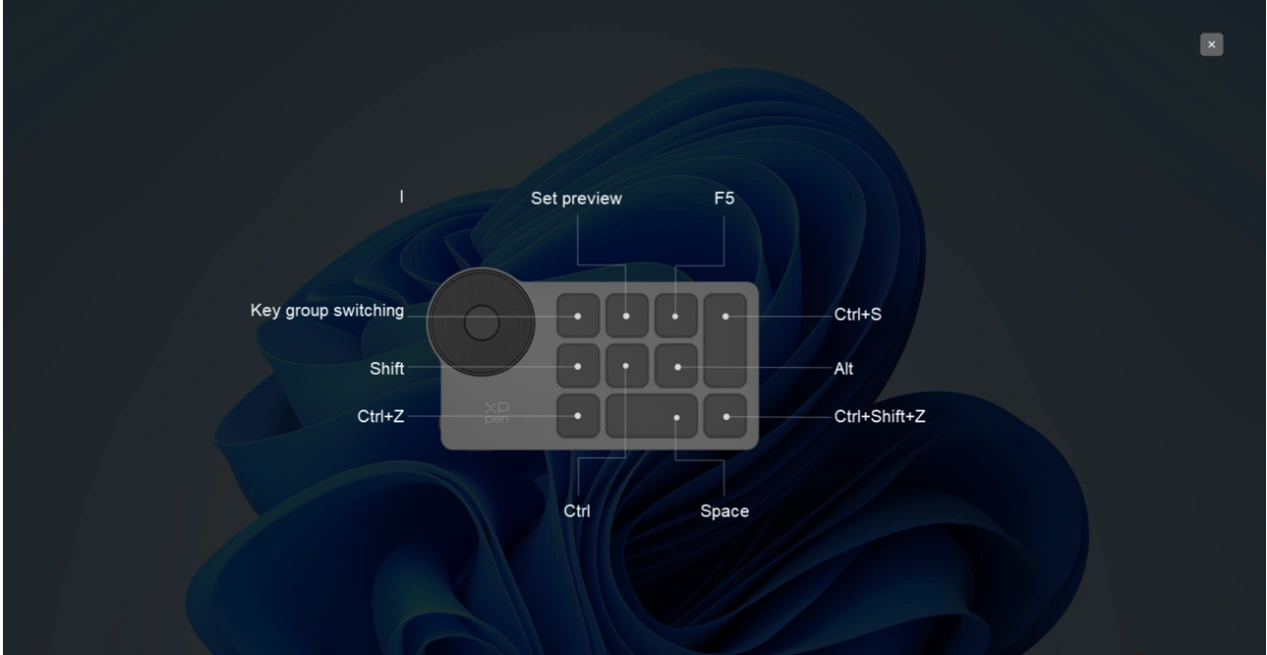
View the key group functions in use. If you select the key group that is not enabled in the driver, functions of the group I will be displayed by default. Click the close button on the upper right to close the window.
Driver Settings

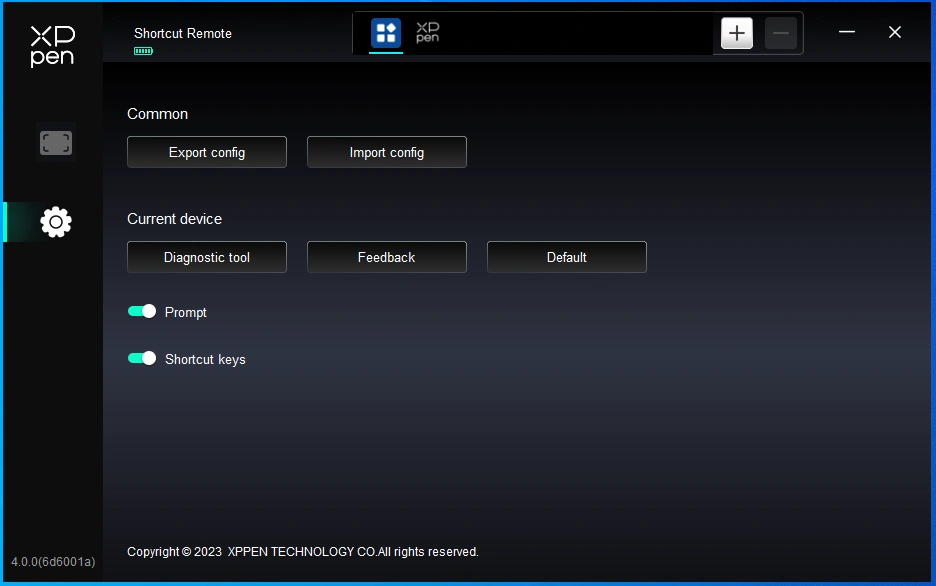
Shortcut keys:
If closed, disable the functions of all keys of the device.
Prompt:
If closed, when you press a key, no key prompt will be displayed at the bottom of the screen.
Diagnostic tool:
You can use the diagnostic tool in case of any problems while using the driver.
Feedback:
If you have any questions or suggestions during the use of the driver, you can give us feedback through this page.
Import & Export config:
You can import/export configurations to read or save their settings.
This function is available for only the same operating system.
Driver Uninstallation
Windows:
Go to Start -> Settings -> Apps -> Apps & Features, find "Pentablet" and then left click "Unload" as per prompts.
Mac:
Go to [Go]-> [Applications], find XPPen and then click "UninstallPenTablet" as per prompts.
Linux:
Deb: Enter command тsudo dpkg -r XPPenLinuxт and execute the command;
Rpm: Enter command тsudo rpm -e XPPenLinuxт and execute the command;
Tag.gz: Unzip file. Enter command тsudoт. Drag uninstall.sh to the window and execute command.
Medibang iOS/iPadOS Connection instructions
1яМConnect Drawing Tablet to iOS/iPadOS device
a) Press and hold the power switch for 3 seconds to turn on the drawing tablet, then long press the power switch for 6 seconds to enter Bluetooth pairing;
b) Turn on Bluetooth on iOS/iPadOS device, and select the drawing tablet to complete pairing (blue light on upon successful pairing).
2яМSet Medibang app
a) Open Medibang, click on "New Canvas" and create a canvas according to the prompts.
b) Enter the drawing interface, click on the settings button in the bottom left corner, and enter the app settings page;
c) Select тVarious settingsт from the pop-up menu;

d) Select тXPPenуЎшЎОхЎт;
e) Select and open " XPPenуЎцЅчЖ" in the pop-up page, and after successfully connecting, a prompt will appear at the bottom of the app.
f) You can also set the mapping direction of the drawing tablet simultaneously, which is set to the horizontal direction by default;
g) After the settings are complete, return to the drawing interface and you can use the drawing tablet for your creative work. The app maps the workspace area to the center area of the drawing tablet by default.
Notes:
1. The shortcut keys on the stylus are temporarily unavailable.
2. If Bluetooth connection is abnormal, you can try to recover connection by the methods below.
a) Reset Bluetooth by repeating the connection steps. The paired device will be automatically cleared in this process. Pair the device again;
b) If the drawing tablet is paired with other devices, please disconnect the Bluetooth connection between the drawing tablet and other devices, or use the Bluetooth switch key to switch to the corresponding device.
Ibis Paint iOS/iPadOS Connection instructions
1яМConnect Drawing Tablet to iOS/iPadOS device
a) Press and hold the power switch for 3 seconds to turn on the drawing tablet, then long press the power switch for 6 seconds to enter Bluetooth pairing;
b) Turn on Bluetooth on iOS/iPadOS device, and select the drawing tablet to complete pairing (blue light on upon successful pairing).
2яМSet ibis Paint app
a) Open ibis Paint, and click "Settings";
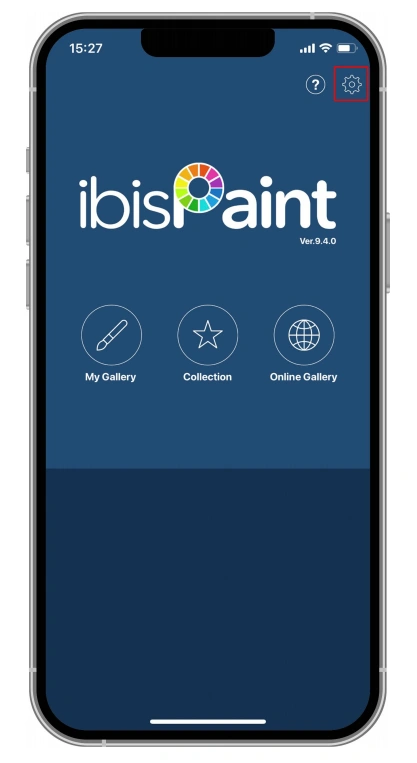
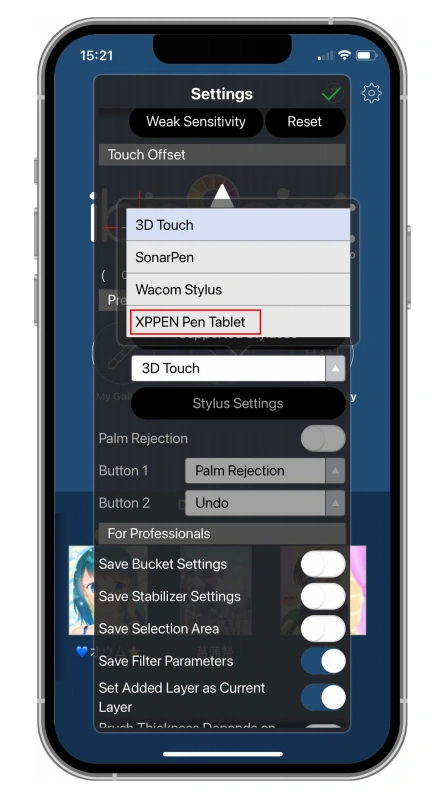
b) Find "Supported Handwrite Stylus" in Settings, and select XPPen Pen Tablet;
3. Set pen pressure
a) Turn on the pen pressure function.
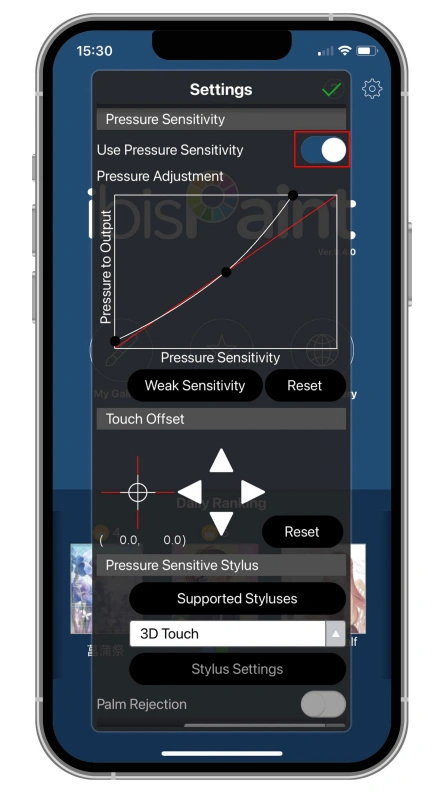
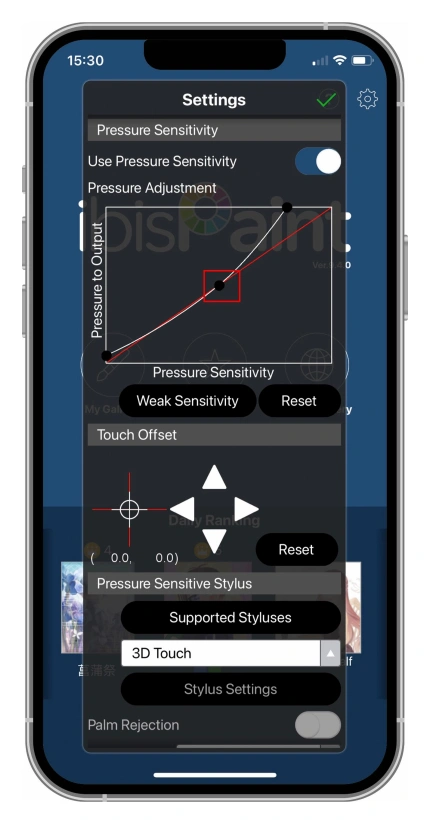
b) Drag the dot on the pressure sensitivity line to adjust pen pressure sensitivity.
c) Set pen key functions
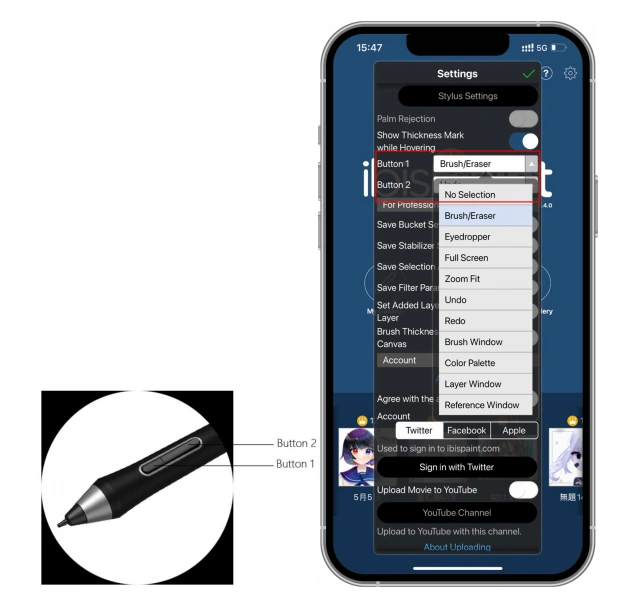
d) Create a canvas and start your creation.
Notes:
1. Shortcut keys and custom settings
The stylus has shortcut keys and pressure sensitivity functions which can be customized in the APP.
The shortcut keys and wheel on the drawing tablet are temporarily unavailable.
The driver settings are temporarily unavailable, so the mapping area cannot be customized.
2. If Bluetooth connection is abnormal, you can try to recover connection by the methods below.
a) Reset Bluetooth by repeating the connection steps. The paired device will be automatically cleared in this process. Pair the device again;
b) If the drawing tablet is paired with other devices, please disconnect the Bluetooth connection between the drawing tablet and other devices, or use the Bluetooth switch key to switch to the corresponding device.
1. Computer fails to recognize the device.
1) Check if your computer's USB port used works normally. If not, use another USB port.
2. Stylus does not work.
1) Make sure you are using the stylus that originally came with your device;
2) Make sure you installed the driver correctly, and check if the pen settings of the driver is normal.
3. The drawing software cannot sense the pen pressure while the cursor can move.
1) Check if the drawing software supports pen pressure;
2) Download the latest driver from XPPen website, and check if the pen pressure is normal in the driver;
3) Before installing the driver, turn off your antivirus software and graphics software;
4) Uninstall drivers for other drawing displays before installation;
5) Restart your computer after the installation is completed;
6) If the pen pressure is normal in the driver (Windows: ensure Windows Ink is enabled in the pen settings of the driver), run the drawing software and test it again.
4. Line latency during drawing with the software.
Check if the computer configuration (CPU&GPU) meets the recommended configuration requirements for the drawing software installed, and optimize related functions via settings according to the FAQs posted on the official website of the drawing software.
5. Paired device fails to connect.
1) Open the Bluetooth connection interface in the operating system and delete the Bluetooth connection of the drawing tablet or Wireless Shortcut Remote;
2) Repeat the Bluetooth wireless connection steps to re-pair and connect the device.
Notes:
Declaration of Conformity
Hereby,[Hanvon Ugee Technology Co.,Ltd.] declares that the radio equipment type [MT1592B] is in compliance with Directive 2014/53/EU. The full text of the EU declaration of conformity is available at the following internet address: www.xp-pen.com/
This device complies with part 15 of the FCC Rules. Operation is subject to the following two conditions: (1) This device may not cause harmful interference, and (2) this device must accept any interference received, including interference that may cause undesired operation.
Warning: Changes or modifications not expressly approved by the party responsible for compliance could void the user's authority to operate the equipment.
FCC NOTE: This equipment has been tested and found to comply with the limits for a Class B digital device, pursuant to part 15 of the FCC Rules. These limits are designed to provide reasonable protection against harmful interference in a residential installation. This equipment generates, uses and can radiate radio frequency energy and, if not installed and used in accordance with the instructions, may cause harmful interference to radio communications. However, there is no guarantee that interference will not occur in a particular installation. If this equipment does cause harmful interference to radio or television reception,
which can be determined by turning the equipment off and on, the user is encouraged to try to correct the interference by one or more of the following measures:
тReorient or relocate the receiving antenna.
тIncrease the separation between the equipment and receiver.
тConnect the equipment into an outlet on a circuit different from that to which the receiver is connected.
тConsult the dealer or an experienced radio/TV technician for help
RF warning statement:
The device has been evaluated to meet general RF exposure requirement. The device can be used in portable exposure condition without restriction.
This device complies with Industry Canada licence-exempt RSS standard(s). Operation is subject to the following two conditions:
(1) this device may not cause interference;
(2) this device must accept any interference, including interference that may cause undesired operation of the device.
Le prУЉsent appareil est conforme aux CNR d'Industrie Canada applicables aux appareils radio exempts de licence. L'exploitation est autorisУЉe aux deux conditions suivantes :
(1) l'appareil ne doit pas produire de brouillage ;
(2) l'utilisateur de l'appareil doit accepter tout brouillage radioУЉlectrique subi, mУЊme si le brouillage est susceptible d'en compromettre le fonctionnement.
MODIFICATION: Any changes or modifications not expressly approved by the grantee of this
device could void the user's authority to operate the device.
Toute modification non approuvУЉ explicitement par le fournisseur de licence de lтappareil peut
entraУЎer lтannulation du droit de lтutilisateur У utiliser lтappareil.
Operation Frequency: 2402-2480MHz
Max powerяМ3.3dbm
Operating temperatureяМ0~45т
ManufacturerяМHanvon Ugee Technology Co.,Ltd.
AddressяМ2/F, West of 3/F, 4/F, No.4 Building, Fulongte Industrial Park, Huaxing Road, Langkou Community,Dalang Street, Longhua District, Shenzhen, Guangdong China
If you need any further assistance, please contact us at:
Website: www.xp-pen.com
Email: service@xp-pen.com