Pilot Pro
Product Introduction
Thank you for choosing the XPPen Pilot Pro. May this device, crafted with thoughtful design and technical ingenuity, bring you a new experience of efficiency and joy during your editing work.
To ensure optimal performance and extended service life of your device, please read this Manual thoroughly before use, and adhere to the recommended maintenance and protection guidelines during use.
To support continuous product improvement, physical appearance, colors, and accessories may vary from the actual product. The Company reserves the right to make technical updates and revise this Manual without prior notice. Thank you for your understanding.
Note: All images in this Manual are for illustrative purposes only.
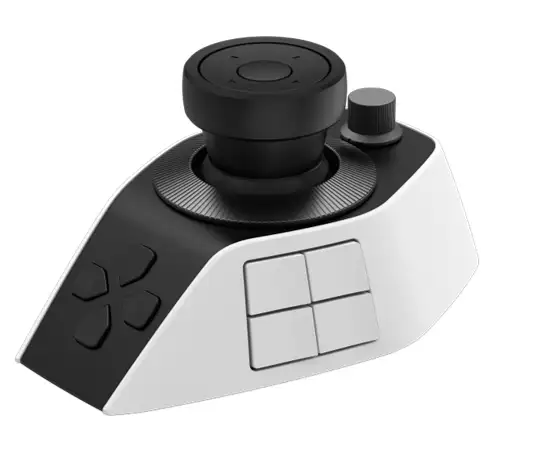
Product Overview
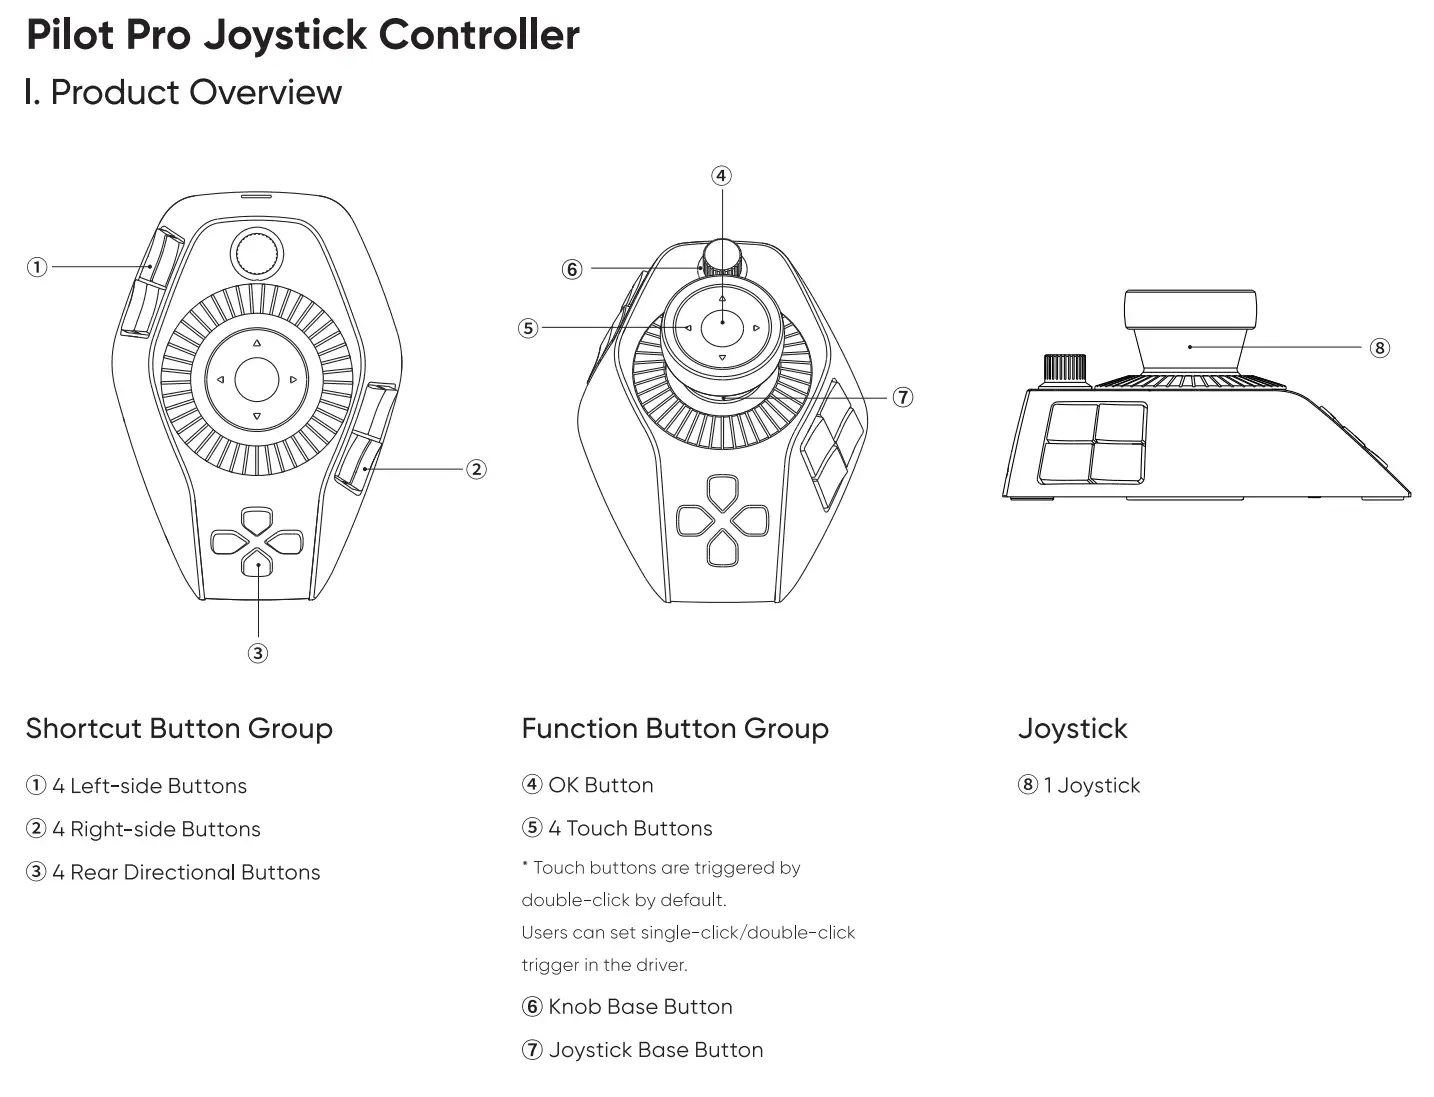
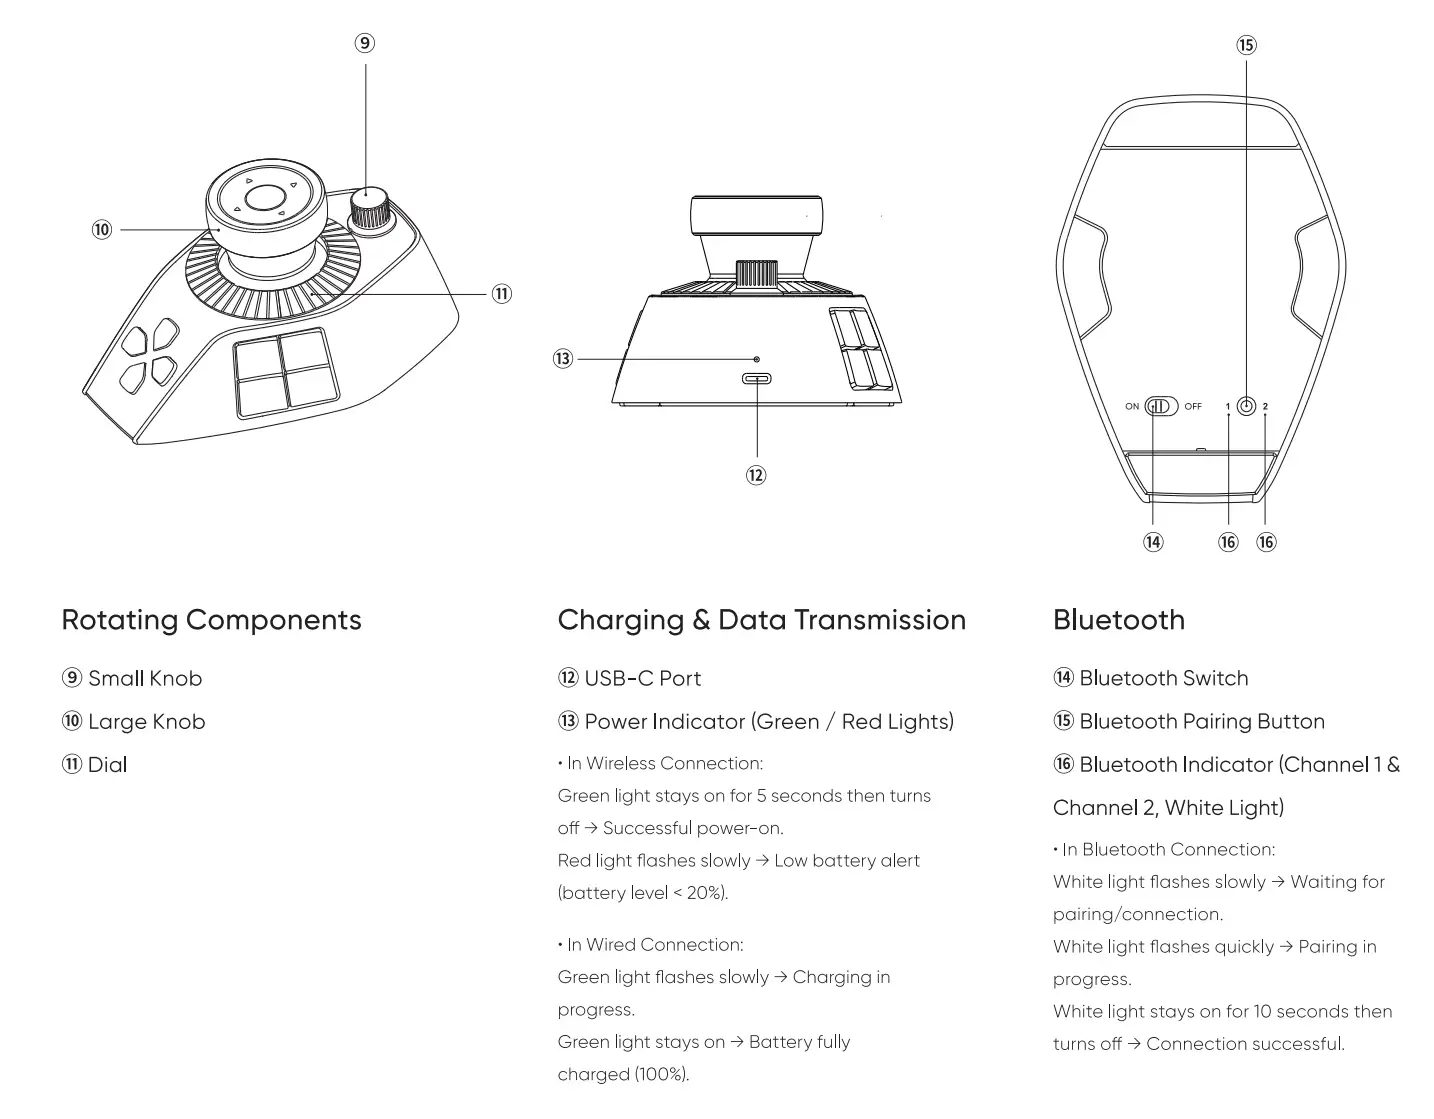
* All images are for reference only. The actual product may vary.
Accessory List
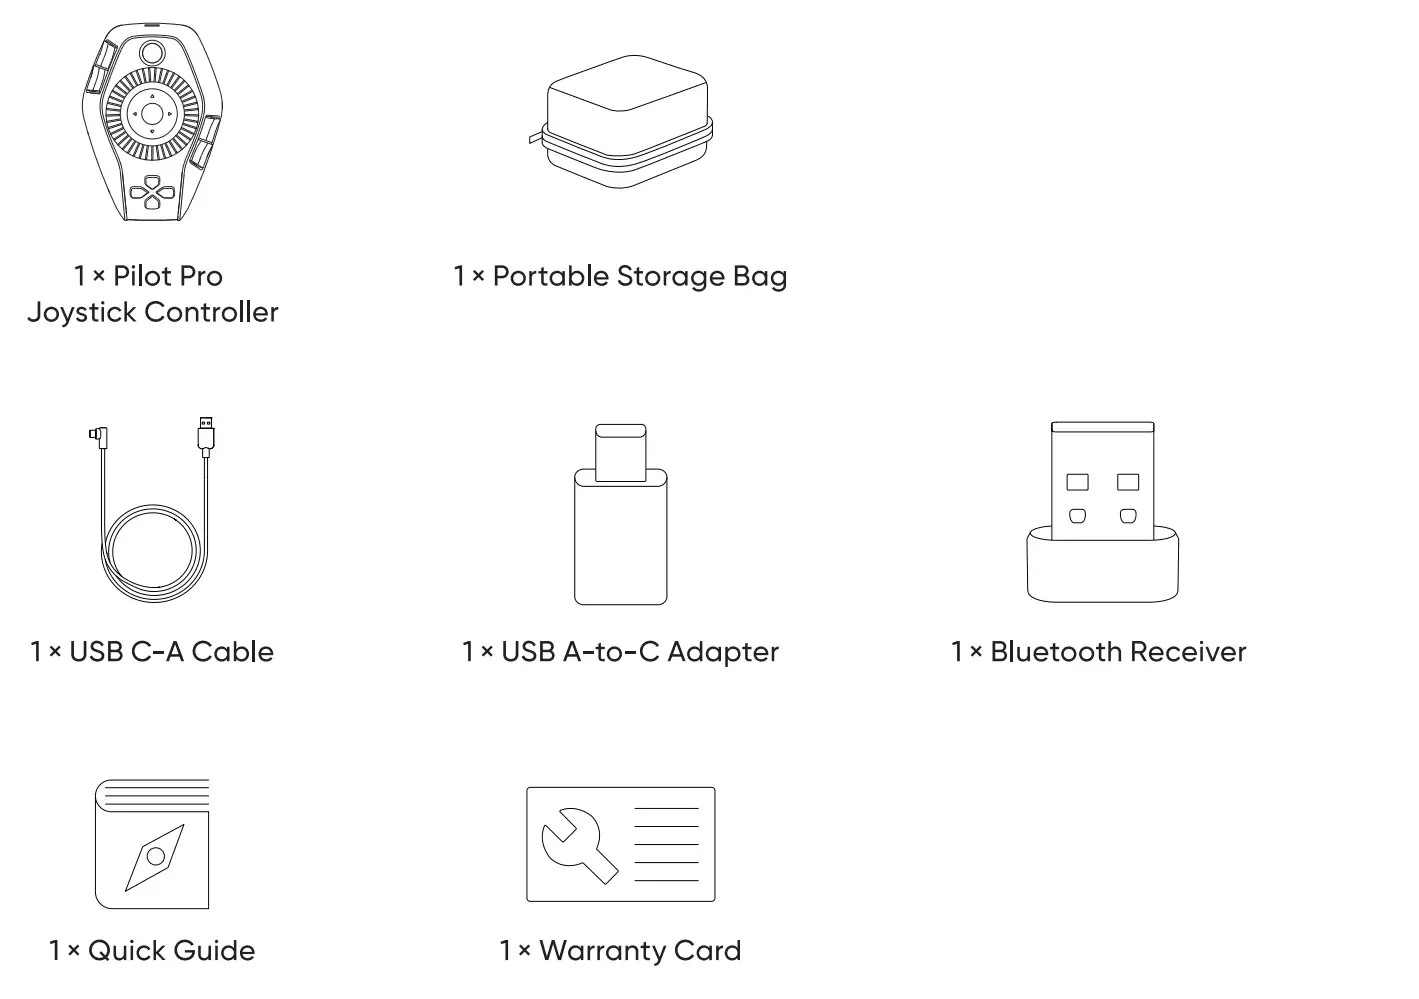
* The images and list are for reference only. The actual product may vary.
Product Connection
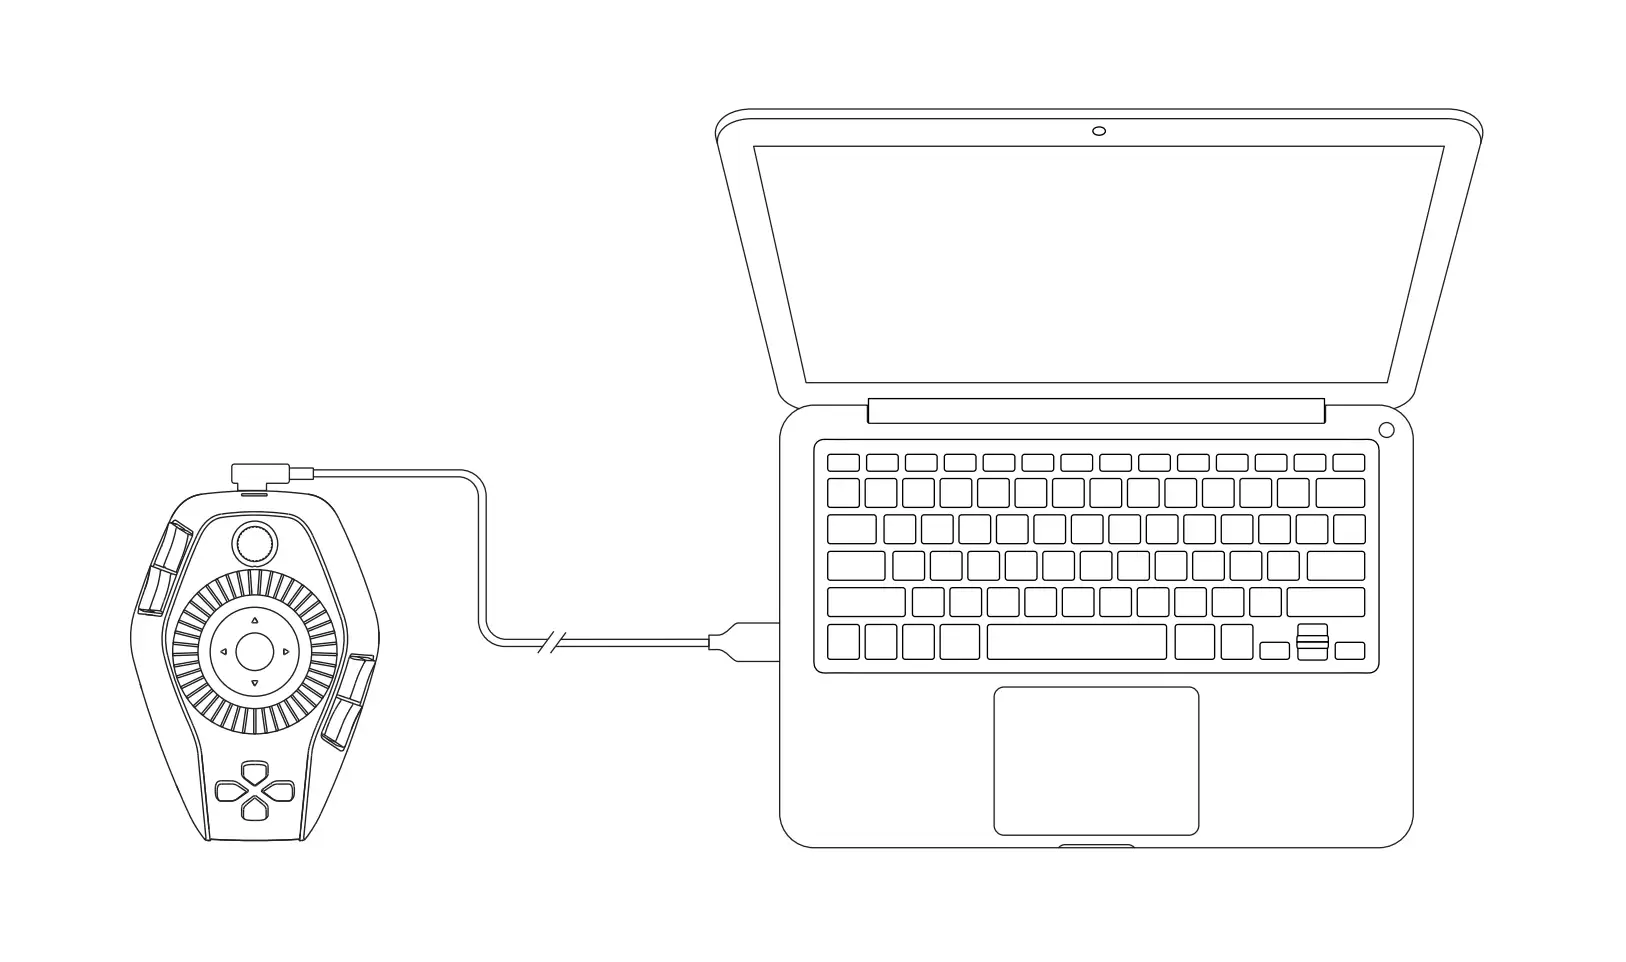
Wired Connection
Connect the controller to the computer using the USB C-A cable.
Wireless Connection
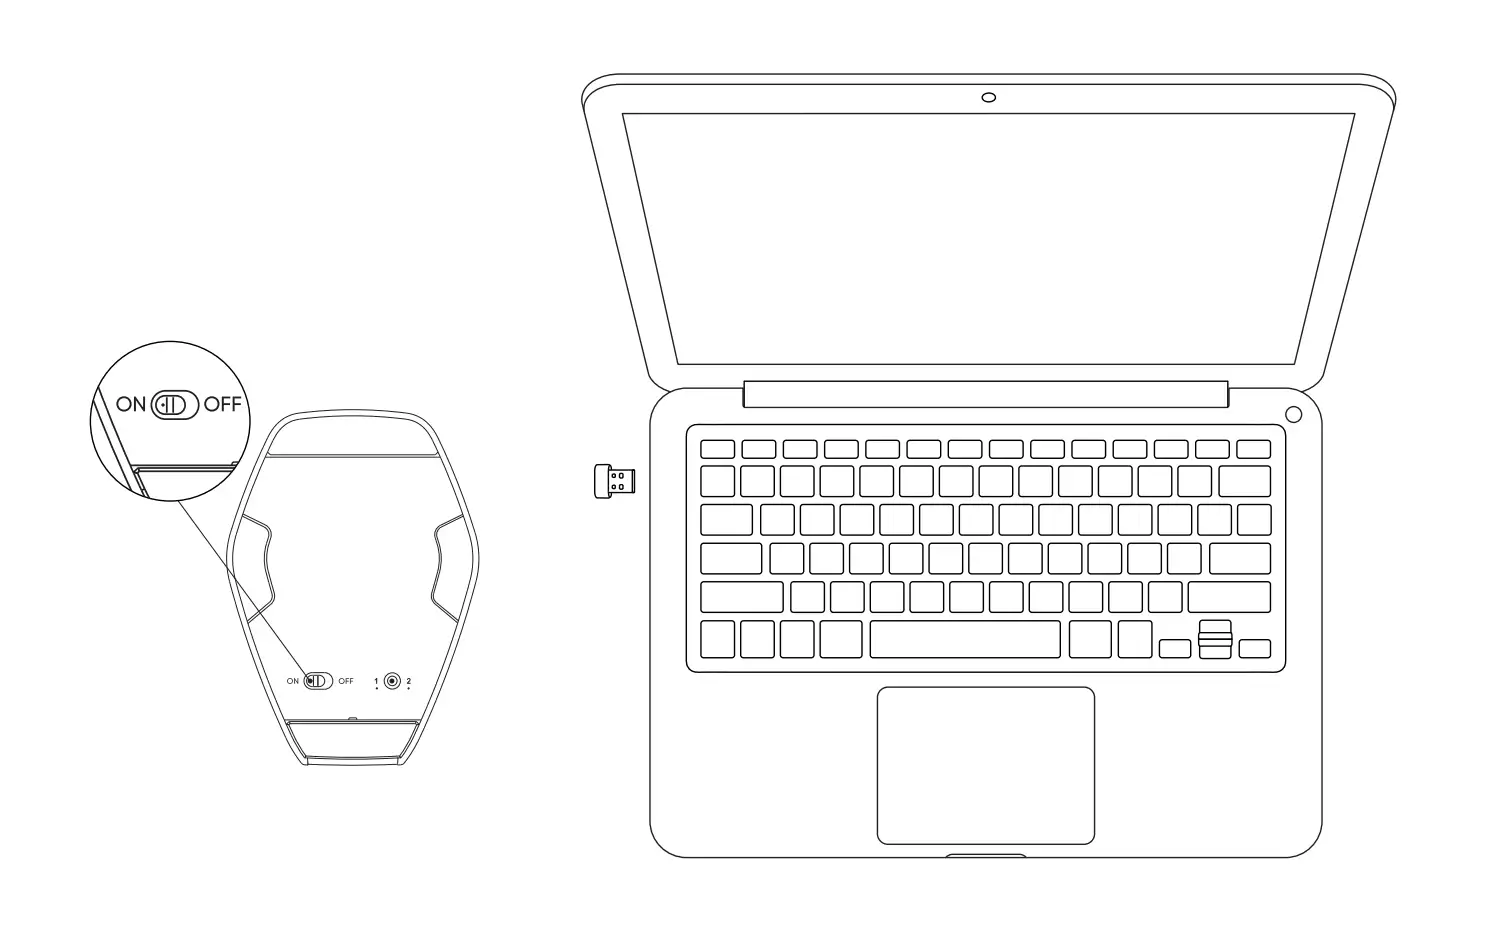
A. Bluetooth Receiver Connection
1. Insert the Bluetooth receiver (dongle) into the computer.
2. Toggle the Bluetooth switch on the bottom of the controller to "ON".
3. White light stays on for 10 seconds then turns off → Connection successful.
* If the Bluetooth receiver needs to be re-paired with the device, please visit the XPPen official website (https://www.xp-pen.com) to download the wireless pairing tool for your specific model, and follow the prompts to complete the pairing and connection.
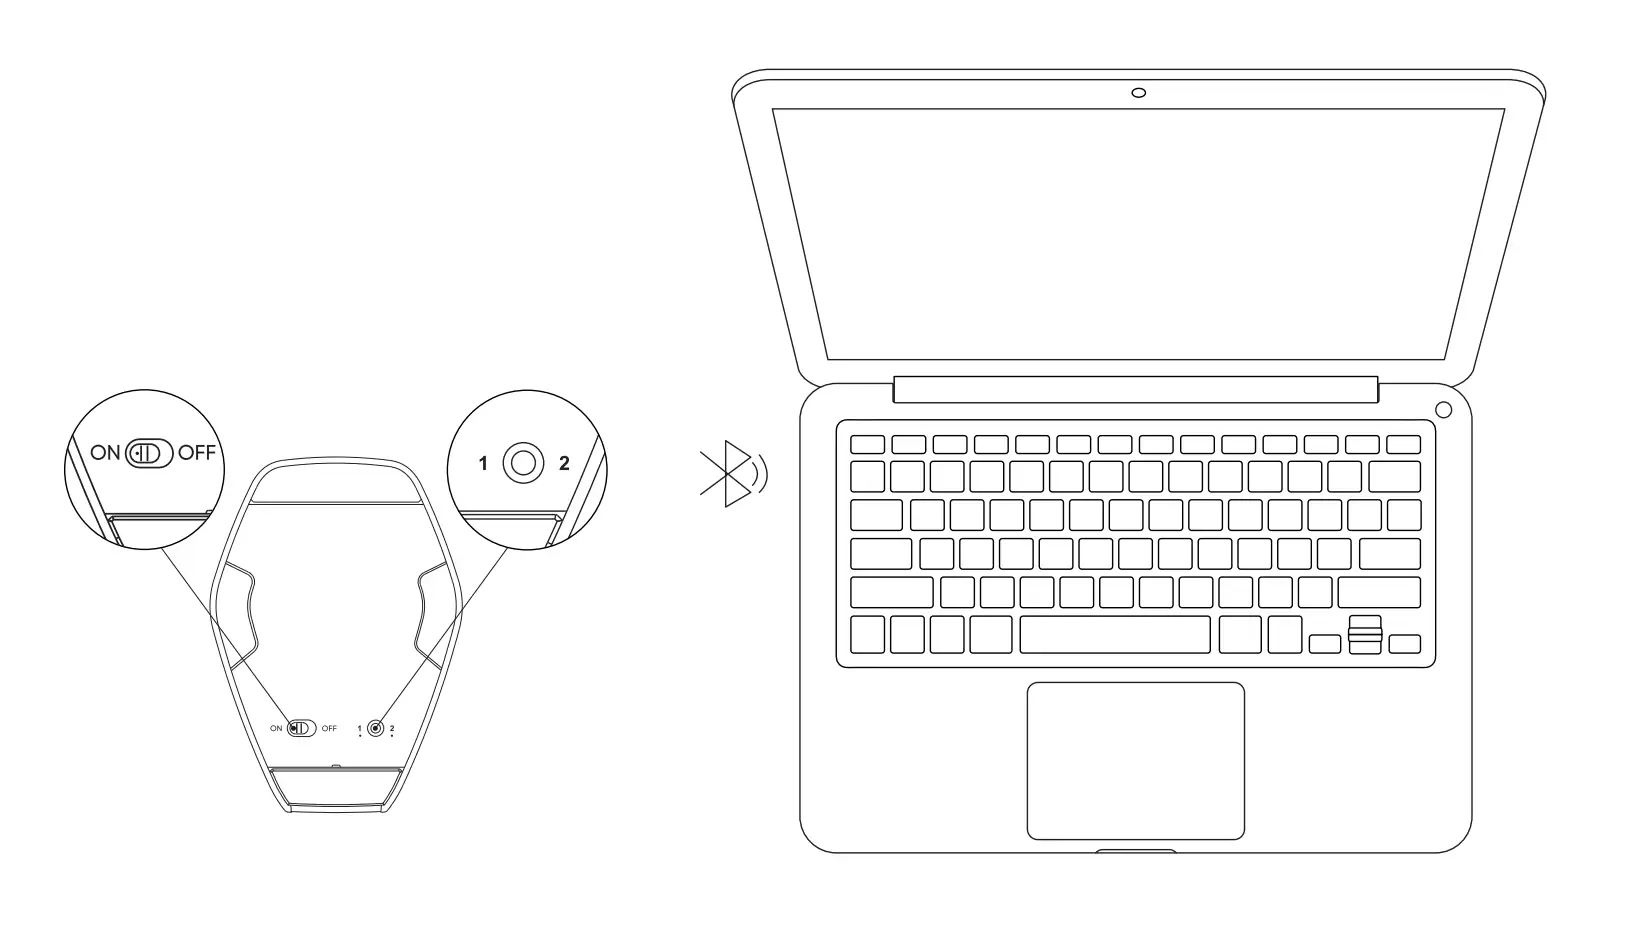
B. Bluetooth Wireless Connection
1. Toggle the Bluetooth switch on the bottom of the controller to "ON"; white light flashes slowly.
2. Press and hold the Bluetooth button for 3 seconds; white light flashes quickly to enter pairing mode.
3. In the computer's Bluetooth settings, add a Bluetooth device, search for "PilotPro", and select it for pairing.
4. To connect an additional computer: Short-press the Bluetooth button once to switch to another Bluetooth channel, then repeat the above steps.
Recommended Usage Posture
This controller is designed for left-hand use. After connection, place it on your left side.
Compatibility
Compatible OS
Mac: macOS 11.0 and above
Windows: Windows 10 or later (or later, 64-bit only)
Recommended software: Adobe® Premiere Pro®, CapCut, DaVinci Resolve, Adobe® Lightroom®, and Adobe® Photoshop®
Adobe® series software: version 2024 or later is recommended.
* In addition to the software listed above, other software is also supported after configuring shortcuts. Note: Due to differences in software versions and underlying architecture, the performance of non-recommended software may vary depending on actual usage.
* Adobe, Premiere Pro, Lightroom, and Photoshop are registered trademarks or trademarks of Adobe Inc. in the United States and/or other countries or regions. This product is not authorized, endorsed, or sponsored by Adobe Inc.
Driver Installation
The device requires a driver to function properly. Please install the driver before use.
Please download the latest driver for your specific model from the XPPen official website.
Notice
1. Turn off all antivirus and graphics software before installation.
2. Download and install the driver matching your OS.
3. Uninstall the controller driver of another brand before installation.
4. Restart the computer after driver installation.
5. It is recommended to use the latest driver version for optimal performance.
Installation Instructions
Windows
After decompression, run the ".exe" file as administrator and follow the prompts to complete the installation.
Mac
After decompression, run the installer package file and follow the prompts to complete the installation. Please note that when opening the file, the system may display a prompt stating "App cannot be opened because Apple cannot check it for malicious software" and prevent the installation. If this issue occurs, you can follow these steps to install the driver:
1. On your Mac, click the Apple menu > System Settings, then click Privacy & Security in the sidebar. (You may need to scroll down.)
2. Go to the Security page, and then click Open.
3. Click Open Anyway.
4. This button is available for one hour after you attempt to open the app.
5. Enter your login password, then click OK.
Driver Uninstallation
Windows
In the Start menu, open Open Settings > Applications > Installed Applications. Locate PilotController. Click Uninstall. Then follow the prompts for uninstallation.
Mac
In [Finder] > [Applications], locate "PilotController" and use the built-in uninstaller to uninstall it, following the prompts.
Driver
Connection Page
After the driver installation is complete, launch the driver, and the connection page will be displayed by default.
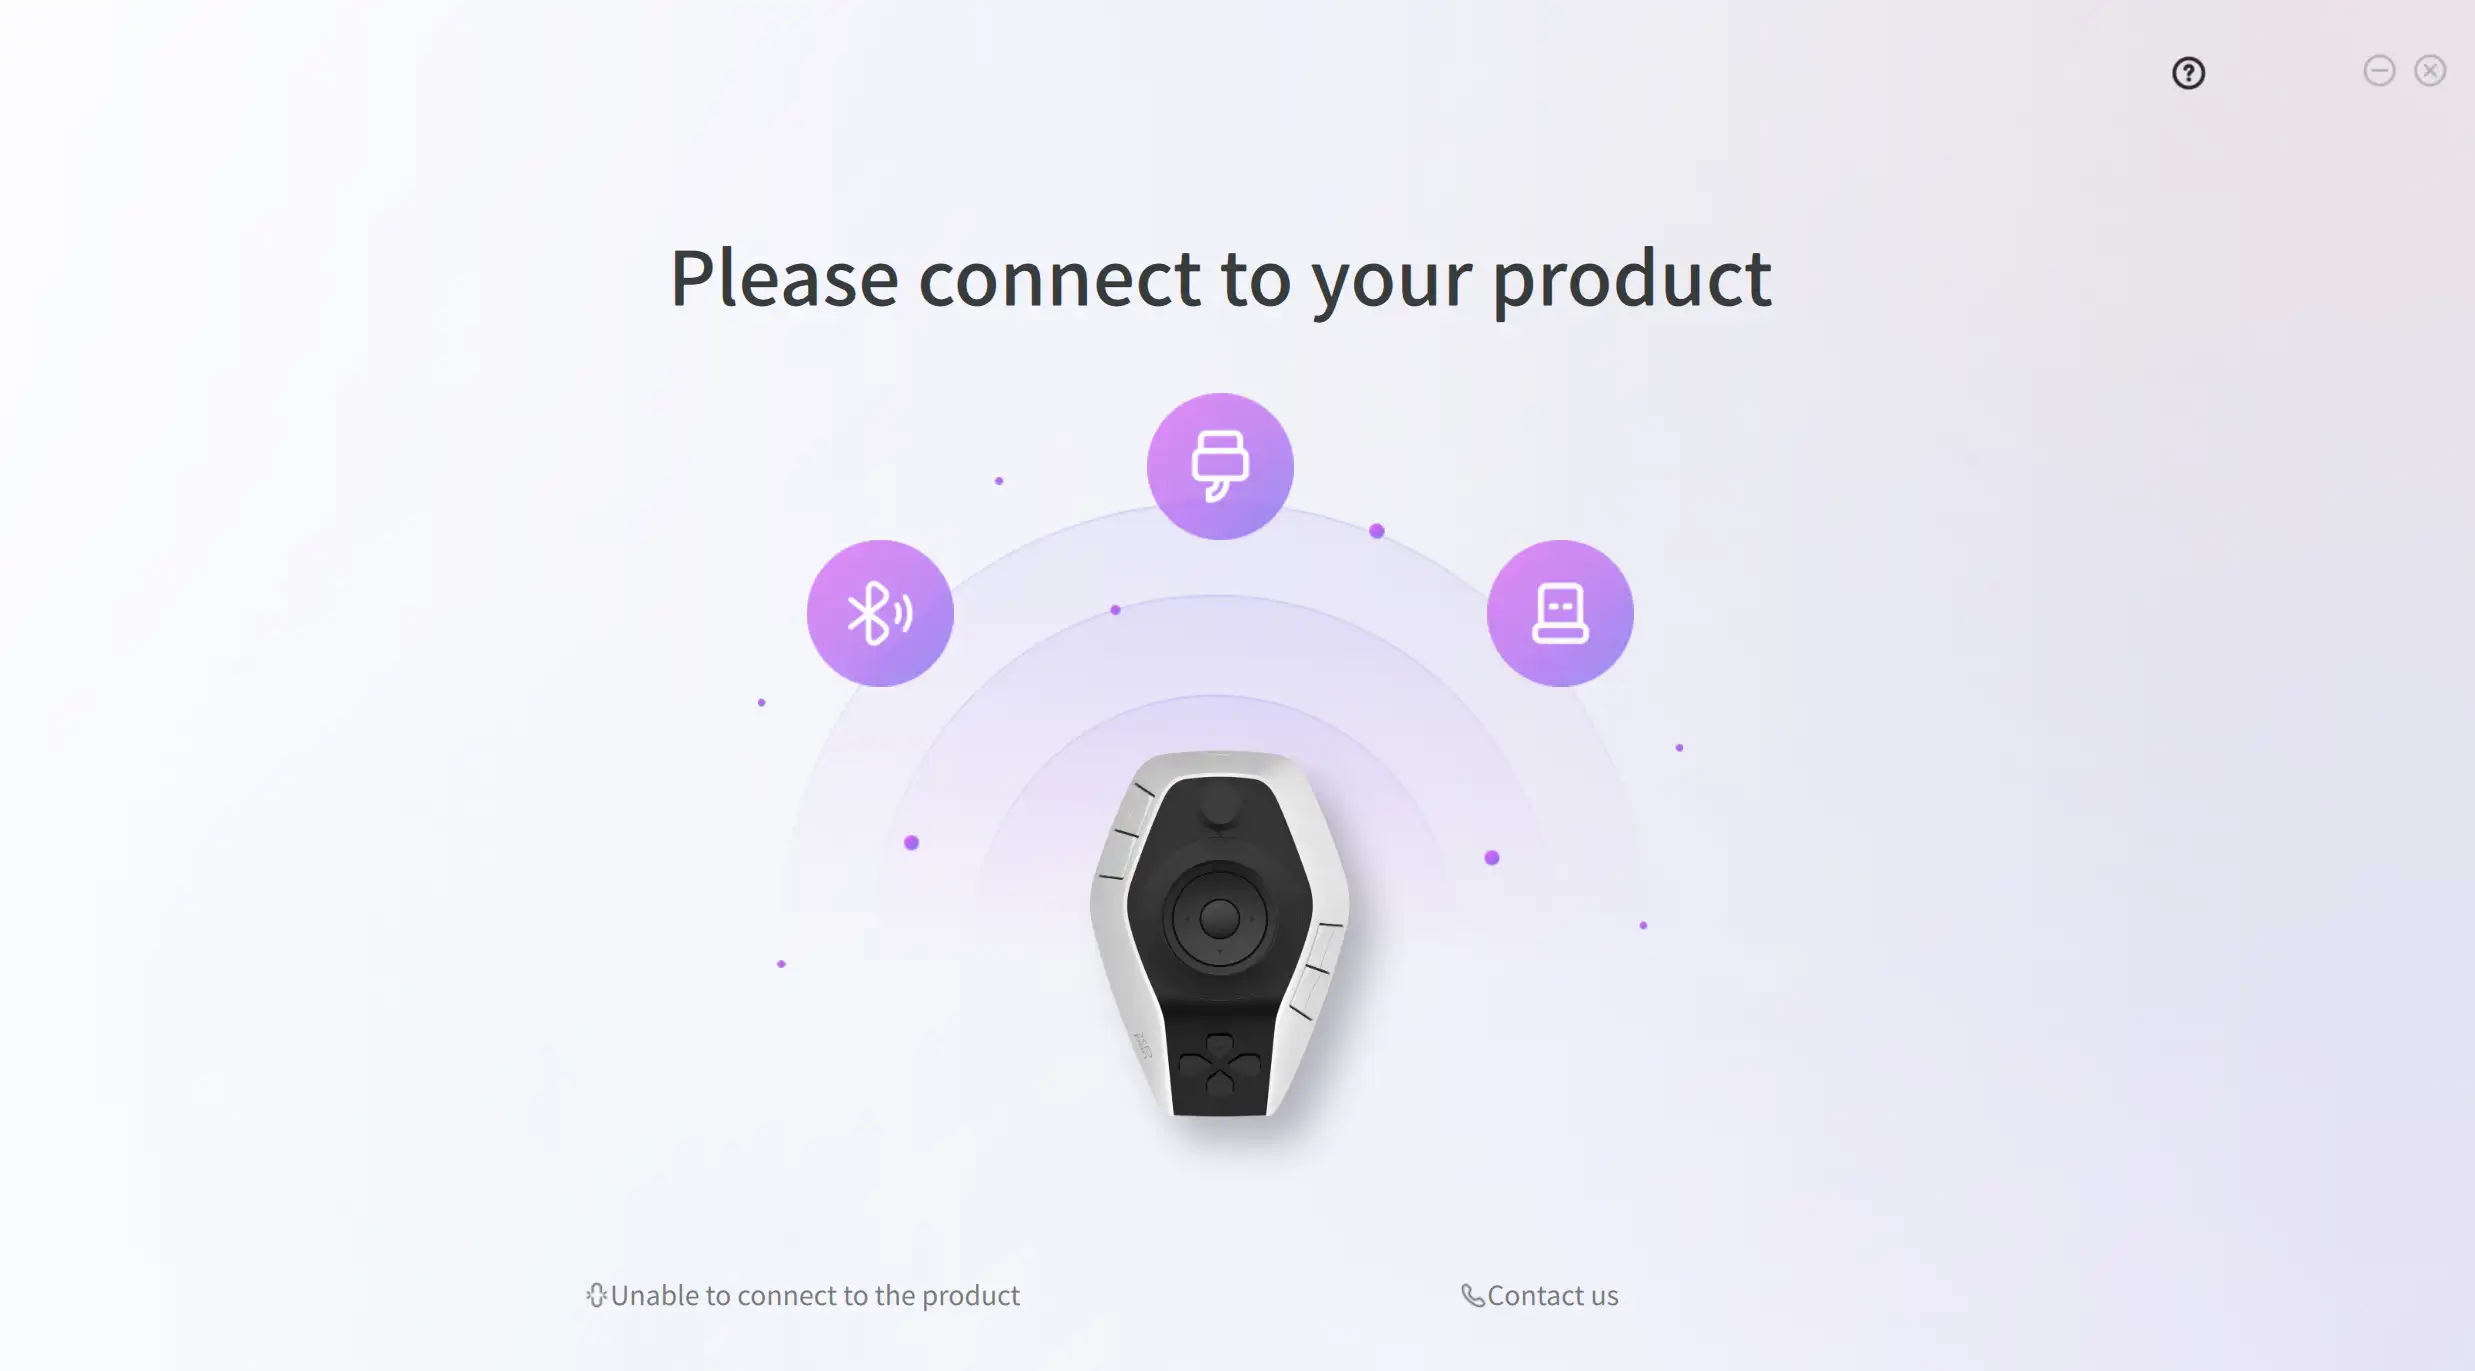
After successfully connecting via any of the following methods: USB C-A cable, Bluetooth, or Bluetooth receiver, you can access the Command Settings page to assign commands to the keys.
In case of any connection or firmware-related issues, you can click the button at the bottom of the page to visit the official website for help documentation and other information, or seek official support via the contact information provided on the website.
Additionally, if the device and driver become disconnected, the driver will return to the connection page. You must reconnect the device before you can use the driver.
Guide Map
After successfully connecting the device for the first time, the interface will automatically navigate from the connection page to the Guide Map page, which includes driver usage instructions, key introductions, operation guidance, and product component descriptions. Please follow the prompts to read through the Guide Map.
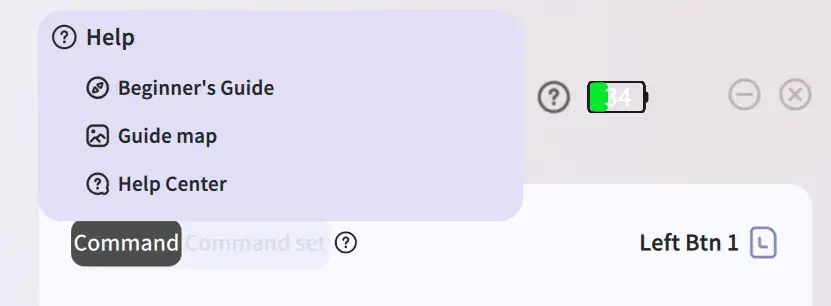
To view the Guide Map again, click the Help icon in the upper-right corner of the homepage.
Beginner's Guide
After successfully connecting the device for the first time, you will access the Beginner's Guide page after viewing the Guide Map. In the guide animation, we will demonstrate how to configure shortcut commands for the buttons on the Pilot Pro.
After finishing the Beginner's Guide for the first time, you will enter the homepage. If you want to view the guide again, click the Help icon as shown in the figure below to access it again.
When you subsequently open the driver, you will go directly to the homepage after the device connects successfully.
Homepage
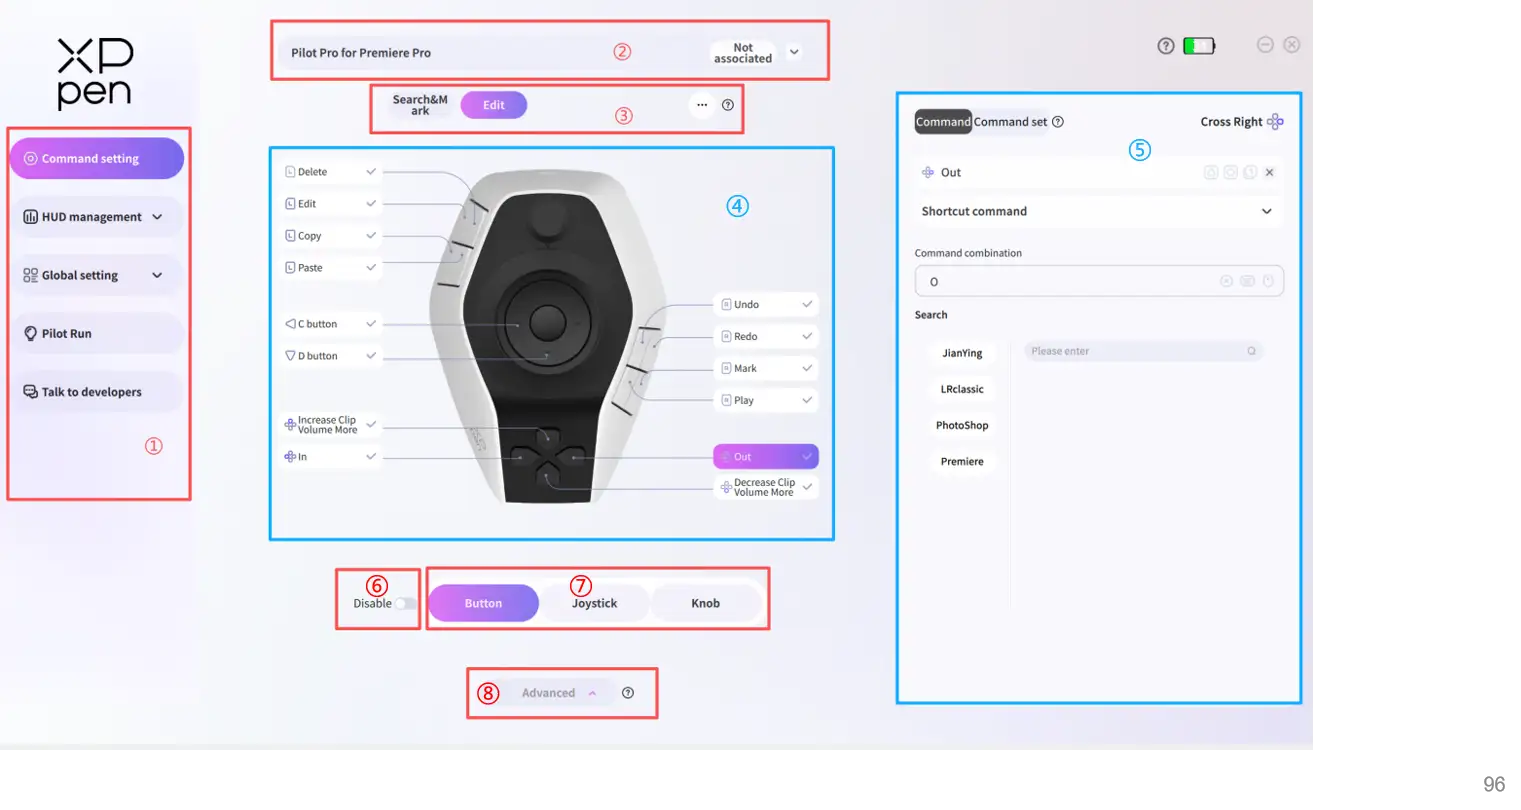
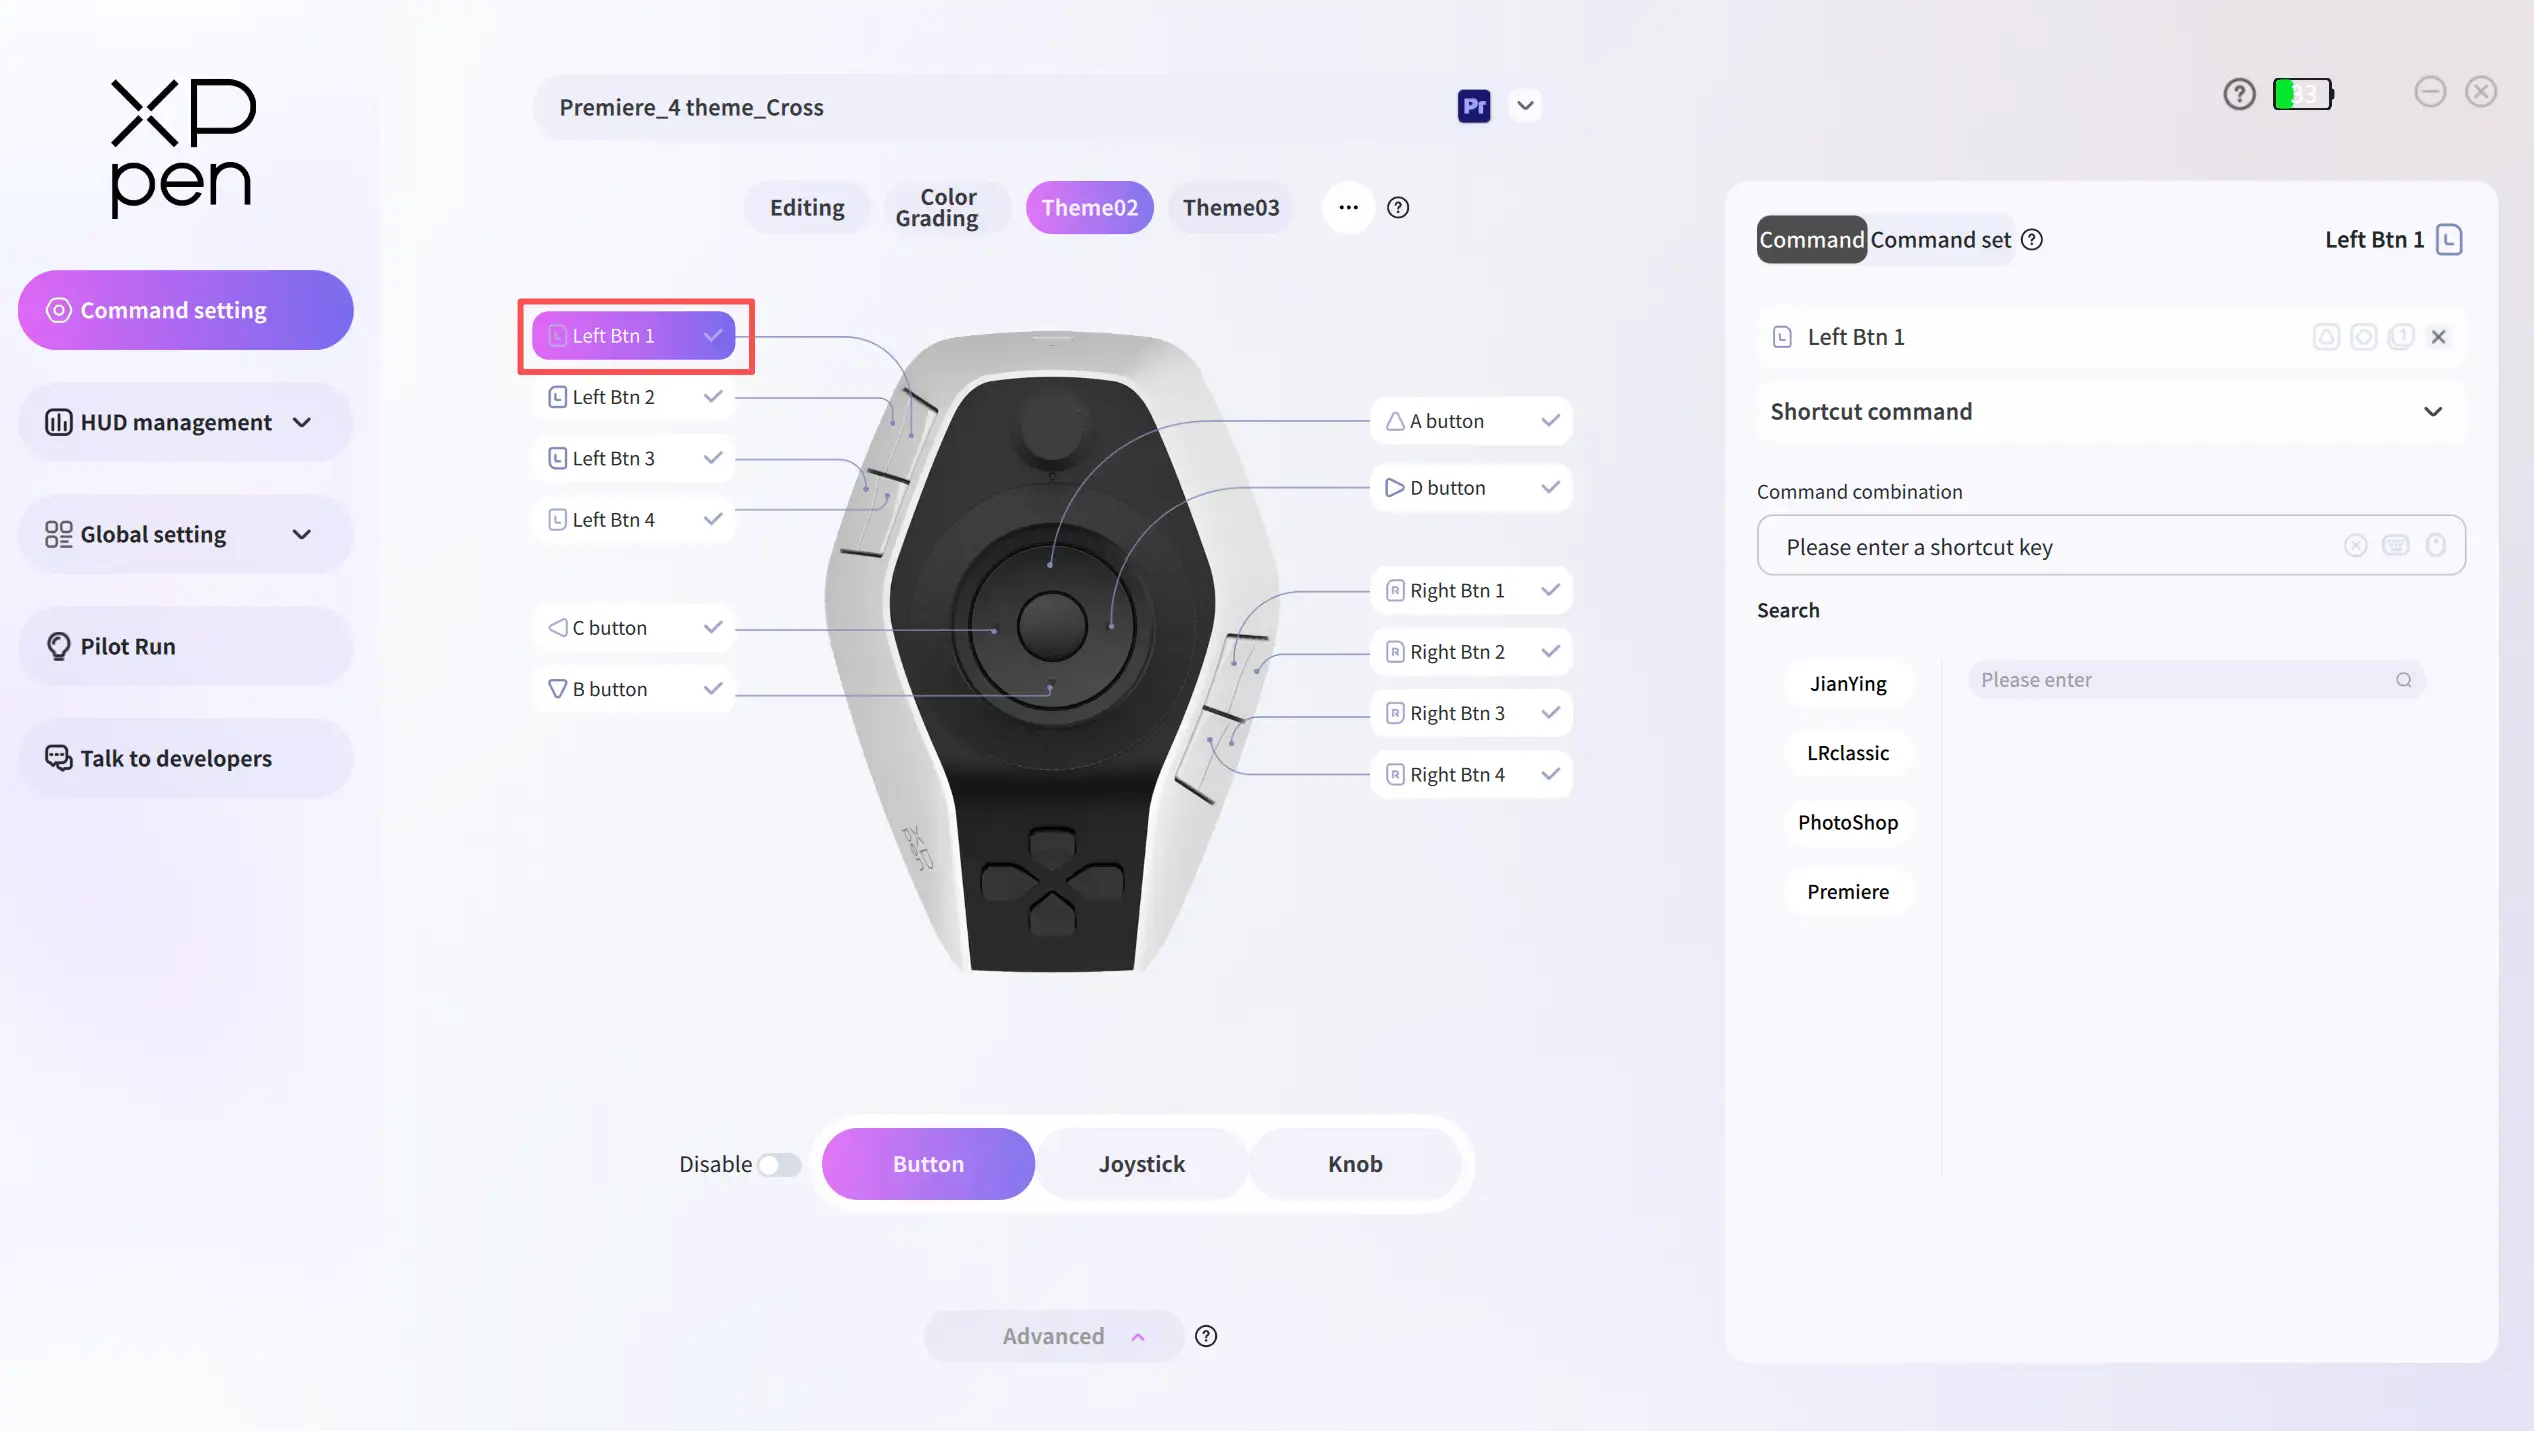
The homepage is the core page of the driver and is divided into the following 8 modules, as shown in the figure:
① Navigation Bar: This module is used to switch between different function pages in the driver. Click the corresponding menu in the navigation bar to jump to the relevant page.
② Preset Management: This module is used to create and manage presets and associate them with matching software.
③ Theme Management: This module is used to create and manage themes and configure the theme switch key (hereinafter referred to as the "theme key").
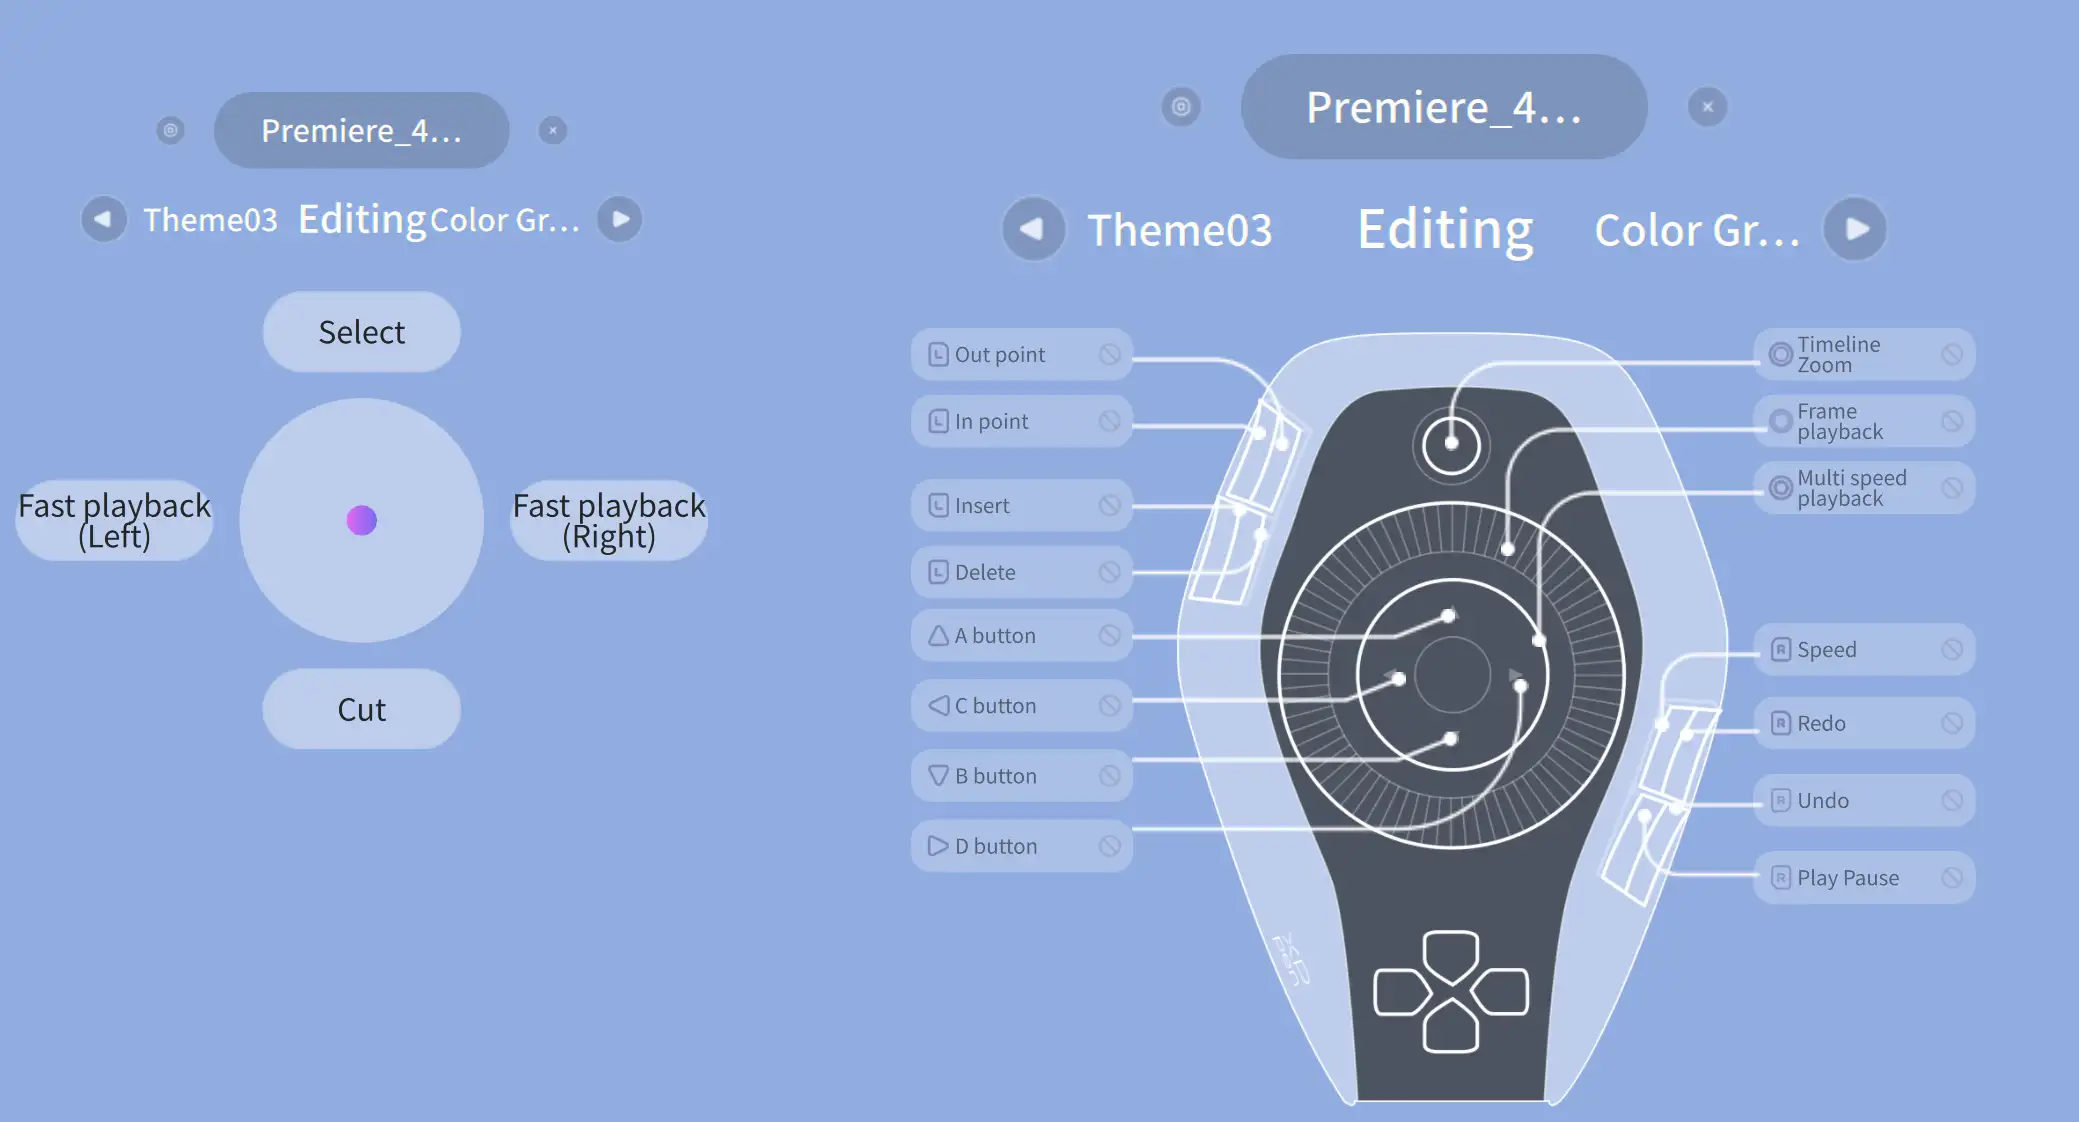
④ Visual Key Layout: This module displays button names and their positions on the device. You can select a button and configure a command for it.
⑤ Command Configuration Panel: After selecting a button in the Visual Key Layout module, you can configure commands or command sets for it in the Command Panel on the right. Once configured, pressing the button will execute the assigned command.
⑥ Enable/Disable: Buttons have two states: enabled and disabled. When button is disabled, its triggered command will not take effect.
⑦ Key Categories: Device keys are divided into three categories: buttons, joysticks, and knobs. Click different categories to switch between button types for command configuration.
⑧ Advanced/Standard Mode: There are two driver modes. Advanced Mode allows access to all features and up to 7 themes per preset. In Standard Mode, Command Set Panel and Theme Management features are unavailable, with a maximum of 4 themes allowed.
Preset
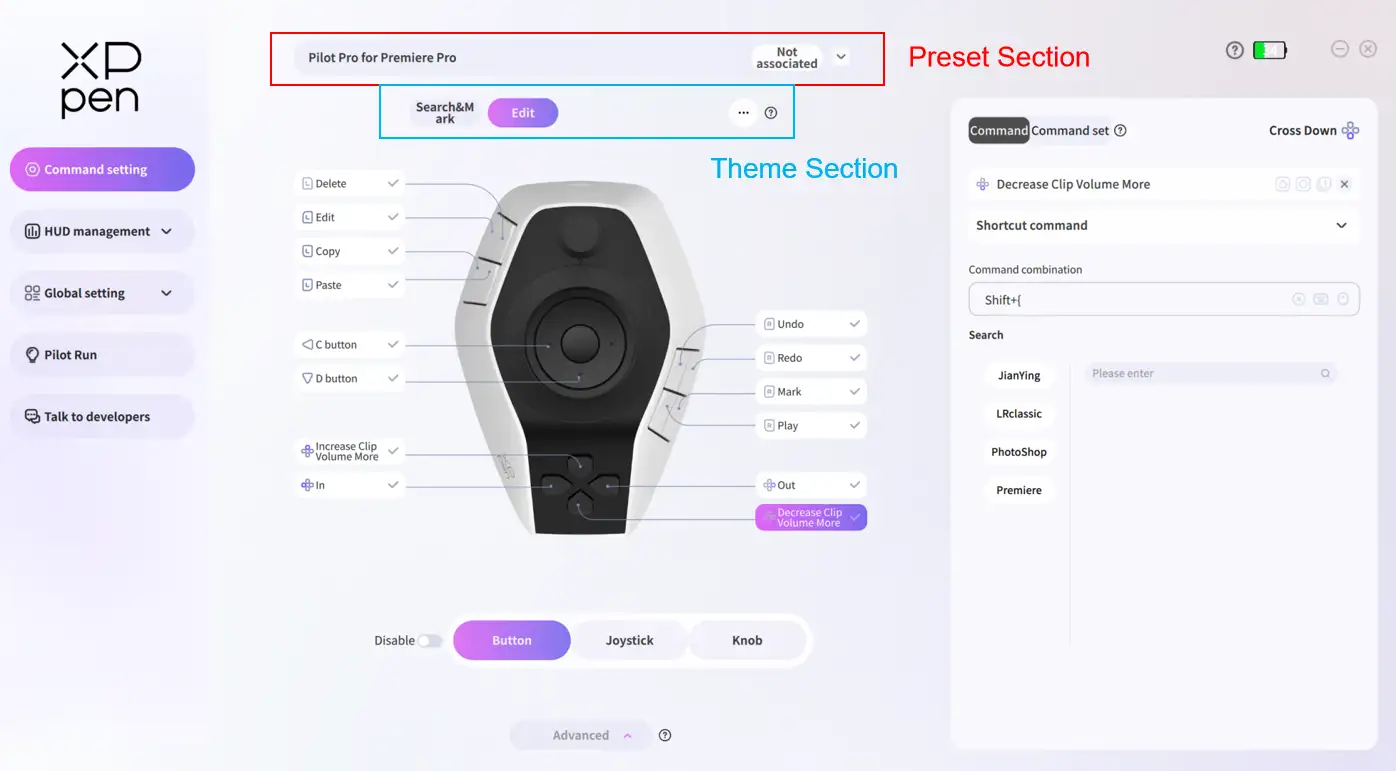
A single preset is associated with one application and can include multiple themes.
The preset section supports creating, importing and exporting presets in the preset list. The theme section is located below the preset section (see figure).
Preset Management
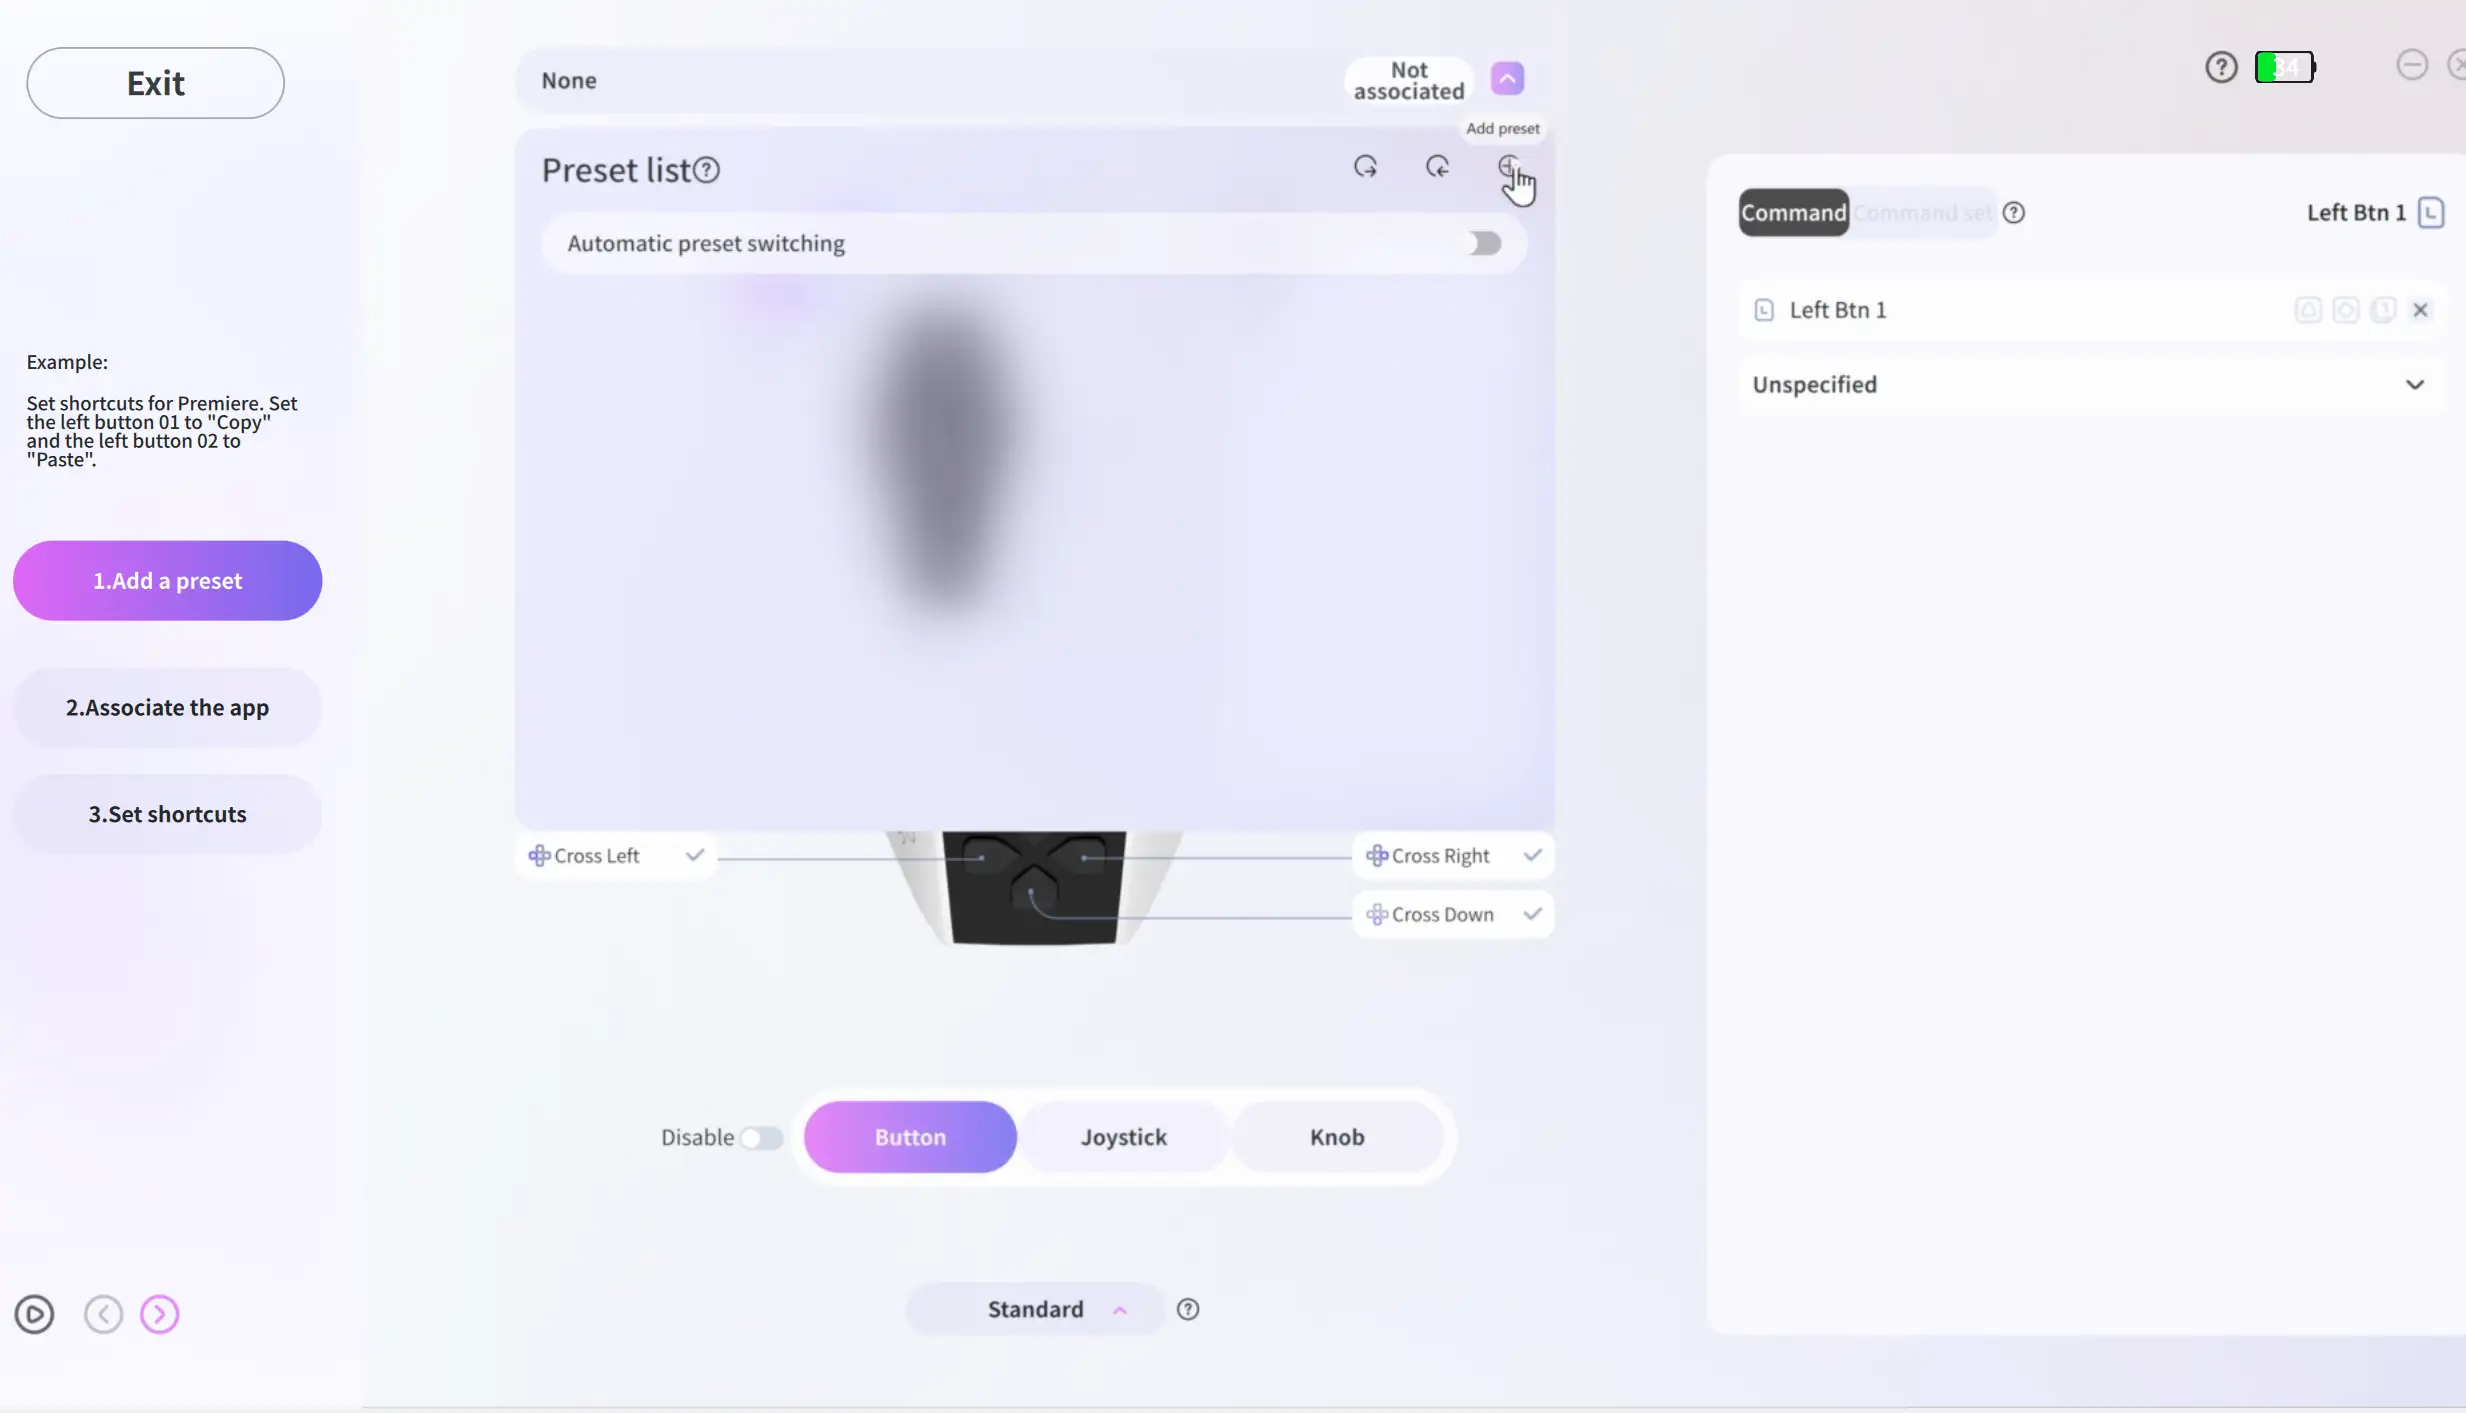
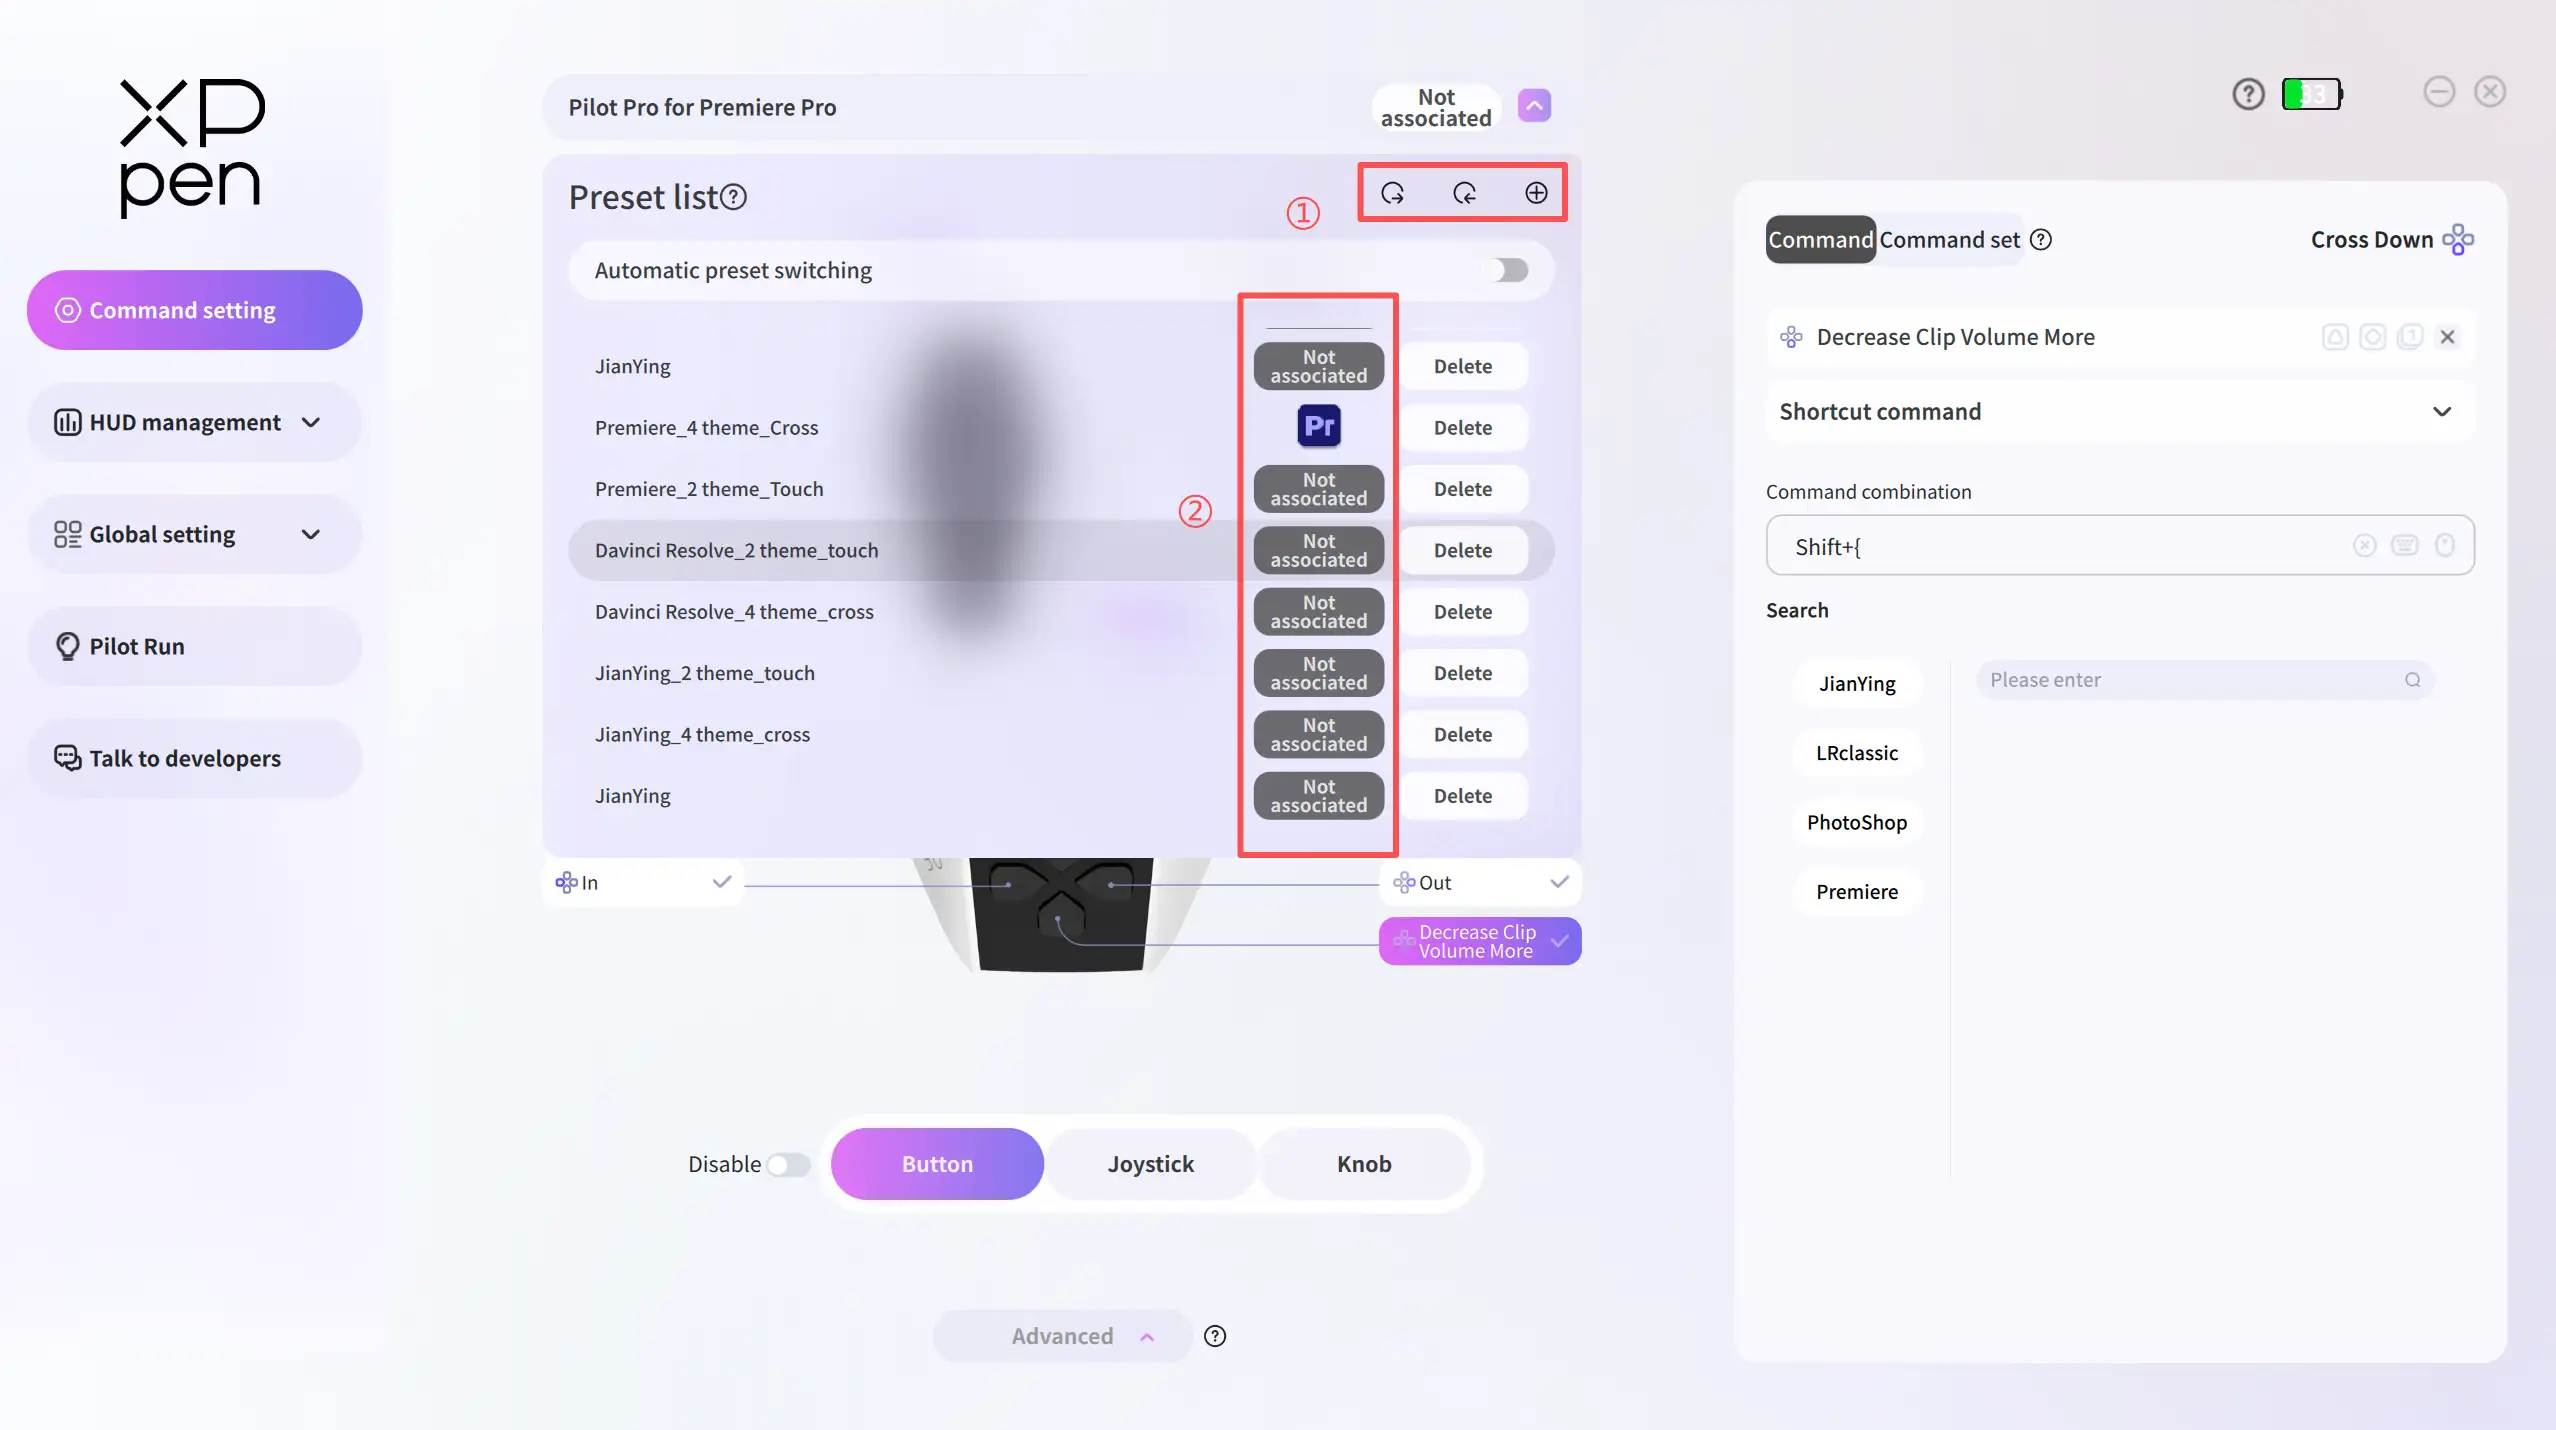
Expand the preset list by clicking the preset section (see figure). You can import, export and create new presets in Area ① of the list.
Edit preset name: Double-click the name to edit.
Create a preset: Click the create button to add a new preset to the list.
Export presets: Click the export button, select one or more presets, and export them to the target path. The default format of preset files is ".json".
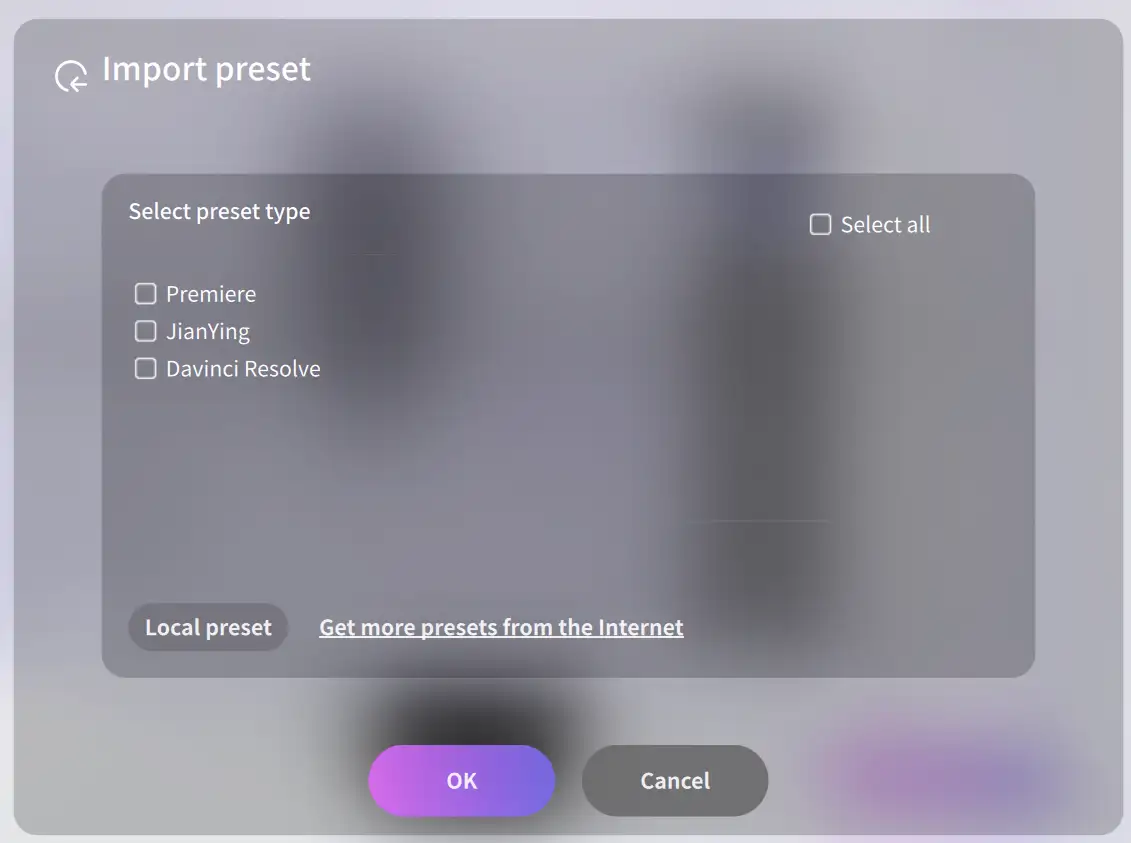
Import presets: The driver supports two import methods (see figure).
Local Preset: Select a local ".json" preset file (only PilotController-compatible .json files are supported) for import.
Official Default Preset: Select and import the official default presets (see figure).
Automatic preset switching
The toggle is enabled by default. When switching between applications, the preset automatically switches to the one associated with the active application. When disabled, the current preset remains unchanged regardless of the application in use.
If multiple presets are associated with the same application, the topmost preset in the list takes effect when the application is launched.
Preset-Application Association
A preset must be associated with a target application to be used:
1.In Area ② of the preset list, click the Not Associated button (see figure).
2.Select the target application in the pop-up window and click OK to complete the association.
Unlink/Relink Preset from Application
In the Link Applications page, click  to unlink or relink the currently selected software. Click another application in the list to switch the selection.
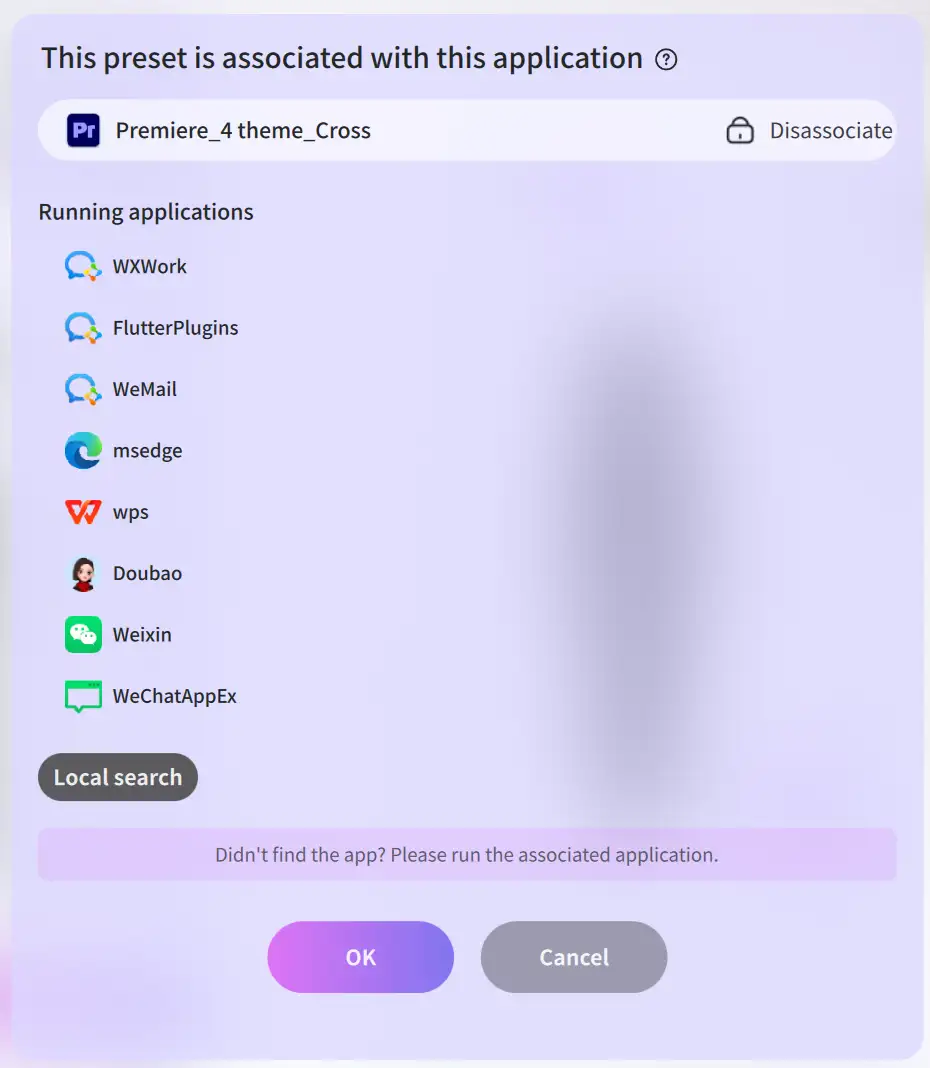
Troubleshooting for Application Association
If the target application is not displayed in the association list, check if the application is running. Launch it and re-enter the Link Applications page—the application will then appear in the list.
If the application is still not found, add its .exe file via Local Search and complete the association thereafter.
Global Preset
Unlike regular presets, the global preset is triggered under specific conditions: when the Automatic Preset Switching toggle is enabled, the system automatically switches to the global preset if the current interface does not belong to any application associated with presets in the list.
Theme
Each theme can be configured with its own set of shortcuts. For example, you can create a preset for "Software P" that contains 4 themes, thereby enabling 4 sets of shortcuts within "Software P".
When creating a new preset, four themes are included by default. The theme keys for these themes are assigned to the A/B/C/D touch buttons on the joystick top by default, activated via double touch. In Advanced Mode, up to 7 themes can be created per preset.
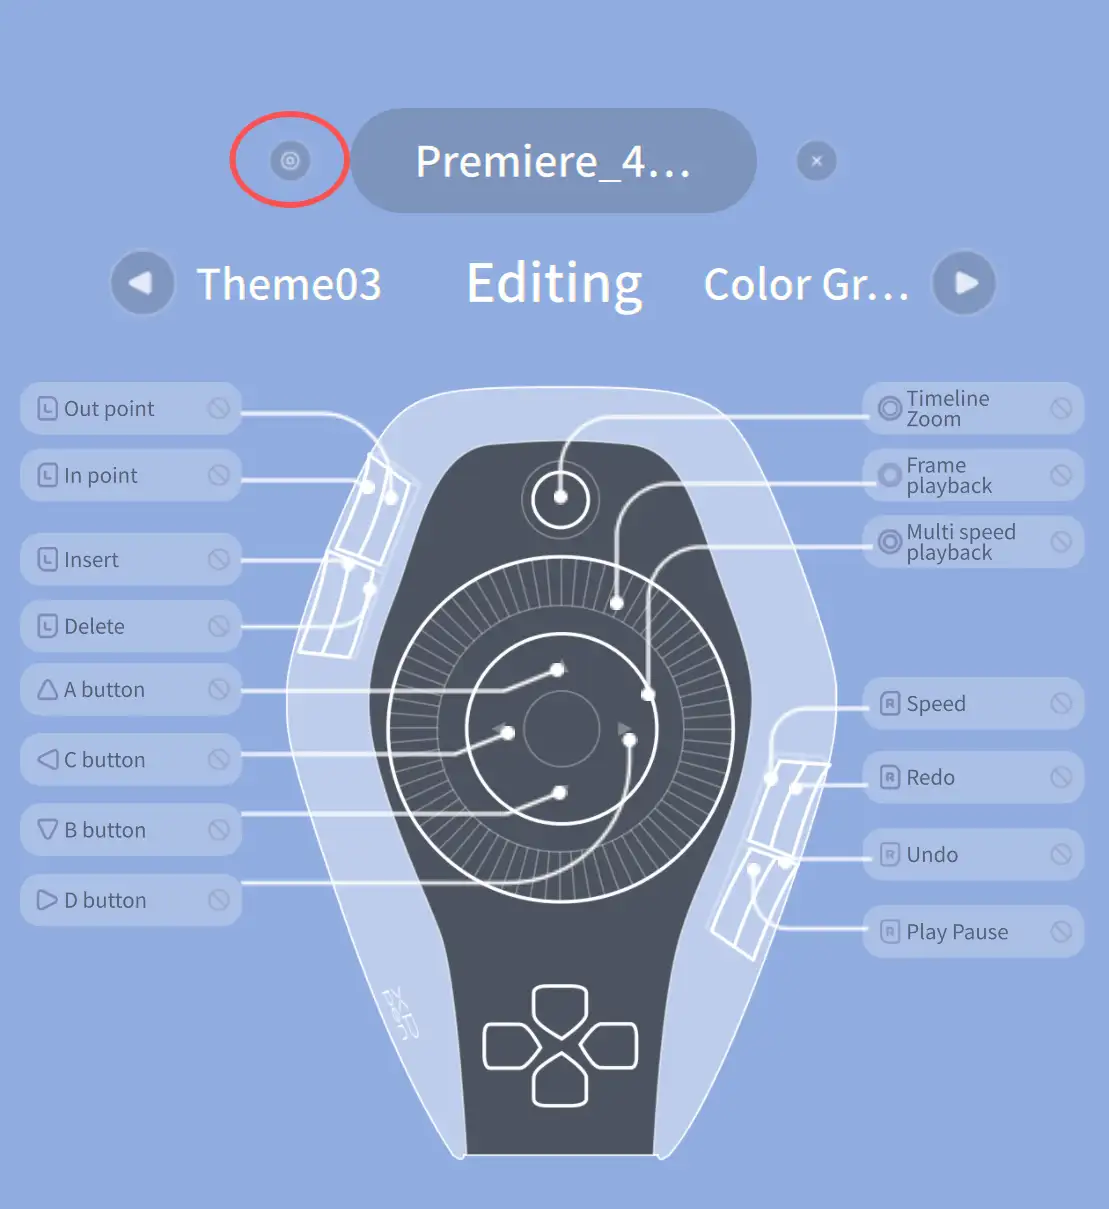
The key for theme activation is the theme key. To manage themes or configure theme keys, switch to Advanced Mode at the bottom of the Command Settings page, and then go to the Theme Management page.

* Note:
Please note that each key can only be set as either a theme key or a custom command at present.Therefore, keys assigned as theme keys will not be displayed in the Visual Key Layout.
If you need to configure a command for a key that is already bound to a theme key, first disable its theme key assignment in the Theme Management page. Two methods are available:
1. Delete the corresponding theme;
2. Change the key bound to that theme.
After unbinding the theme key function, you can find the key been displayed in the Visual Key Layout and configure a command for the key on the homepage.
Click  to access the Theme Management page (see figure).
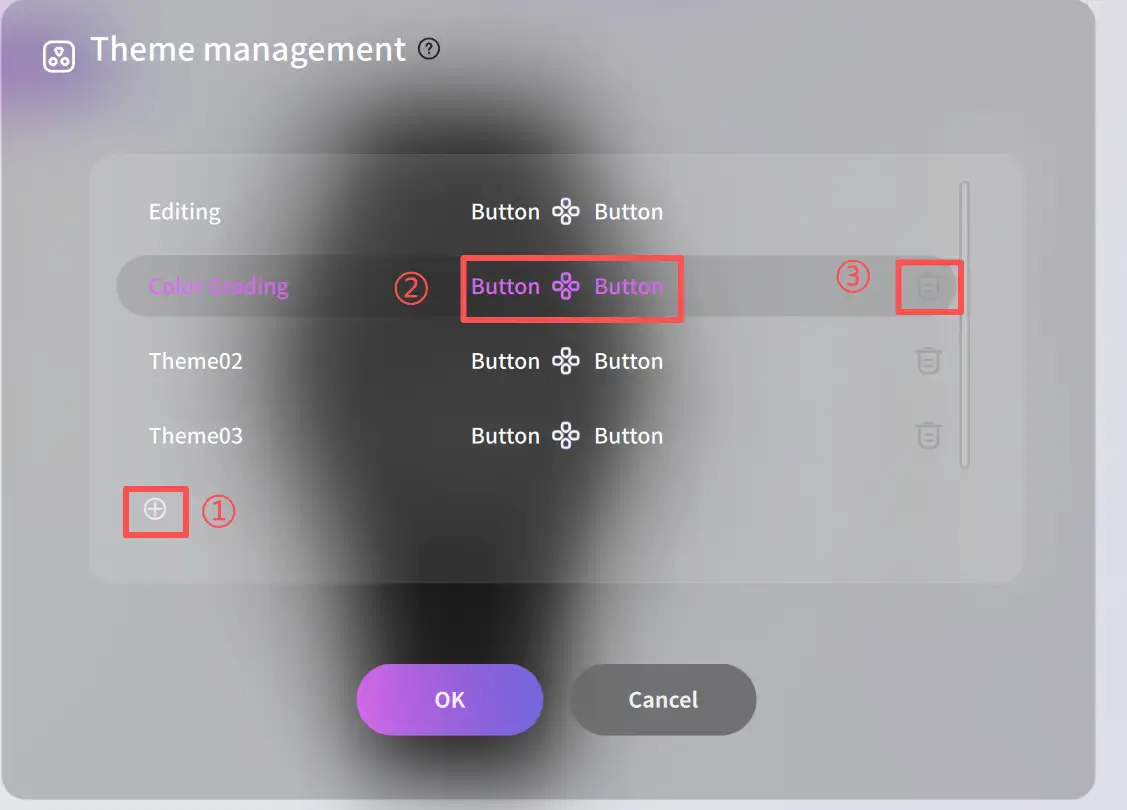
Double-click the theme name to edit.
Click the Delete button (as shown in ③) to delete the theme.
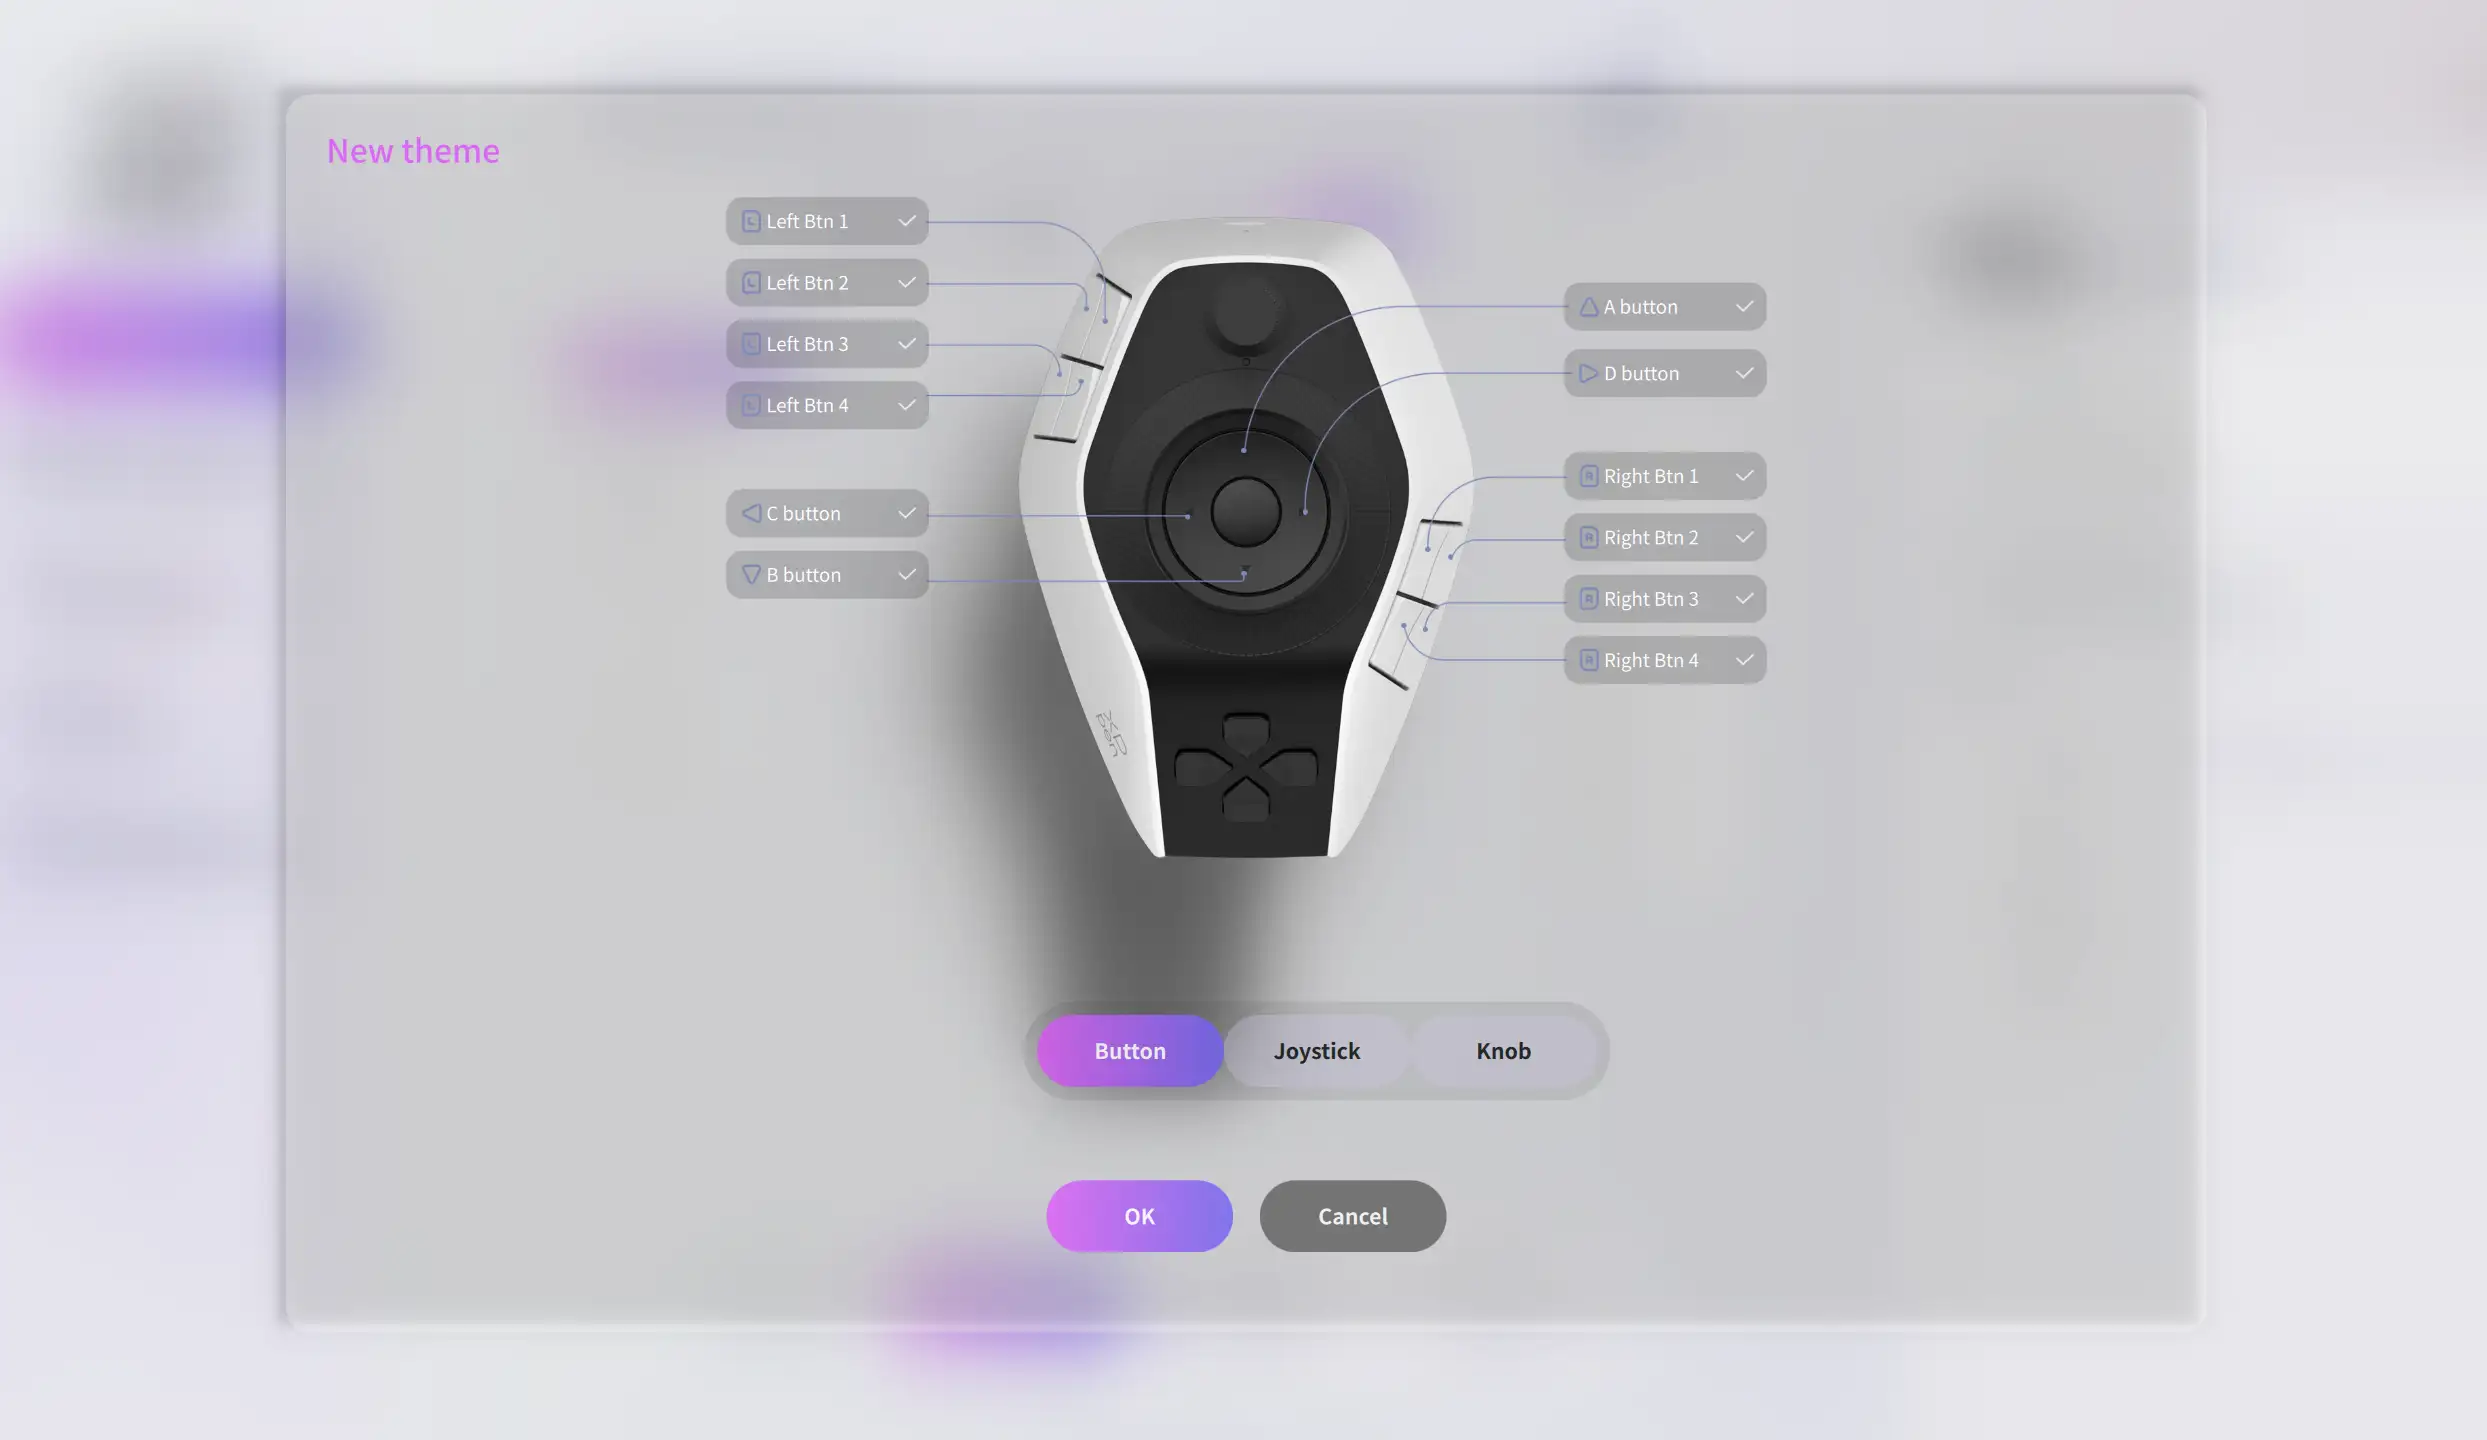
Click the Create button (as shown in ①) to add a new theme (see figure). When creating a theme, you must first select a theme key and click Save to complete the creation.
Double-click the theme key to set it for that theme.
Enable/Disable Keys
The device's keys can be set to Enabled or Disabled. If you temporarily want to prevent a specific key's command from taking effect, you can set it to Disabled. When the theme key is disabled, it can no longer be used to switch themes.
Click  to enable or disable all keys for all themes under the same preset.
Click the disable icon 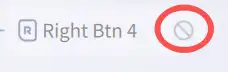 on the right of a key to enable or disable that specific key. This setting applies to all themes under the same preset.
Command/Command Set
Command Panel
After creating a preset for your software, you also need to set the commands for the keys on the Pilot Pro within that preset to use it. Commands can be assigned to buttons, joysticks, and knobs on the Pilot Pro.
The following example of "setting a shortcut for left-side button 01" illustrates how to configure shortcuts.
1. Press the left-side button 01 on the device, or select it with the mouse in the Visual Key Layout page of the driver, then to configure the shortcut name and command details in the Command Panel on the right. The command will take effect immediately once configured.
2. For keys classified as buttons or joysticks, only one shortcut command can be assigned to each key. For knobs, a shortcut command can be assigned to each direction; however, when configuring Macro, Built-in, or Quick tool commands, one command can only be assigned to a single knob.
3. In the Command Panel on the right, you can edit the command name, type, and details. You can set the command name as needed, but special characters ( / : * ? " < > |)are not allowed in the name.
4. Several icons are displayed at the end of the command name, which vary according to the currently selected key type. The functions and meanings of these icons are as follows:
a.  Send on Press: Sends command when the key is pressed
b.  Send on Release: Sends command only when the key is released
c.  One-Shot Send: Sends command once during a single press-and-release cycle
d .  Continuous Send: Sends command repeatedly while the key is held down
e.  One-click Copy: Copies current key settings to the same key in other themes
f.  Clear Command: Clears all parameters in the current Command Panel
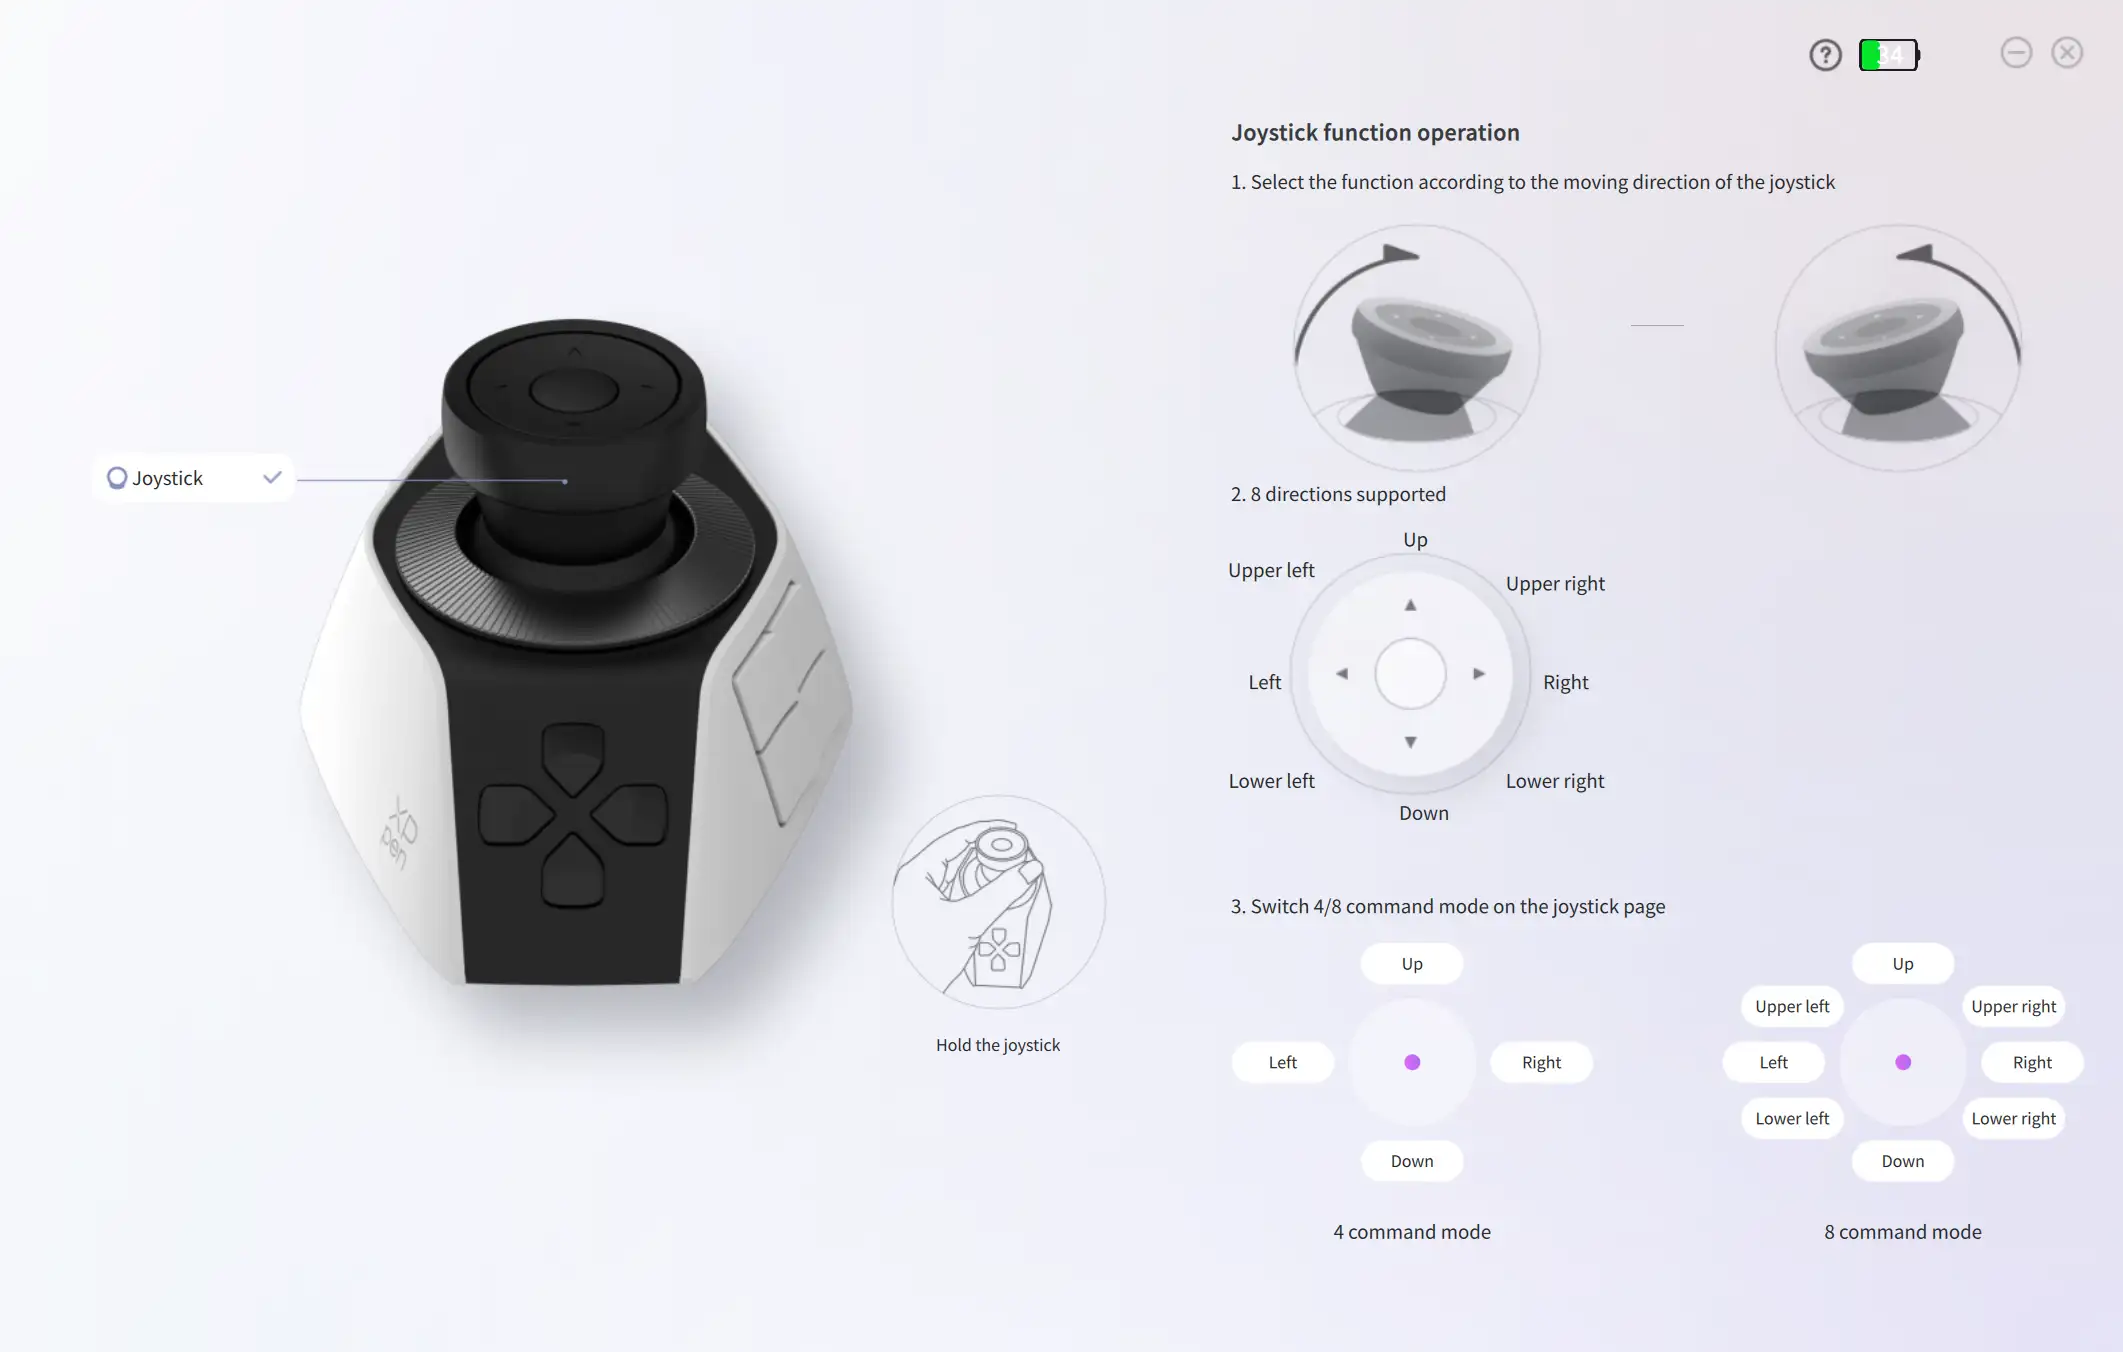
g.  Joystick Properties: Opens the Joystick Settings page
h.  Vibration Intensity: Adjusts vibration intensity for all knobs uniformly
i.  Rotation Speed: Adjusts rotation speed for each knob individually
5. Four command types can be configured for keys: Shortcut Command, Macro Command, Built-in Comand, and Quick Tool.
Shortcut command
6. Shortcut commands refer to software shortcut combinations. For example, in video editing, the common shortcut for the in-point is "I" and for the out-point is "O".
a. There are three ways to set shortcuts:
i. Search for the desired shortcut in the "Search" library and click to select it;
ii. If the library does not contain the shortcut you want to set, you can either type the shortcut combination directly using your keyboard ;
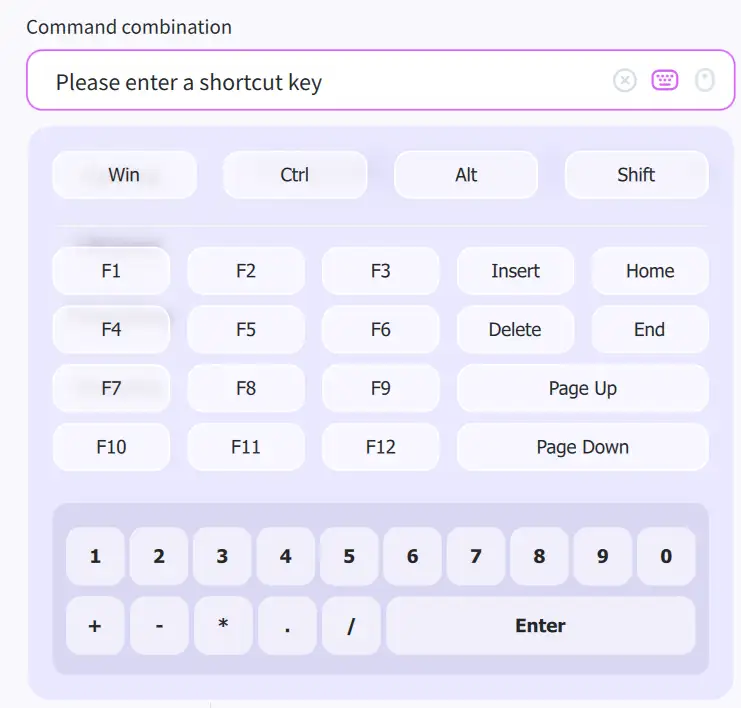
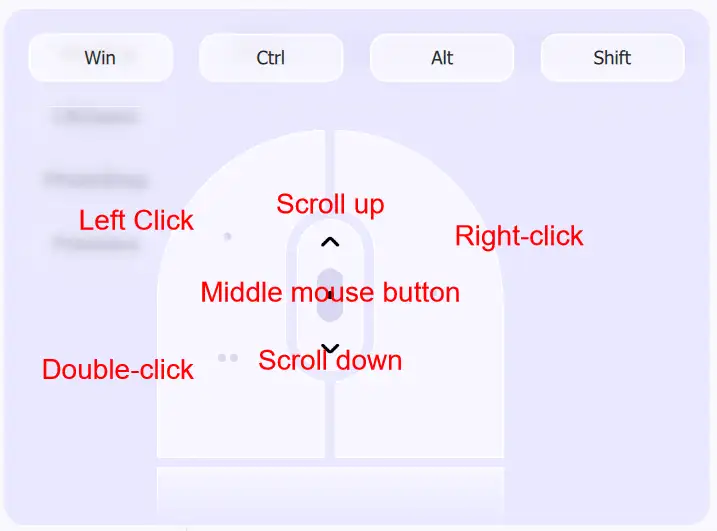
iii. Or click  to use the on-screen keyboard provided by the driver (see figure).
b. In the on-screen keyboard, modifier keys (Win, Ctrl, Alt, and Shift) can be selected in multiple combinations, while non-modifier keys can only be selected individually.
Macro Command
7. The Macro Command feature supports configuring a series of instructions. When triggered, the instructions are executed in sequence from top to bottom.
a.Multiple macros can be created under the same preset, and all keys share a single macro list; however, each key can only be configured with one macro selected from the list.
b. Click  to add a new macro.
c. Click the  button to expand/collapse command details. In command details, click Add Action to add a subcommand. Once added, click "×" at the end of a subcommand to delete it, or double-click the subcommand to edit it.
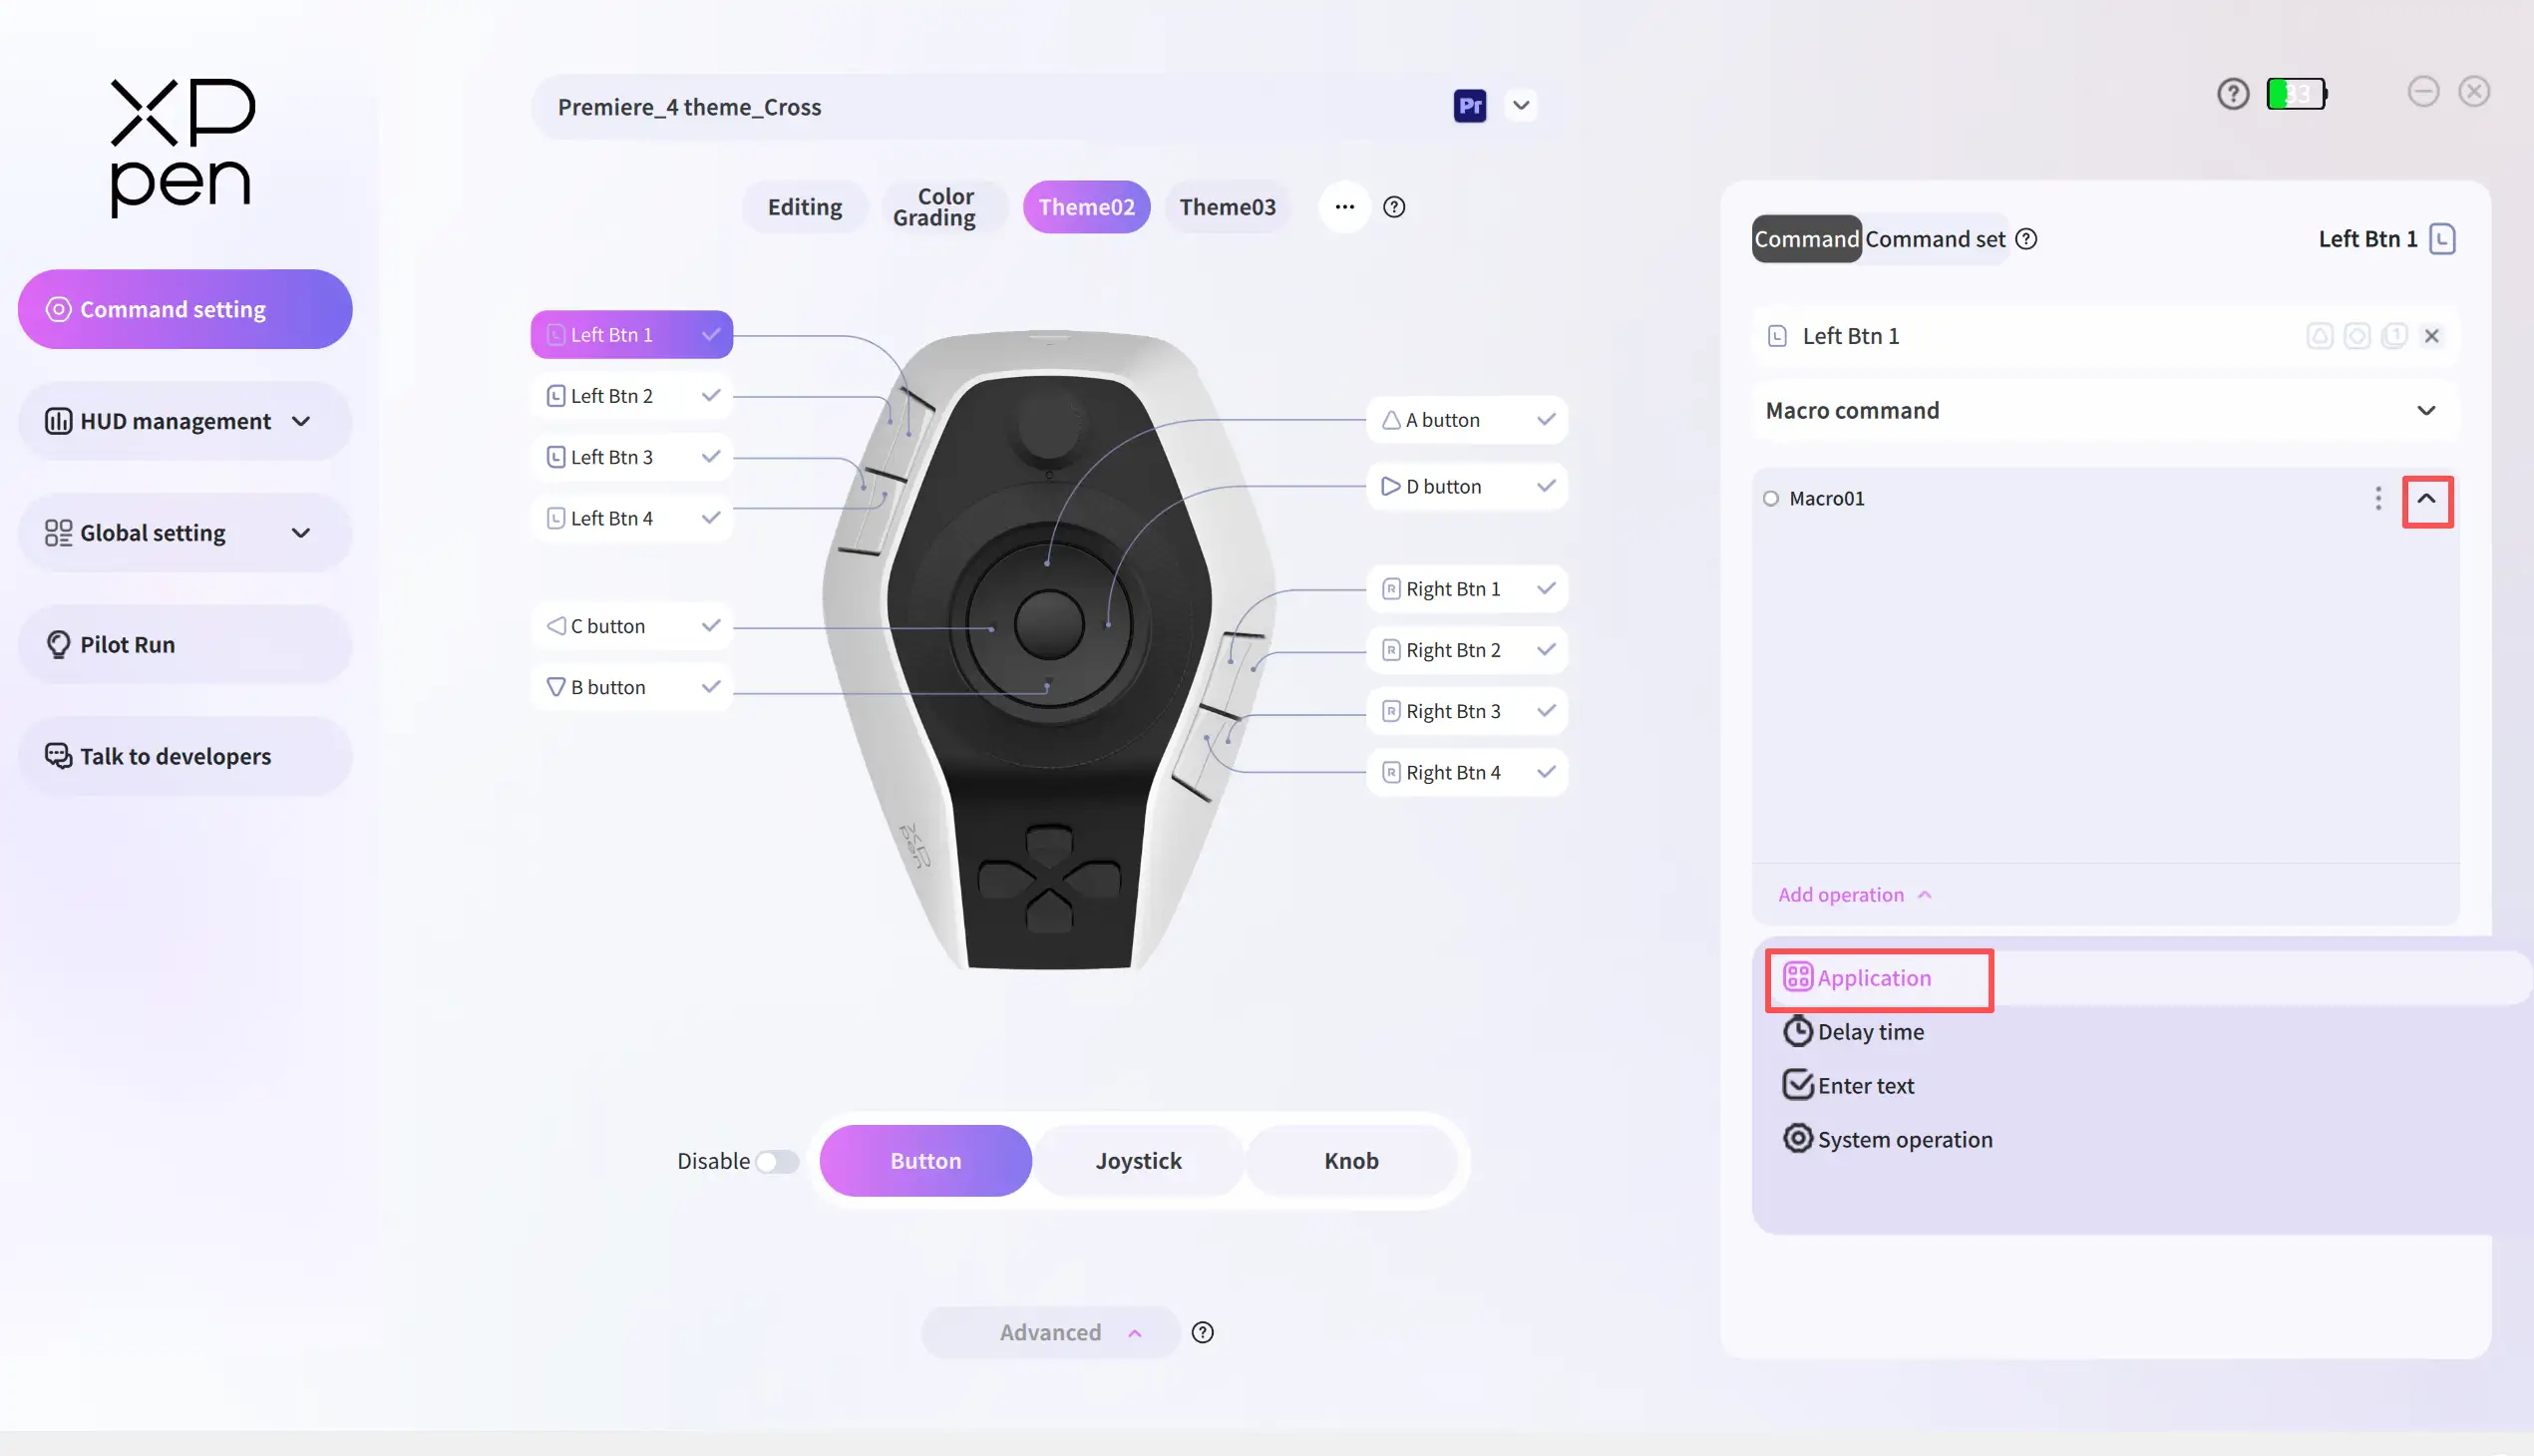
d. Application: One command can be configured for a specific application, such as opening, maximizing, or minimizing the application.
e. Delay time: Controls the interval between the execution of two commands. For example, if you add such a command between two adjacent subcommands A and B and set the time interval to 1,000 ms, subcommand B will only be executed 1,000 ms after subcommand A is executed.
f. Input text: When this command is executed, a string of text will be entered.
g. System operation: These commands are primarily instructions related to the operating system and universal shortcuts, such as copy, paste, and volume up/down.
Built-in command
8. Built-in commands are commands that we encapsulate for certain operations within the software that cannot be performed using keyboard shortcuts alone. Once assigned to a key, they enable quick access to those operations. For example, when assigning the “color temperature” command to a knob, you can adjust the color temperature between warm and cool by rotating the knob left and right.
Quick Tool
9. The last category is Quick Tool commands, which are primarily operating system-related commands, such as taking screenshots or opening the calculator.
Command Set Panel
If you feel that assigning only one command to a key is insufficient, you can configure a command set for that key. A command set is a collection of individual commands, containing up to 8 commands.
1. To configure a command set, you must first switch to Advanced Mode, and then click 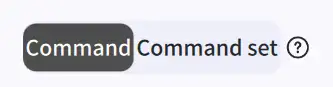 to switch to the Command Set Panel. Click
  to add a new command to the command set (up to 8 can be created).
2. Click a created command to select it. You can then configure it as a shortcut, macro, built-in, or quick tool command below. The operating steps are consistent with those in the [Command] section above.
a. Double-click the command to rename.
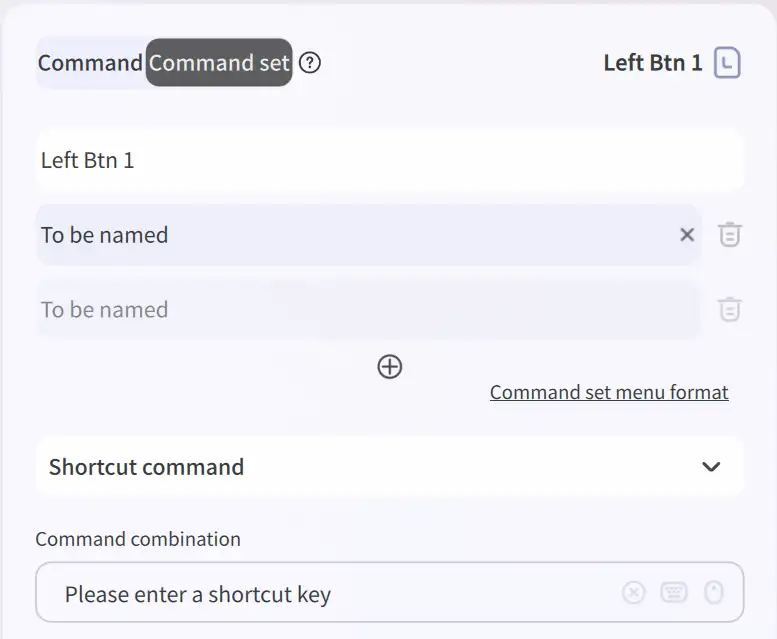
3. Click  to delete the command.
4. Command Set Window Format: It is used to set the style of the command set window, including display position, font size, and opaqueness.
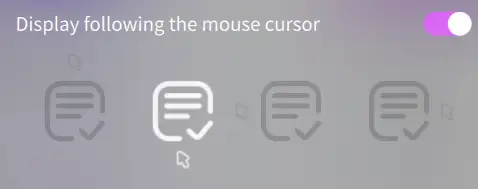
a. The Follow Mouse Cursor setting controls the position (above, below, left, or right of the mouse cursor) where the command set window should appear when invoked. You can choose from the following four positions (see figure). In this mode, the command set window always appears following the mouse cursor..
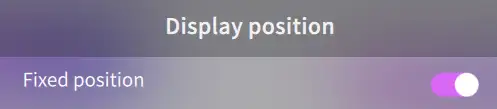
b. Enabling the Fixed Position switch will lock the command set to a specific location on the screen, making it unmovable.
5. After configuring the command set, you can invoke it (see figure).
6. Click the  button to set the command set's appearance and opacity. You can also click
  to set the command set position to Follow Mouse Cursor or Fixed Position.
7. Steps to operate the command set after invoking it:
a. Select commands: Move the joystick up or down, or move the mouse up or down.
b. Execute commands:
i. Non-knob commands (such as Copy and Paste) can only be executed by selecting them and pressing the OK button or clicking them with the mouse. Rotating the knob does not validate such commands.
ii. Knob commands (such as Brush: Flow) can only be adjusted and activated by rotating the knob. Clicking with the mouse or pressing the OK button does not validate such commands.
c. Steps to close the command set:
i. In Fixed Position mode, press the Small Knob Base Button or click the close icon “×” with the mouse to close the command set window.
ii. In Mouse Follow mode, the command set window will close automatically after executing any command.
HUD Management
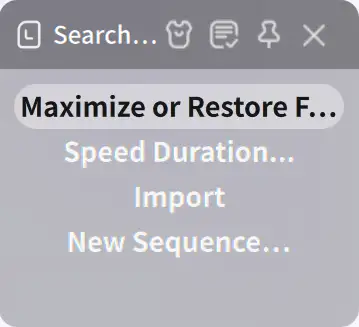
Can't remember all those shortcuts you set? Open the HUD to see which shortcuts are configured for each joystick, button, and knob.
In the driver's HUD Control panel, you can turn the HUD on/off for the base and the joystick.
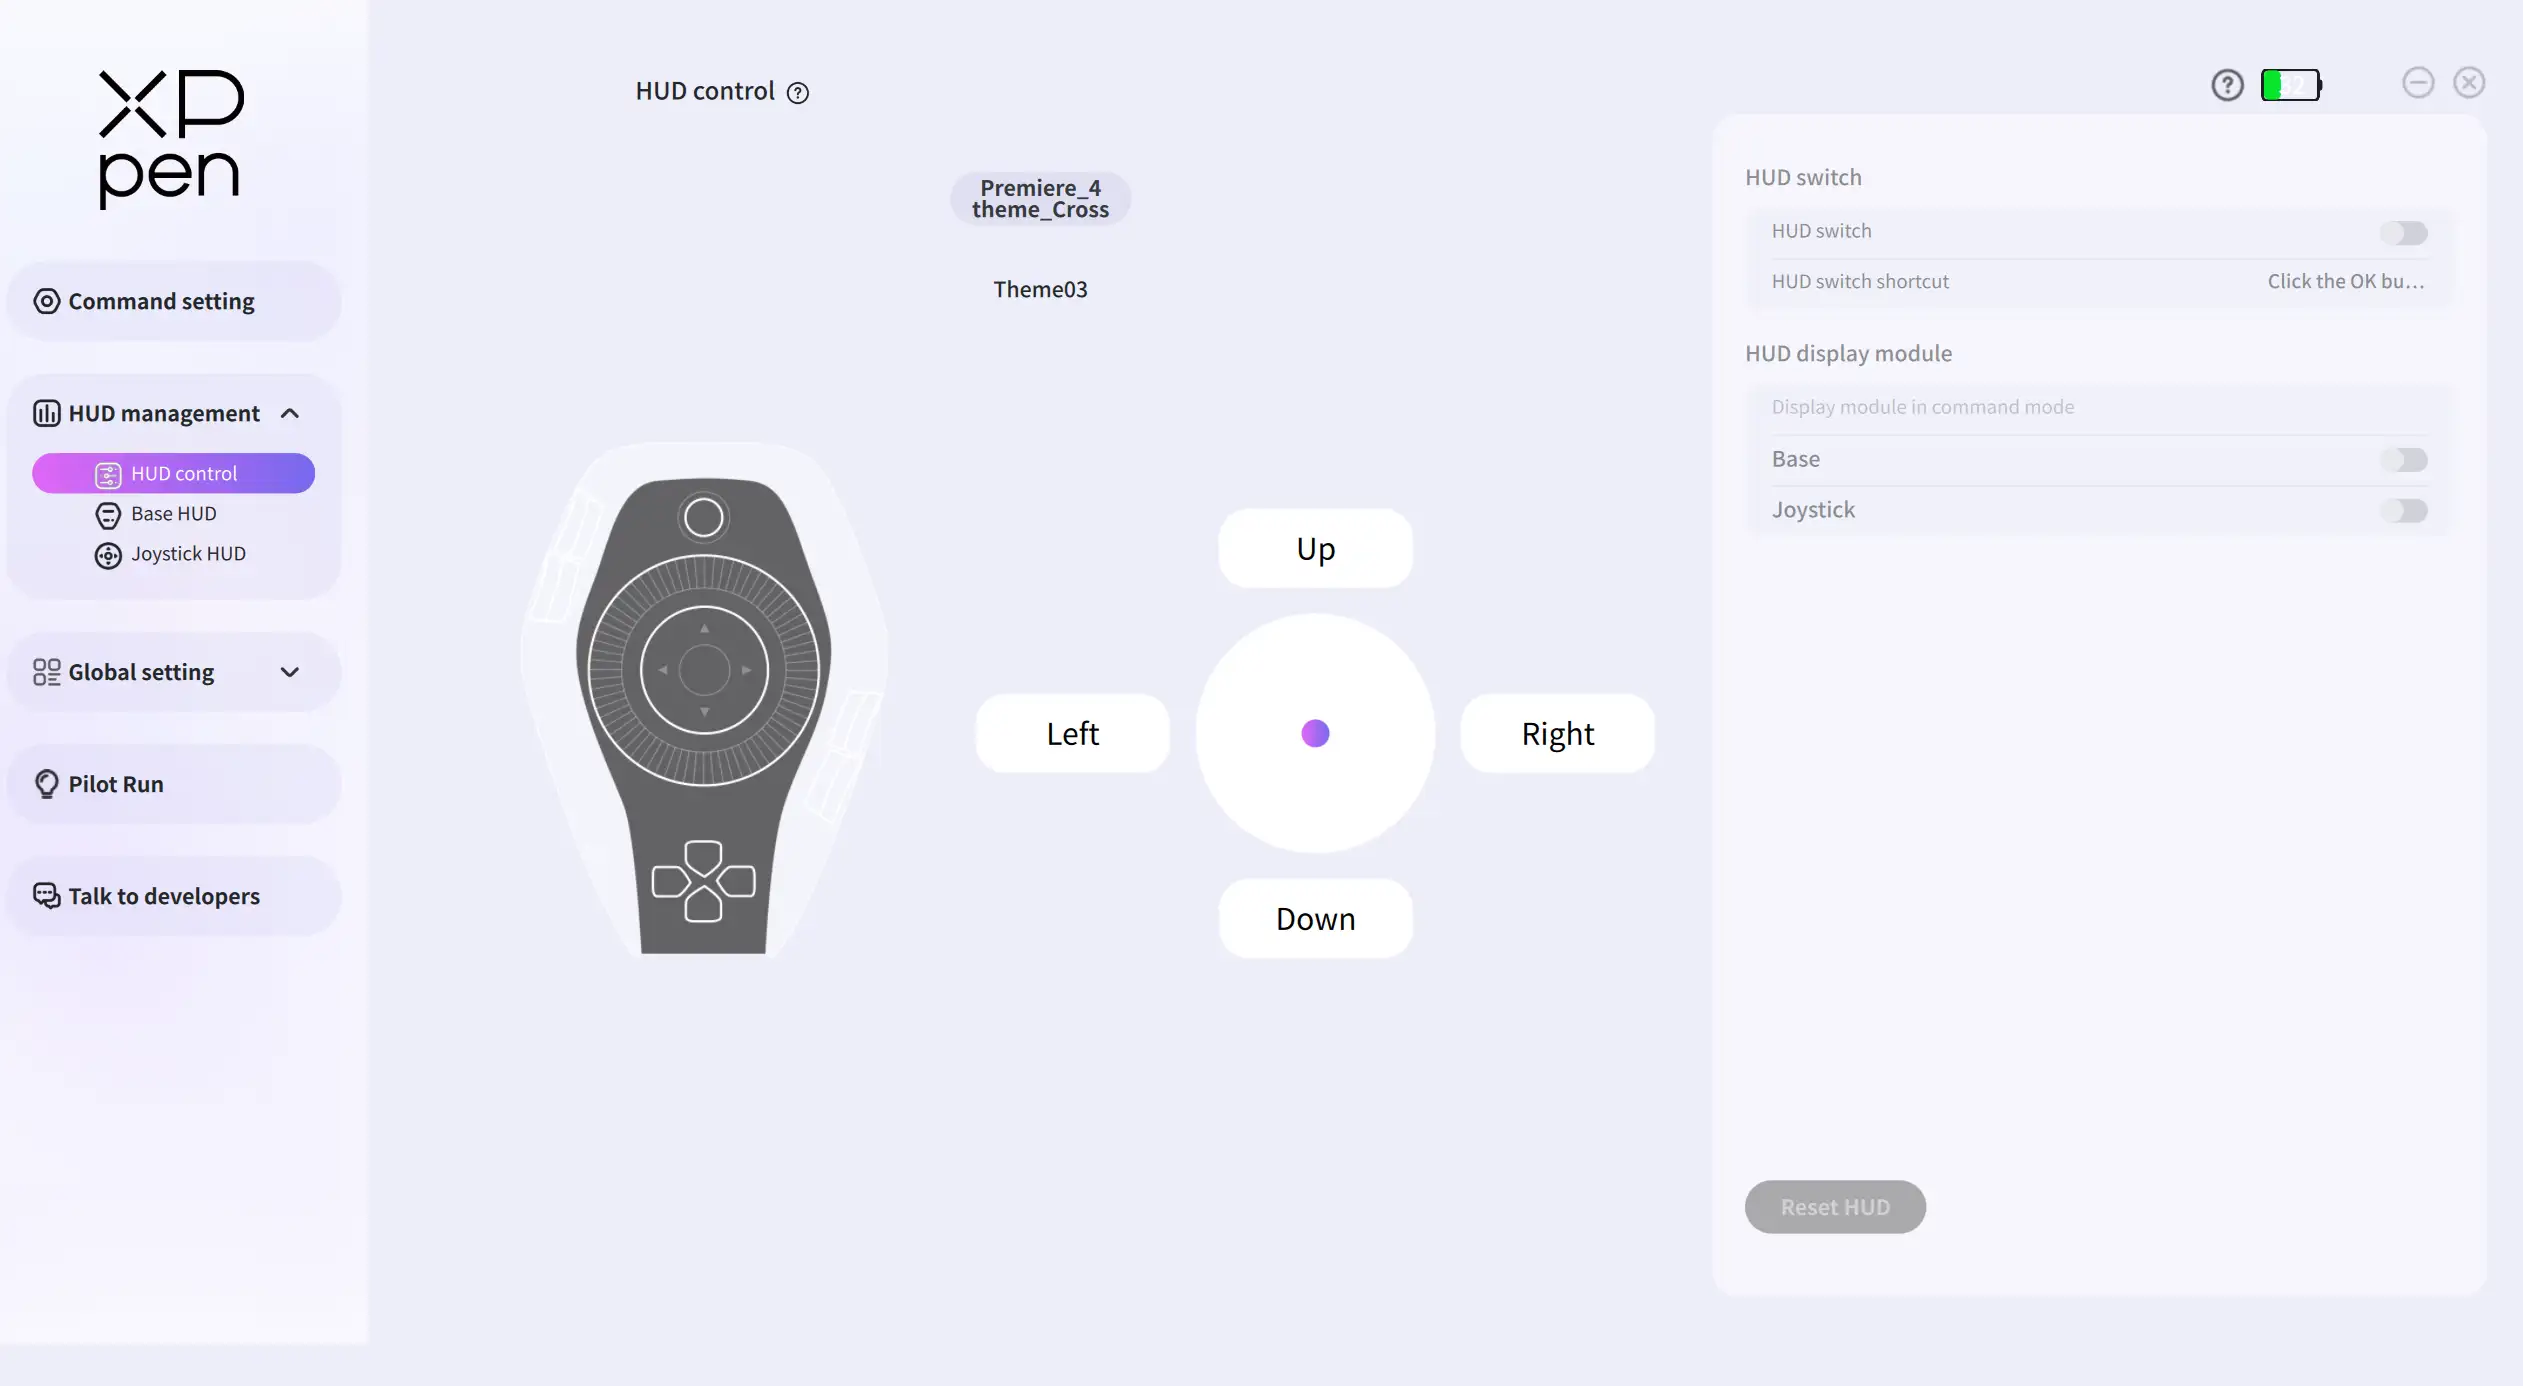
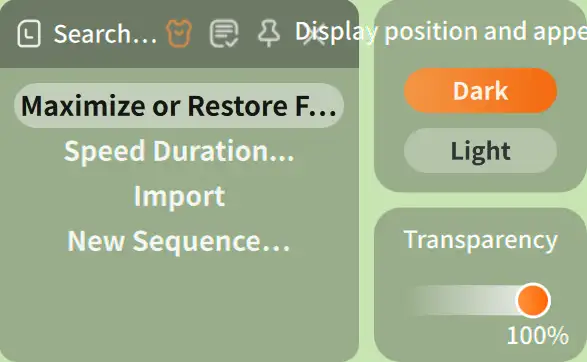
In Base HUD and Joystick HUD, you can individually adjust the appearance, size, and transparency of each HUD.
Turn HUD on/off:
Press the OK button in the driver or in the software associated with the current preset to toggle HUD. Alternatively, manually turn HUD on or off in the HUD Management page of the driver.
Adjust HUD parameters:
Adjust them in the driver or in the top-left corner of the HUD floating window.
Switch themes in HUD floating window:
Click the theme name on either the left or right side, and the corresponding theme will rotate to the center and take effect.
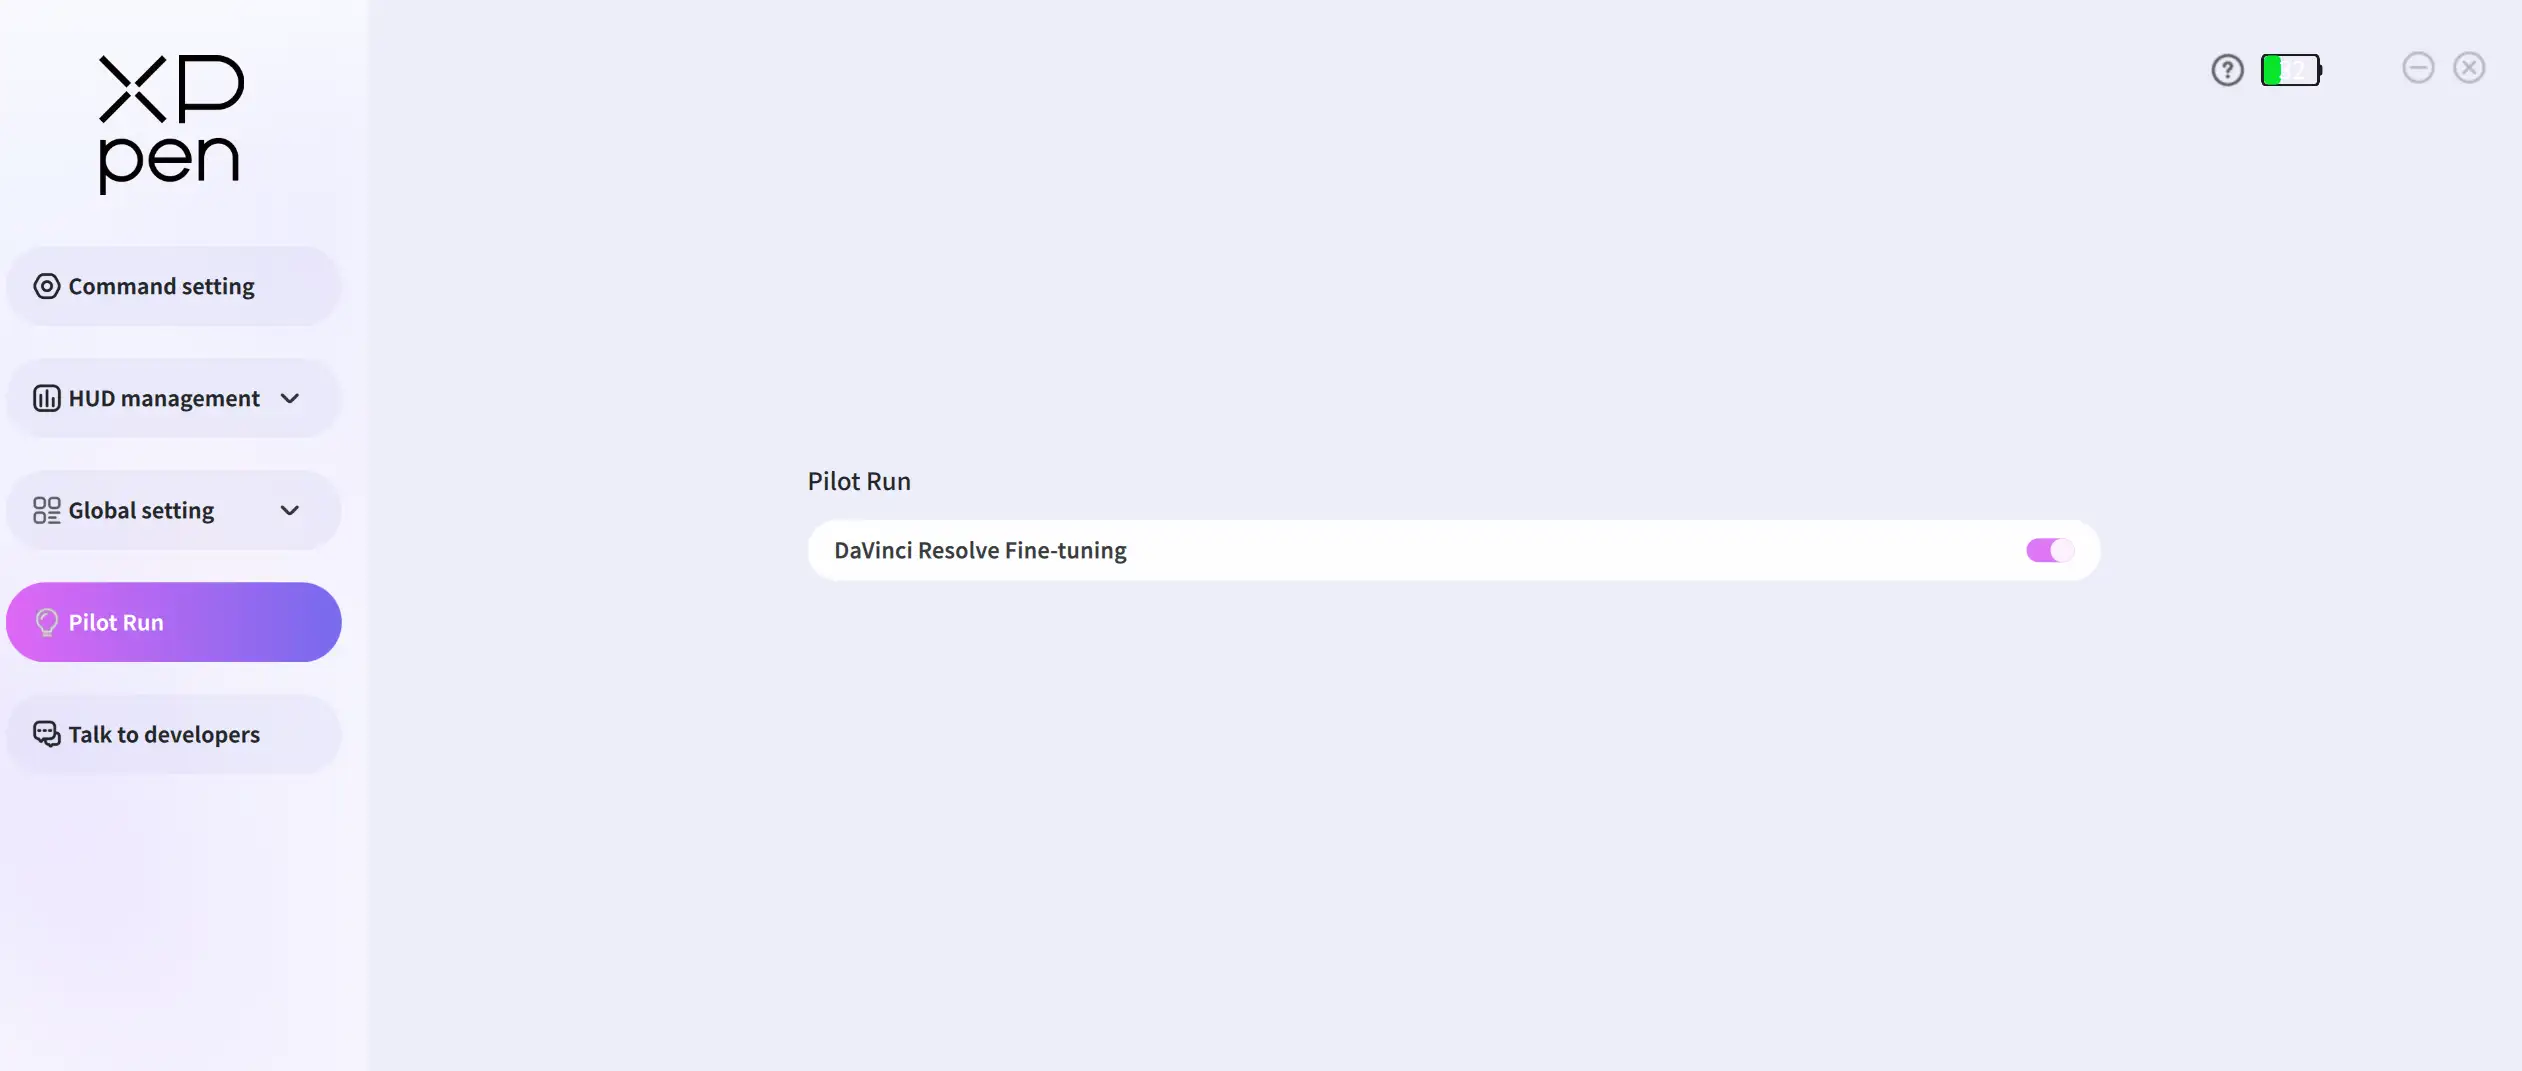
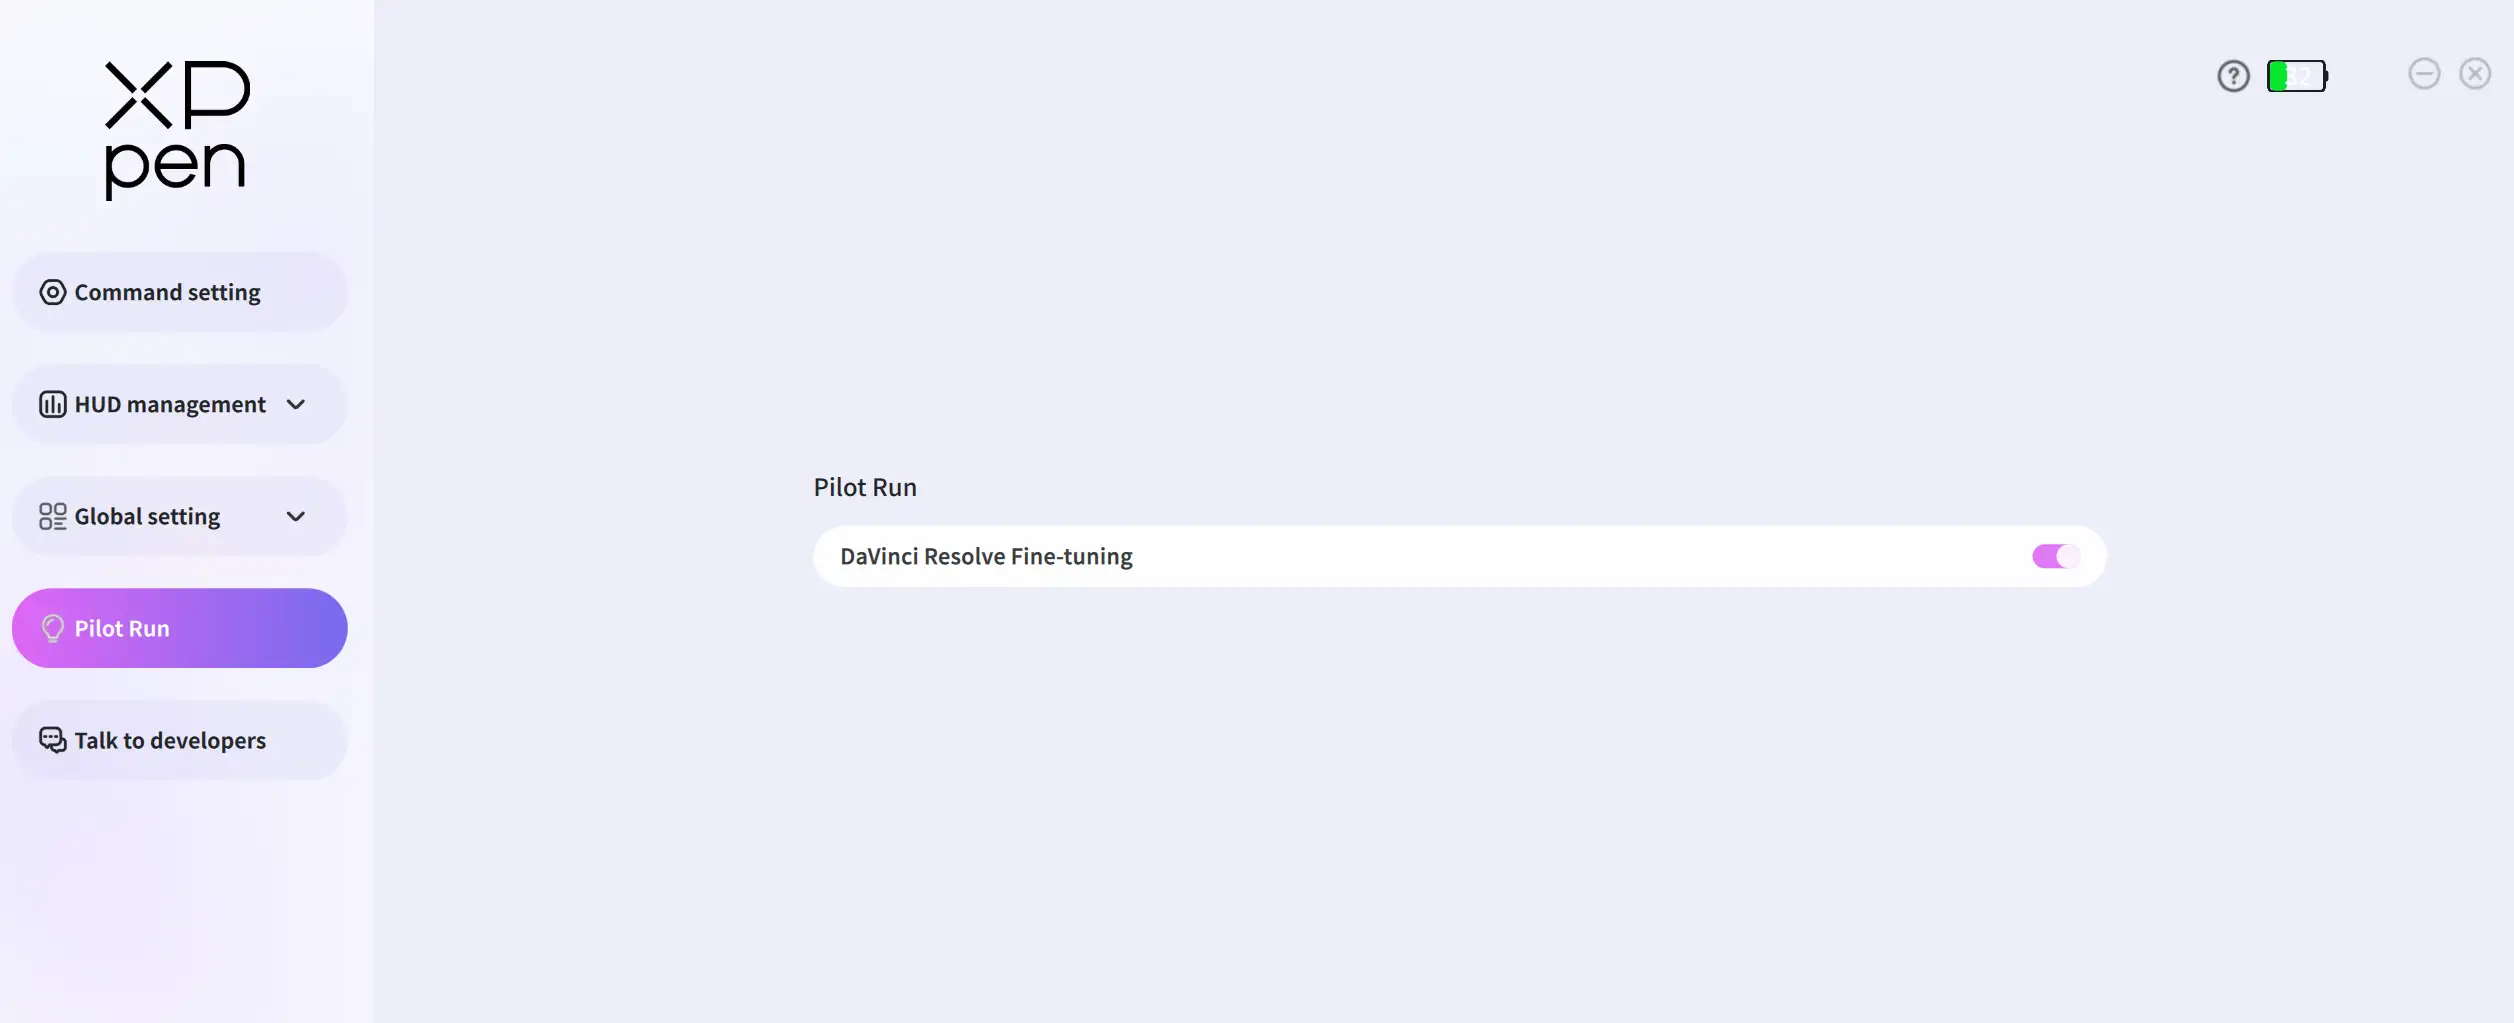
Pilot Run
Unlike the driver's core key-Command Set, the Pilot Run module provides experimental features for you to explore. It currently includes the DaVinci Resolve fine-tuning feature (currently supports DaVinci Resolve 20.2, with partial compatibility for other versions).
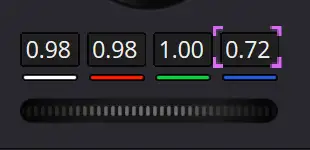
When the driver is running and the DaVinci Resolve Fine-tuning feature is enabled, you can use Pilot Pro to precisely adjust components such as color wheels, sliders, and values in the DaVinci Resolve Color page.
When you hover the mouse over a component, a selection highlight appears around the component, indicating that it is supported (see figure).
The following components are used as examples to illustrate how to use the fine-tuning feature:
1. Value: Rotate the small knob left or right to adjust the value.
2. Horizontal Slider: Rotate the small knob left or right to adjust the slider. Rotate it left to move the slider left, and rotate it right to move the slider right.
3. Vertical Slider: Rotate the small knob left or right to adjust the slider. Rotate it left to move the slider down, and rotate it right to move the slider up.
4. Color Wheel: Press and hold the OK button while moving the joystick to move the color wheel pointer in the corresponding direction. Release the OK button to stop the pointer.
5. Restore Defaults: Press the Small Knob Base Button to reset the above components to their default states.
Global Settings
1. Language: Changes the driver language to other languages.
2. Auto-start when turned on:
a.Sets whether the driver starts automatically at system startup.
b.If the joystick drifts, use the "Joystick Direction Calibration" feature and follow the step-by-step instructions to restore it to normal. If you make an error during calibration, please exit the process, click Restore Default Settings , and then perform the calibration again.
3. Prompt during preset switching: Sets whether to display a prompt when switching presets and its display duration.
4. Battery monitoring: Configures the display style of the battery level in the top-right corner of the driver.
5. Skin customization: Chooses from two driver appearance options: light and dark.
6. Product Information: Views the product model, driver version, and firmware version.
7. Storage Information: Sets the save location for recorded GIFs. Double-click the text box to select a designated save folder.
Talk to developers
If you need to download the latest drivers or presets, you can click the latest driver/preset file to download them from the corresponding page on the official website.
If you encounter any issues while using the product, you can click "FAQ" to view detailed information on the official website, or click "I want to report product issues & provide suggestions" to share your opinions.
If you wish to share your custom presets with other users, click Share My Preset File to upload and share your preset files on the official website.
Contact Us
For any questions, please contact us in the following ways:
Email: service@xp-pen.com
Website: www.xp-pen.com