Santa Hat Drawing: Easy Step-by-Step Guide for Beginners
OTHERSWelcome to this festive drawing tutorial! Whether you're just starting your digital art journey or looking to add some holiday cheer to your artwork, learning to draw a Santa hat is the perfect place to begin. This iconic symbol of Christmas is not only fun to create but also teaches you fundamental drawing techniques that you can apply to countless other projects. In this comprehensive guide, you'll learn how to draw a charming Santa hat from start to finish, progressing from simple sketches to a fully colored and shaded masterpiece. We'll break down the entire process into 8 easy-to-follow steps, each accompanied by clear visual references showing exactly what your artwork should look like at every stage.
What You'll Learn:
How to sketch basic hat shapes with smooth, confident curves
Techniques for adding texture and dimension to fur elements
Color application methods for vibrant, festive results
Shading and highlighting techniques to make your drawing pop
Tips specific to using a drawing tablet effectively
Tools You'll Need:
For this tutorial, we'll be using the XPPen Artist 12 3rd drawing tablet, a fantastic device for beginners and intermediate artists alike. Its pen display technology allows you to draw directly on the screen, making the experience intuitive and natural. However, don't worry if you have a different tablet or even just a mouse—the techniques we'll cover are universal and can be adapted to any digital drawing setup.
Skill Level:
This tutorial is designed specifically for beginners with little to no prior drawing experience. Each step is explained in detail, and we'll take our time to ensure you understand not just what to do, but why we're doing it.
Time Required:
Most beginners can complete this drawing in 30-45 minutes, though feel free to work at your own pace. There's no rush—the goal is to learn and enjoy the creative process!
By the end of this tutorial, you'll have a beautiful Santa hat drawing that you can use in holiday cards, social media posts, or as part of larger Christmas-themed artwork. You'll also gain confidence in using your drawing tablet and develop skills that will serve you well in future projects.
So grab your stylus, open your favorite drawing software, and let's spread some holiday cheer together.
How to Draw A Santa Hat: Easy Step-by-Step Guide
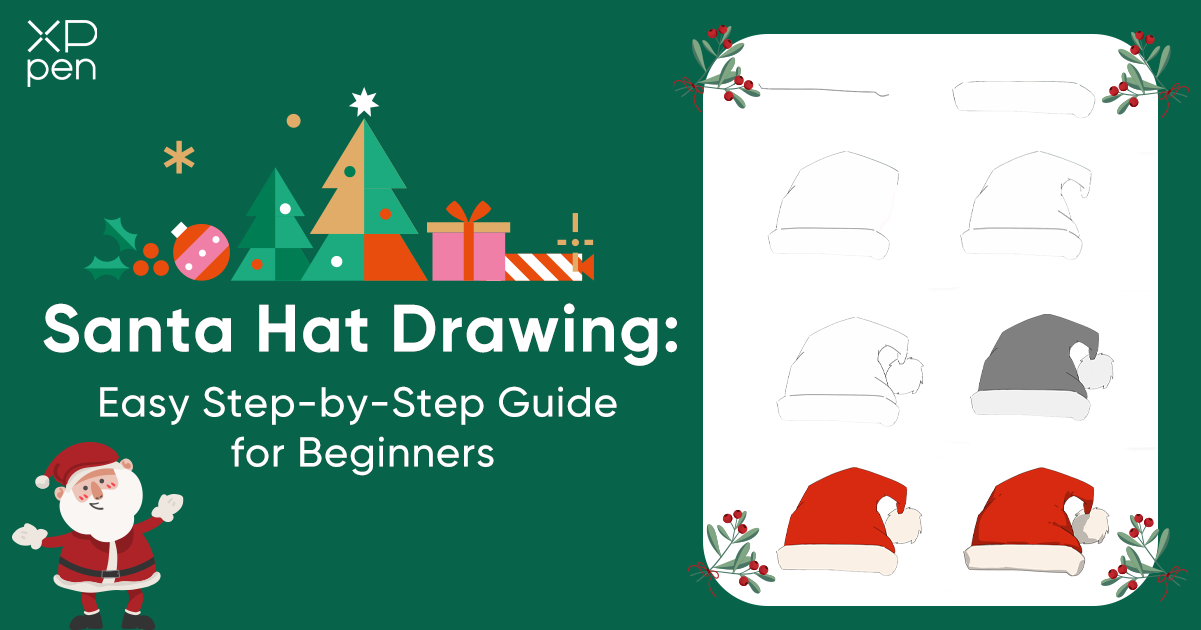
Step 1: Set the Basic Hat Shape in the Canvas
When drawing a Santa hat, start by sketching its overall shape in your mind. Imagine it as a triangle with a slightly curved or floppy tip, which helps the hat look soft and relaxed. Pay attention to the proportions: the base should be wide enough to look like it could fit on a head, and the tip should taper gently without becoming too long or too short. Once you’ve had a rough picture in your mind, start to draw a horizontal line that follows the curve at the bottom of the hat.
Tip: Zoom in when drawing this line so you can control the curve precisely. This also makes it easier to maintain consistent thickness.
Step 2: Complete the Hat Band
To create a fluffy texture for the hat band, start by drawing a second line parallel to the first, which gives the band a defined boundary. Then add small, short flicking strokes along the edge to suggest fur—keeping the texture subtle will make it look more natural. Try to keep the two lines roughly parallel so the band appears neat while still maintaining a soft, fluffy look.
Tip: Change the brush size slightly for the fur details to make it appear layered. This adds depth without cluttering the band. Also, the band should be about one-fifth the height of the entire hat.

Step 3: Sketch the Hat Body
With the band finished, outline the hat body’s size, height, and flowing silhouette. Keep the tip drooping slightly to one side to suggest movement.
Tip: The Santa hat body should be about four-fifth the height of the entire hat.

Step 4: Refine the hat body details
Further refine the body of the Santa hat. Intentionally let the pointed tip droop to one side to add a sense of movement. At the same time, carefully refine the interlocking structure lines of the folds.

Step 5: Draw the Pom-Pom
The pom-pom at the tip of the hat should be drawn as a loose, slightly irregular circle rather than a perfect geometric one, since a bit of unevenness makes it look more natural. Its size should feel balanced with the rest of the hat—usually about the same width as the hat band. To give it a soft, fuzzy texture, add small flicks or short lines radiating outward from the edge of the shape.
Tip: Lightly sketch first, then go over it with firmer strokes once you’re happy with the shape. This keeps the pom-pom soft and fluffy in appearance.

Step 6: Add Base Shading (optional)
Start by filling the body of the hat with a neutral gray as a placeholder color—this helps you plan where to add shading and highlights later. Consider the direction of your light source; typically, light comes from above or the side, so the opposite edges or the bottom of the hat will naturally fall into shadow. Keep the fur band and pom-pom white in contrast, as these areas will receive their own subtle shading in the next steps.
Tip: Use a soft brush to fill large areas evenly without leaving streaks.

Step 7: Apply Color
Next, replace the base gray with a rich, festive red to bring the hat to life. To keep the edges crisp, zoom in and use a smaller brush when trimming around the band and pom-pom. For more depth, layer your colors: begin with a mid-red, then add lighter reds for highlights and darker reds for shadows to give the hat a more dimensional and realistic appearance.
Tip: When coloring near the fur, leave a little white edge to prevent the red from bleeding into the fluffy parts.

Step 8: Final Shading and Highlights
To add depth and dimension, apply darker red tones along the folds and edges of the hat. Highlight the areas where light naturally hits—such as the top curves, tip edges, or raised sections—using a soft, slightly lighter red or pinkish tone. Lightly shade the fur band with soft grays to suggest subtle shadows while keeping it fluffy. For the pom-pom, add gentle shading inside the circular shape and soft highlights along the outer edges to make it appear round and three-dimensional.
Tip: Zoom in to add tiny texture details on both the fur band and pom-pom—these little touches make a big difference. Step back frequently to see if the shading reads well overall and adjust intensity if needed.

Video Tutorial
About Us
Founded in 2005, XPPen is a leading global brand in digital art innovation under Hanvon UGEE. XPPen focuses on the needs of consumers by integrating digital art products, content, and services, specifically targeting Gen-Z digital artists. XPPen currently operates in 163 countries and regions worldwide, boasting a fan base of over 1.5 million and serving more than ten million digital art creators.
Learn more


Want to elevate your drawing skills?
Discover step-by-step tutorials, expert tips, and creative techniques to boost your drawing skills.
