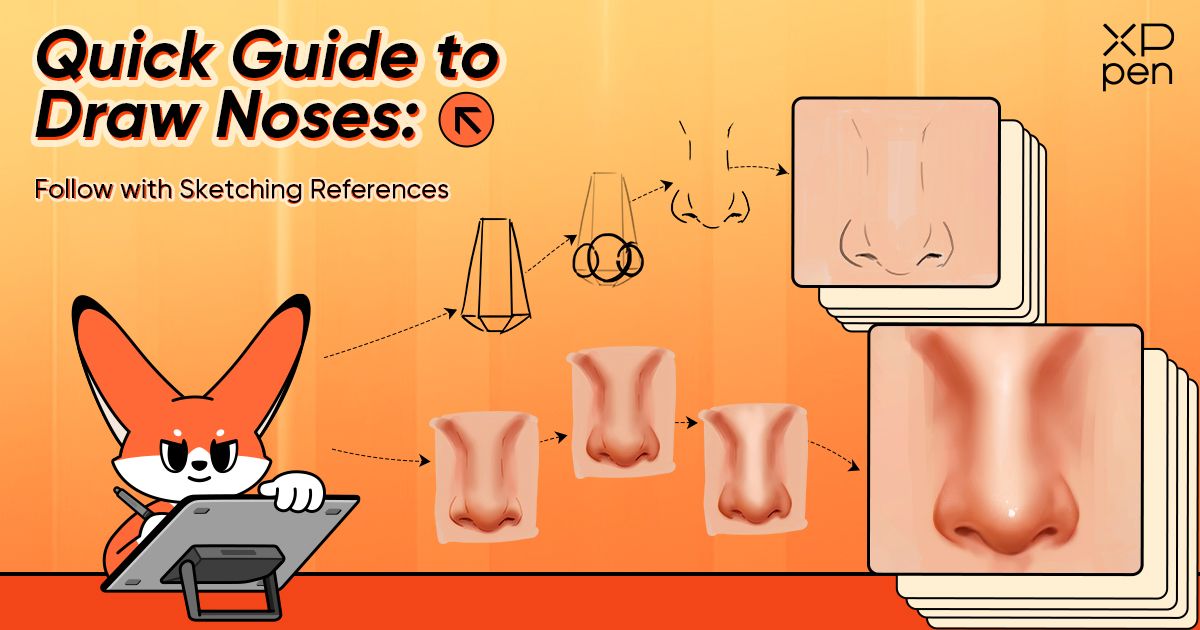
How To Draw Noses (With Sketching References)
OTHERSWhen it comes to sketching portraits, drawing a nose is one of the most challenging tasks. Whether you're aiming for a photorealistic portrayal or a stylized illustration, understanding the underlying structure and proportions is essential in drawing the nose.
It's crucial to grasp the basic anatomy of the nose and it consists of several key components, including the bridge, nostrils, and tip. Familiarizing yourself with these parts will make it easier to capture their unique characteristics in your sketches.
In this drawing tutorial, we will show you a practical method for drawing noses so you can accurately and vividly depict the intricate details of the nose.
Whether you're a beginner in drawing or a seasoned pro, you can create noses similar to the example below by following these outlined steps.

Noses come in various shapes and sizes. However, the fundamental ideas behind drawing a nose are always the same: picture the nose as an elongated form with nostrils on either side. You can follow the steps below to make drawing a nose easier and learn the skill more quickly.
What you'll learn in this tutorial
-
How to draw a nose from the front
-
How to draw a nose when the light comes from three different angles—above, lateral, and below
-
How to draw a nose from three different perspectives: frontal, profile, and 45° angle
Preparation Stage
It's important to arrange your array of drawing tools before drawing. You can use digital drawing tools including graphic tablet, stylus, and drawing software like Photoshop or Procreate. You can also choose traditional tools like pencils, brushes, paints, and paper.
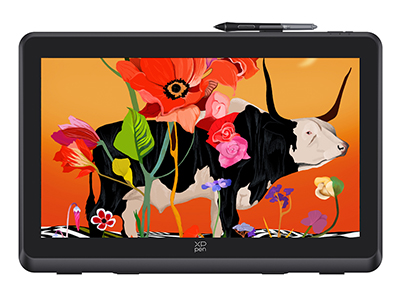
For this drawing guide, we'll be utilizing the Artist Pro 22 (Gen 2) drawing tablet with screen in tandem with the cutting-edge 16K-level pressure-sensitive stylus. Once you have everything ready, let's get started!
Video Guide
Click on the video below to see how to draw noses step-by-step:
Step 1: Sketching the Fundamental Outline
Begin by drawing a vertical rectangle which will serve as the foundational contour for our nose depiction. Create four diagonal lines that extend to the sides of the rectangle, one from each of its four corners. These diagonal lines will determine the alae's dimensions and arrangement.
It's important to note that not every person's nasal structure is perfectly symmetrical. We are using a standardized nose shape ratio for illustration to more fully explain this method.

Step 2: Delineating the Nose's Assorted Segments
In this step, we will demarcate the distinct components of the nose to ensure that the forthcoming nasal portrayal retains symmetry and avoids distortion. Sketch two diagonal lines originating from the nose's center and extending downwards; these lines will establish the location and contour of the nasal bridge. This particular area forms a dual-triangle configuration.
Beneath the terminal point of these diagonal lines, sketch a moderately sized circle. Its diameter should approximate that of the rectangle's width. This circle serves as a guide for placing the nostril. Following this, on either side of the circle, draw petite circles. These will eventually serve as the foundation for the nostrils.

With this foundation in place, we can proceed to establish a distinct nose outline, which will make the subsequent stage of adding color easier.

Step 3: Applying Fundamental Coloration
Create a fresh layer situated beneath the sketch outline layer, and infuse it with a rudimentary skin tone hue.

After that, choose a slightly darker shade and draw a soft, rounded line around the edge of the nose's contour area to get a graduated color transition. This procedure improves how we visually perceive the shape and structure of the nose.

Step 4: Infusing Shadow and Dimension
Use a slightly darker shade and a small, soft, round brush to apply shadows to various parts of the nose. This method gives the nose a 3D appearance.
In order to enhance the clarity and definition of the nose outline in the sketch, choose a hard, round brush and gently erase along its contours.

Step 5: Crafting Luminous Highlights
Put highlights on areas that catch and reflect light by using a lighter color which gives the nose a realistic feel.
Use a small, firm, round brush to add even more intense highlights to the tip of the nose and other appropriate areas that call for accentuation.

Step 6: Elaborating on Details
Don't forget to pay attention to the smaller details, especially the nostrils. Use a slightly darker color to define the shape of the nostrils.
Use delicate brushstrokes to diffuse the color and create a smooth transition that blends in with the skin tone around it. Then add a slightly brighter shade to draw attention to the nostril outlines and create the illusion of depth.
Step 7: Fine-Tuning Shadows and Illumination
The final step involves adding more subtleties to the lighting and shadows, creating in a stronger sense of three-dimensionality and authenticity.
Deliberate consideration of the light source's orientation is essential. The configuration of the shadow will differ from that produced by lateral light if the light is coming from above.
The placement of shadows and highlights should be adjusted to complement the light's trajectory depending on the intended source of illumination in order to give the nose a more pronounced three-dimensional appearance.
An alternative example of how shadows and highlights change when light comes from three different angles—above, lateral, and below—is shown in the image after this one:

Navigating Diverse Angles
If you feel the need for more refinement after rendering the nose in accordance with light sources from various perspectives, think about taking on the challenge of representing the nose from various angles.
Accept perspectives with a 45° slant, a profile, and more. The illustration below serves as an example, showing the nose from three different perspectives: frontal, profile, and at a 45° angle:

Draw a Nose Like a Pro with XPPen
The caliber of your tools is crucial when it comes to honing your drawing skills. XPPen is delighted to impart this invaluable nose drawing technique, seizing the occasion to introduce our esteemed offerings—the Artist Pro 22 (Gen 2) drawing tablet with screen and the X3 Pro smart chip stylus . Your ability to render the nose and other facial features will improve thanks to these tools.

The Artist Pro 22 (Gen 2) drawing tablet with screen by XPPen stands as a prime selection. Boasting a high-resolution display, it captures intricate painterly nuances, facilitating the faithful portrayal of texture, shadows, and highlights in your nasal depictions. In addition, the Artist Pro 22 (Gen 2) boasts tilt-sensing technology, endowing your artistic endeavors with a natural fluidity akin to traditional paper-based sketching.
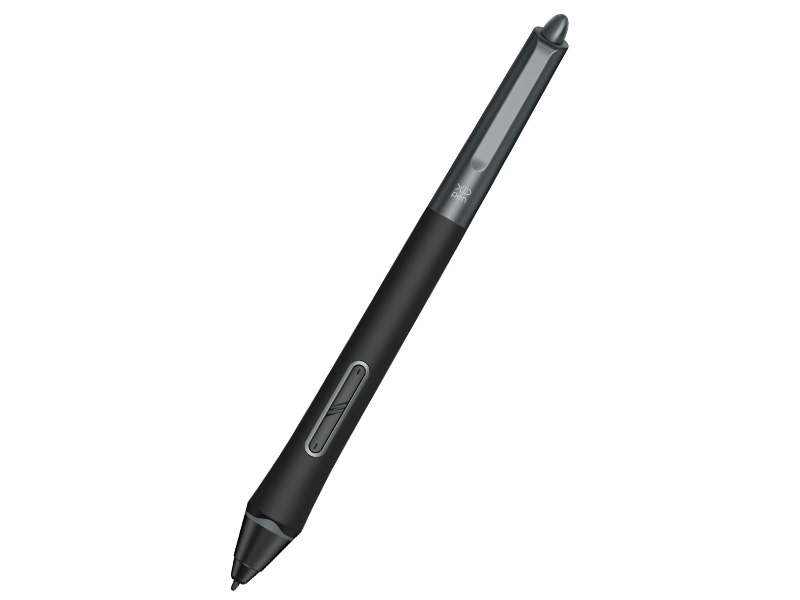
Partnering with the drawing tablet is the X3 Pro smart chip stylus, a precise instrument granting you unparalleled control over line thickness and delicacy. This stylus proudly pioneers the world's first 16K levels of pressure sensitivity, empowering you to effortlessly conjure the most delicate brush strokes, thus accentuating every intricacy in your nose portrayal.
Regardless of the stage of your artistic journey, whether a fledgling creator or a seasoned maestro, XPPen products stand ready to fulfill your requisites and augment your portraiture prowess. With the synergistic fusion of the Artist Pro 22 (Gen 2) drawing tablet and the X3 Pro smart chip stylus, harness the power of XPPen to catapult your drawing aptitude to new horizons.
Don't ignore the trove of resources available from XPPen as you begin your artistic journey. In order to help you climb to the summit of artistic excellence, we remain unwavering in our commitment to providing you with superior drawing tools.
About Us
Founded in 2005, XPPen is a leading global brand in digital art innovation under Hanvon UGEE. XPPen focuses on the needs of consumers by integrating digital art products, content, and services, specifically targeting Gen-Z digital artists. XPPen currently operates in 163 countries and regions worldwide, boasting a fan base of over 1.5 million and serving more than ten million digital art creators.
Learn moreRecommended Articles
ANIMALS How to Draw a Cute Dog with Simple Steps (Cartoon & Realistic Styles) ANIMALS Easy Drawing Guide: How to Draw a Cat Face ANIMALS How to Draw a Wolf: Step-by-Step Guide for Beginners OTHERS Easy Drawing Ideas for Beginners: 8 Step-by-Step Tutorials


-
 Artist Pro 22 (Gen 2)
2.5K QHD Calman Verified 21.5-inch Display
16K Level Pressure Sensitivity
Switch Between Three Color Spaces: sRGB, Adobe RGB, and Display P3
It features:
Ignite All-round Performance
-
 X3 Pro Smart Chip Stylus
World's first 16K Pressure Levels
Enhanced Responsiveness and Accuracy
Felt Nibs for Realistic Feel
Two Shortcut Keys + Digital Eraser
Enhanced Responsiveness and Accuracy
Uninterrupted EMR Technology
Lightweight and Durable Design
It features:
Want to elevate your drawing skills?
Discover step-by-step tutorials, expert tips, and creative techniques to boost your drawing skills.
