Adobe Premiere Pro Tutorial for Color Grading: 2026 Complete Guide
KNOWLEDGEAdobe Premiere Pro is one of the most popular video editing software programmes, the best for content professionals. You are editing YouTube videos, travel films, short documentaries, or social media content. This provides all the tools you need to create polished, professional-looking videos.
One of its most powerful features is colour grading. It helps you fix dull footage, create a consistent look, and give your videos a cinematic feel. In this Adobe Premiere Pro tutorial, you’ll learn the entire colour grading process. We’ll cover everything from setting up your project to making expert colour adjustments. This way, you can make each video shine.
Why Do Beginners Struggle with Colour Grading in Adobe Premiere Pro?
Many beginners face the same challenge. They can edit videos, but for colour grading, they often rely on LUTs because they are unsure how to adjust colours manually. The biggest mistake is trying to change everything at once. Many people start moving every slider in Lumetri Color right away. This usually makes the footage look too bright, too colorful, and less natural.
The problem becomes even more noticeable with log footage. Log video is recorded with low contrast and saturation to preserve more image detail. It is not designed to be graded directly. Always apply the correct input LUT first. It turns your flat footage into a normal-looking image, making it much easier to color grade.
This is a simple way to avoid these issues. You can use two Lumetri Color effects on the same clip:
- First Lumetri: Apply only the input LUT to convert log footage.
- Second Lumetri: Adjust your settings for exposure, contrast, color balance, and mood.
Using this method makes color grading easier and helps your video look clean and professional.
The fix is simple: use two separate Lumetri Color effects on the same clip.
- First Lumetri → Input LUT only (converts log footage to a normal image)
- Second Lumetri → All your creative adjustments (exposure, contrast, color, mood)
Step-by-Step Guide to Color Grading in Premiere Pro
Step 1: Fix White Balance First
Always start with white balance before anything else. Even a perfectly exposed clip can look wrong if the color temperature is off. Indoor footage often looks too orange. Outdoor footage can look too blue in colour.
In the Basic Correction section of Lumetri Colour, you have two options:
- Use the temperature slider: drag toward orange to warm up, and drag toward blue to cool down. Use Tint to fix green or magenta casts.
- Click the White Balance Eyedropper and click on something white or grey in your video. Premiere Pro does the rest automatically.
Getting white balance right creates a solid foundation. If you skip this step, every other adjustment will feel slightly off.
Step 2: Balance Your Exposure
With white balance fixed, now work on brightness. In Basic Correction, use these controls:
- Exposure adjusts the overall brightness
- Contrast increases or decreases the difference between light and dark areas
- Highlights recover detail from bright areas like skies
- Shadows bring out detail in dark areas
- Whites / Blacks set the absolute brightest and darkest points
Make small adjustments. A subtle change almost always looks better than an aggressive one.
Step 3: Add Depth with Curves
Once your image is balanced, open Curves in Lumetri Color. Curves give you more precise control than the Contrast slider. Start with a gentle S-curve. Move the top right up a bit for brighter highlights. Then, shift the bottom-left down slightly for deeper shadows. This adds cinematic contrast without destroying detail.
You can also adjust individual color channels, pushing blue up in shadows for a cool cinematic tint or adding red for warmth across the whole image.
Step 4: Create Mood with Color Wheels
Open Color Wheels and Match in Lumetri Color. You will see three wheels: shadows, midtones, and highlights. Drag the center dot toward any color to tint that part of the image.
The most popular look: push shadows toward teal and highlights toward orange. This orange and teal split tone is used in almost every Hollywood film and travel video. It makes subjects pop naturally.
Keep movements small. Tiny adjustments look professional. Big ones look fake.
Step 5: Apply a LUT for Style
Once your image is corrected, you can add a stylistic look using a LUT (Look Up Table). Think of a LUT like a preset filter; it changes the overall color style of your video in one click. In the Creative section of Lumetri Color, click the Look dropdown to browse built-in LUTs. Hover over each one to preview it live on your footage.
Important rule: never apply a LUT at 100% strength**.** Bring the Intensity slider down to around 50–70%. That is where it looks stylish but still natural. Also remember a LUT cannot save badly exposed footage. Always color correct first, then apply a LUT.
Step 6: Fix One Specific Color with HSL Secondary
Your overall grade looks great, but one thing still bothers you. The sky is not blue enough. The grass looks a little yellow. You do not need to redo everything.
Open HSL Secondary in Lumetri Color and follow these steps:
- Click the eyedropper tool
- Click on the color you want to fix in your video preview
- Adjust Hue, Saturation, or Lightness; only that specific color changes; everything else stays the same
This tool is best for portraits, travel videos, and outdoor footage where one off-color element can distract from the whole frame.
Read your Lumetri scopes always
Your monitor can lie to you. Every screen renders colors differently. An image that looks perfect on your laptop may look wrong on someone else's TV or phone. Lumetri Scopes show you the real, accurate numbers so you do not have to guess.
- The waveform monitor shows brightness. Keep the line between 0 (black) at the bottom and 100 (white) at the top.
- RGB Parade splits your image into red, green, and blue graphs separately. If one channel sits higher than others in neutral areas, that is your color cast.
- Vectorscope shows a circle. The closer your signal is to the center, the more natural your colors look.
Check your scopes after every major adjustment. Your eyes get tired. Scopes never do.
Match Colors Between Different Clips
You have shot the same scene from two angles, but in the timeline, one clip looks warm and the other looks cold. They do not match.
- Premiere Pro has a built-in fix:
- In Color Wheels and Match, click Comparison View
- Put the clip that looks correct on one side as your reference
- Select the clip you want to fix on the other side
- Click Apply Match Premiere Pro automatically adjusts the second clip to match the first
Pro tip: If your footage has people in it, enable Face Detection before clicking 'Apply Match'. This tells Premiere to prioritise skin tones when matching, and the result looks much more natural.
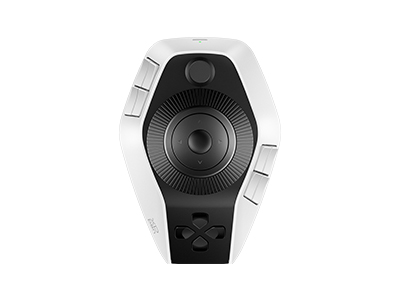
Speed Up Your Adobe Premiere Pro Color Grading with the XPPen Pilot Pro
As you get better at colour grading, you might find that using a mouse for precise adjustments can be slow and frustrating. Small tweaks to exposure, colour wheels, and curves often take multiple tries. This can slow down the editing process.
The XPPen Pilot Pro is designed to make colour grading faster and more precise. A joystick gives you better control. This makes it easier to refine shadows, highlights, and colour balance while creating a consistent cinematic look.
The Pilot Pro works smoothly with Adobe Premiere Pro. This means you can stick to your current workflow but get things done faster and more precisely.

To see how the joystick works in real-world colour grading, watch the XPPen Pilot Pro demo video below. You can also visit the official XPPen Pilot Pro product page to explore its features and compatibility.
Common Mistakes That Ruin Color Grades
- Grading Log footage without an input LUT. Always convert first; otherwise, every slider crushes or blows out the image.
- Using only one Lumetri Colour effect. Use two, one for conversion and one for creative grading.
- Too much saturation. Check the Vectorscope. If you are hitting the edges, pull back.
- Pushing the contrast slider too hard. Use curves instead for far more control and far cleaner results.
- Grading every clip one by one. Use an adjustment layer above all clips. Grade once; it applies to everything underneath.
- Trusting only your eyes. Always check Lumetri scopes before you export.
Adobe Premiere Pro Tutorial Summary
This tutorial shows you how to colour grade in Adobe Premiere Pro. Follow this order every single time:
- Import footage and set up your sequence
- Open the Color workspace and select your clip in Lumetri Colour.
- Fix white balance, exposure, and shape with Curves
- Add mood with color wheels; apply a LUT at low intensity
- Target specific colors with HSL Secondary
- Verify everything with Lumetri Scopes matches your clips
Do it in that order, every time, and your footage will look dramatically better. The gap between Premiere Pro and DaVinci Resolve is much smaller than most people think. In almost every case, the difference is the workflow, not the software
Ready to try it? Visit the official XPPen Pilot Pro product page here and see exactly how it can speed up your Premiere Pro colour grading workflow.
Now open Premiere Pro and start grading. You have everything you need.
Final Words
Color grading gets easier the more you practise. Start with white balance and exposure, then make small changes using the other tools. Keep editing, try different looks, and you'll soon create videos that look clean, natural, and professional.
About Us
Founded in 2005, XPPen is a leading global brand in digital art innovation under Hanvon UGEE. XPPen focuses on the needs of consumers by integrating digital art products, content, and services, specifically targeting Gen-Z digital artists. XPPen currently operates in 163 countries and regions worldwide, boasting a fan base of over 1.5 million and serving more than ten million digital art creators.
Learn moreRecommended Articles
TIPS Top 5 Adobe Illustrator Alternatives in 2026 (Free & Paid) TIPS Adobe Illustrator vs Affinity Designer: Which is Better? TIPS Adobe Illustrator vs. Adobe Photoshop: When to Use Each KNOWLEDGE Adobe Premiere Pro Tutorial for Video Editors [Beginner's Guide]


Looking for the Best Drawing & Design Apps?
Discover essential drawing techniques, expert tips, and the best app recommendations to boost your creativity and master digital art.
